
Sunlight which appears to us mostly as white light is actually made up of a spectrum of different colours which you can see when rainbows form. Rainbows appear in the sky when sunlight shining from behind us, hits the water droplets in the air in front of us at a 42 degree angle. When sunlight traveling through air hits the surface of a water droplet it slows down and changes direction, this is called refraction and it happens because water is denser than air so the light can’t travel as quickly through it. If the sunlight hits the the water droplet at a perfect 42 degree angle then it is also reflected off the back of the water droplet, bouncing back across the water droplet and out again causing it to refract even more before it reaches your eyes.

As the spectrum of different colours that make up sunlight have different wavelengths they change speed and direction at slightly different rates. Which means they refract off at slightly different angles splitting into a bow shape rainbow of colours as they are refracted back at us.
The colours of any object we see depends on how the light reflecting off that object reaches our eyes. Different objects absorb or scatter different wavelengths of light in different ways. For example the surface of a red ball will only reflects the wavelength of light that we see as red whilst absorbing all the other colours. With a rainbow all the light is being reflected back but as as it refracts at different angles the colours appear fanned out.
The colours we see in a rainbow are ordered from longest wavelength of visible light to the shortest wavelength of visible light. The Red is first in a rainbow as it has the longest wavelength of visible light at about 650 nanometers, then comes orange, yellow, green and blue followed by violet which has the shortest wavelength of visible light at about 400 nanometers.
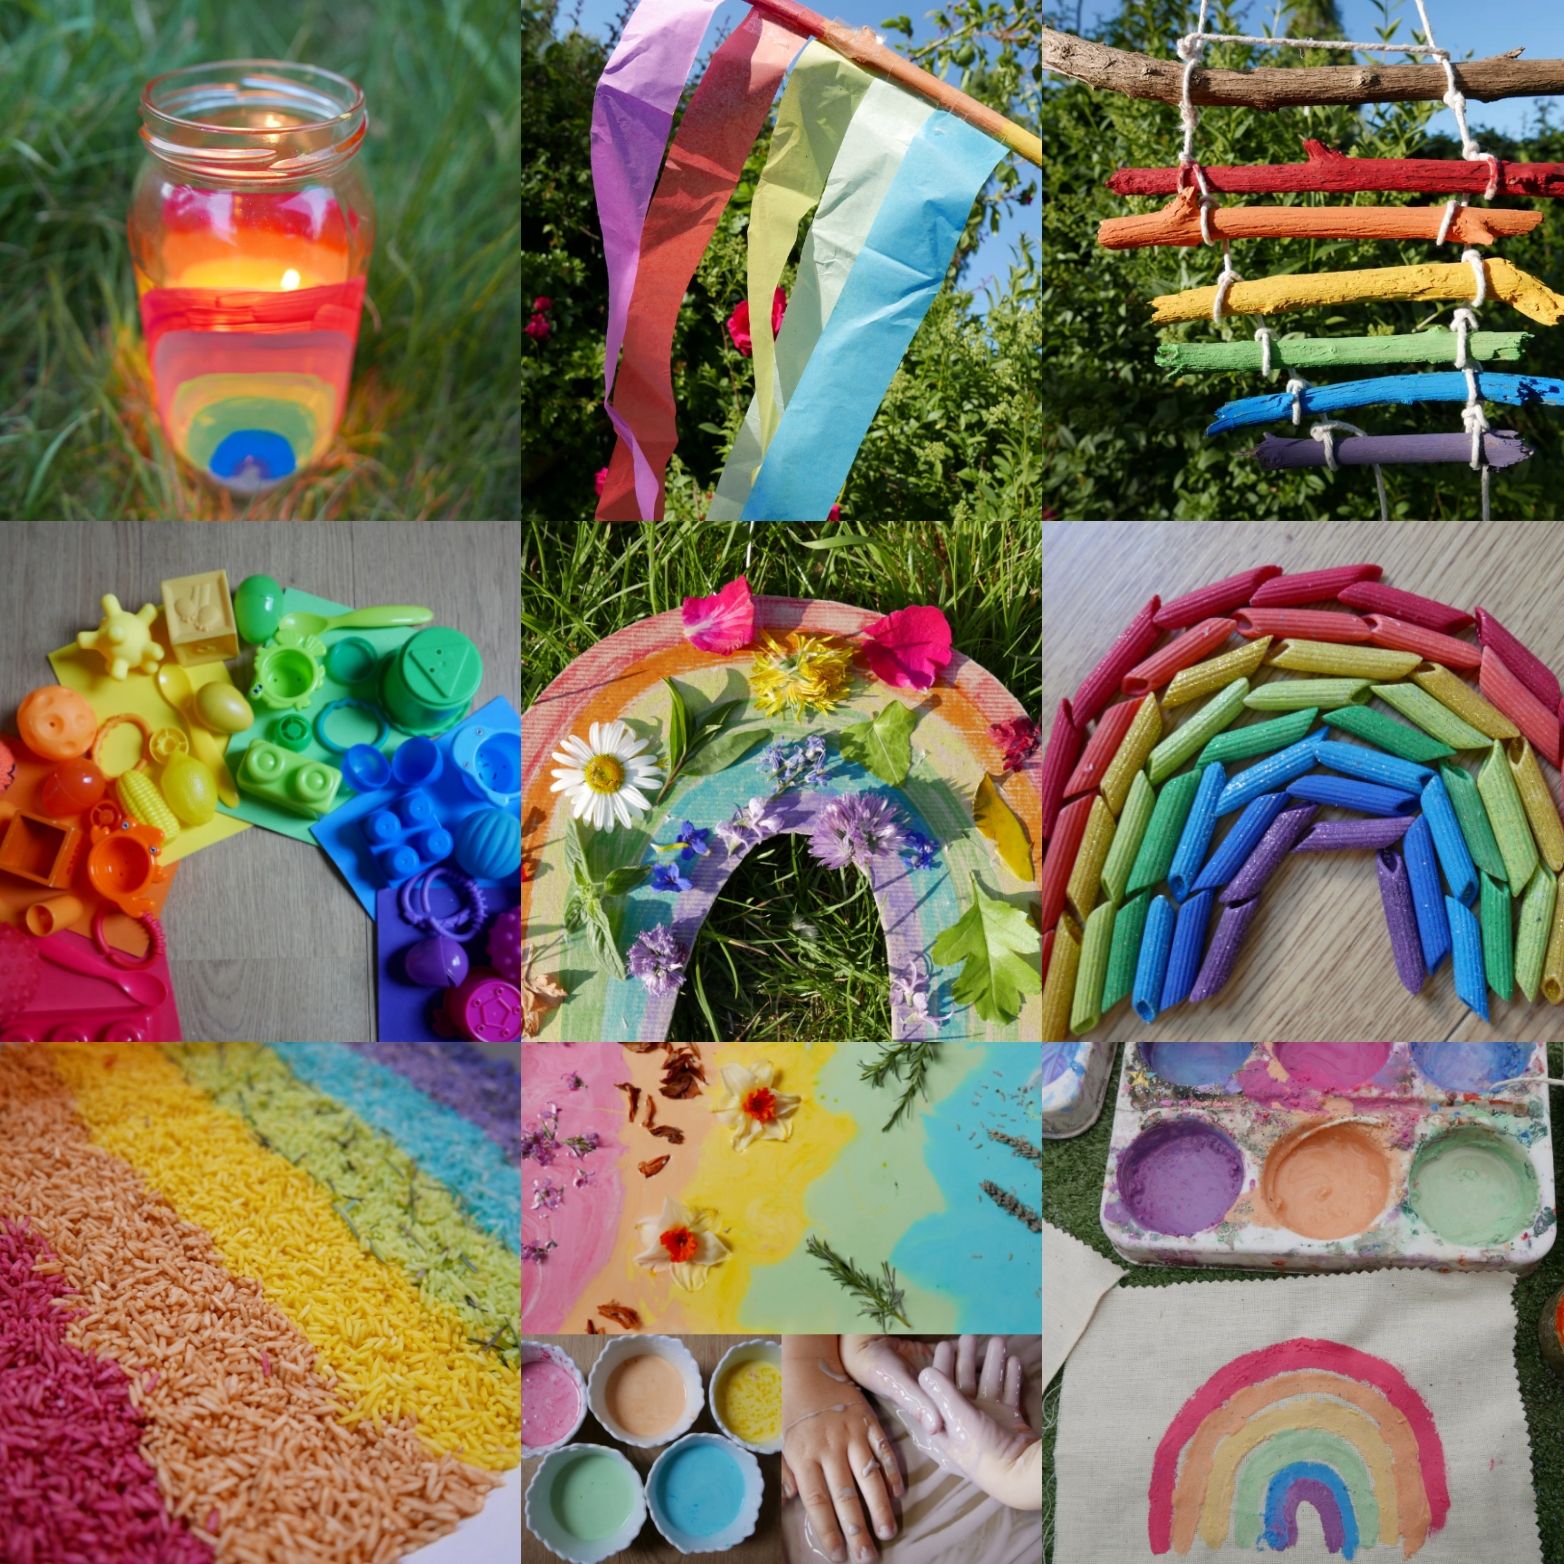
You can learn more about rainbows by enjoying some of the simple science, sensory and art and craft activities below.
1. Learn all the colours of the rainbow
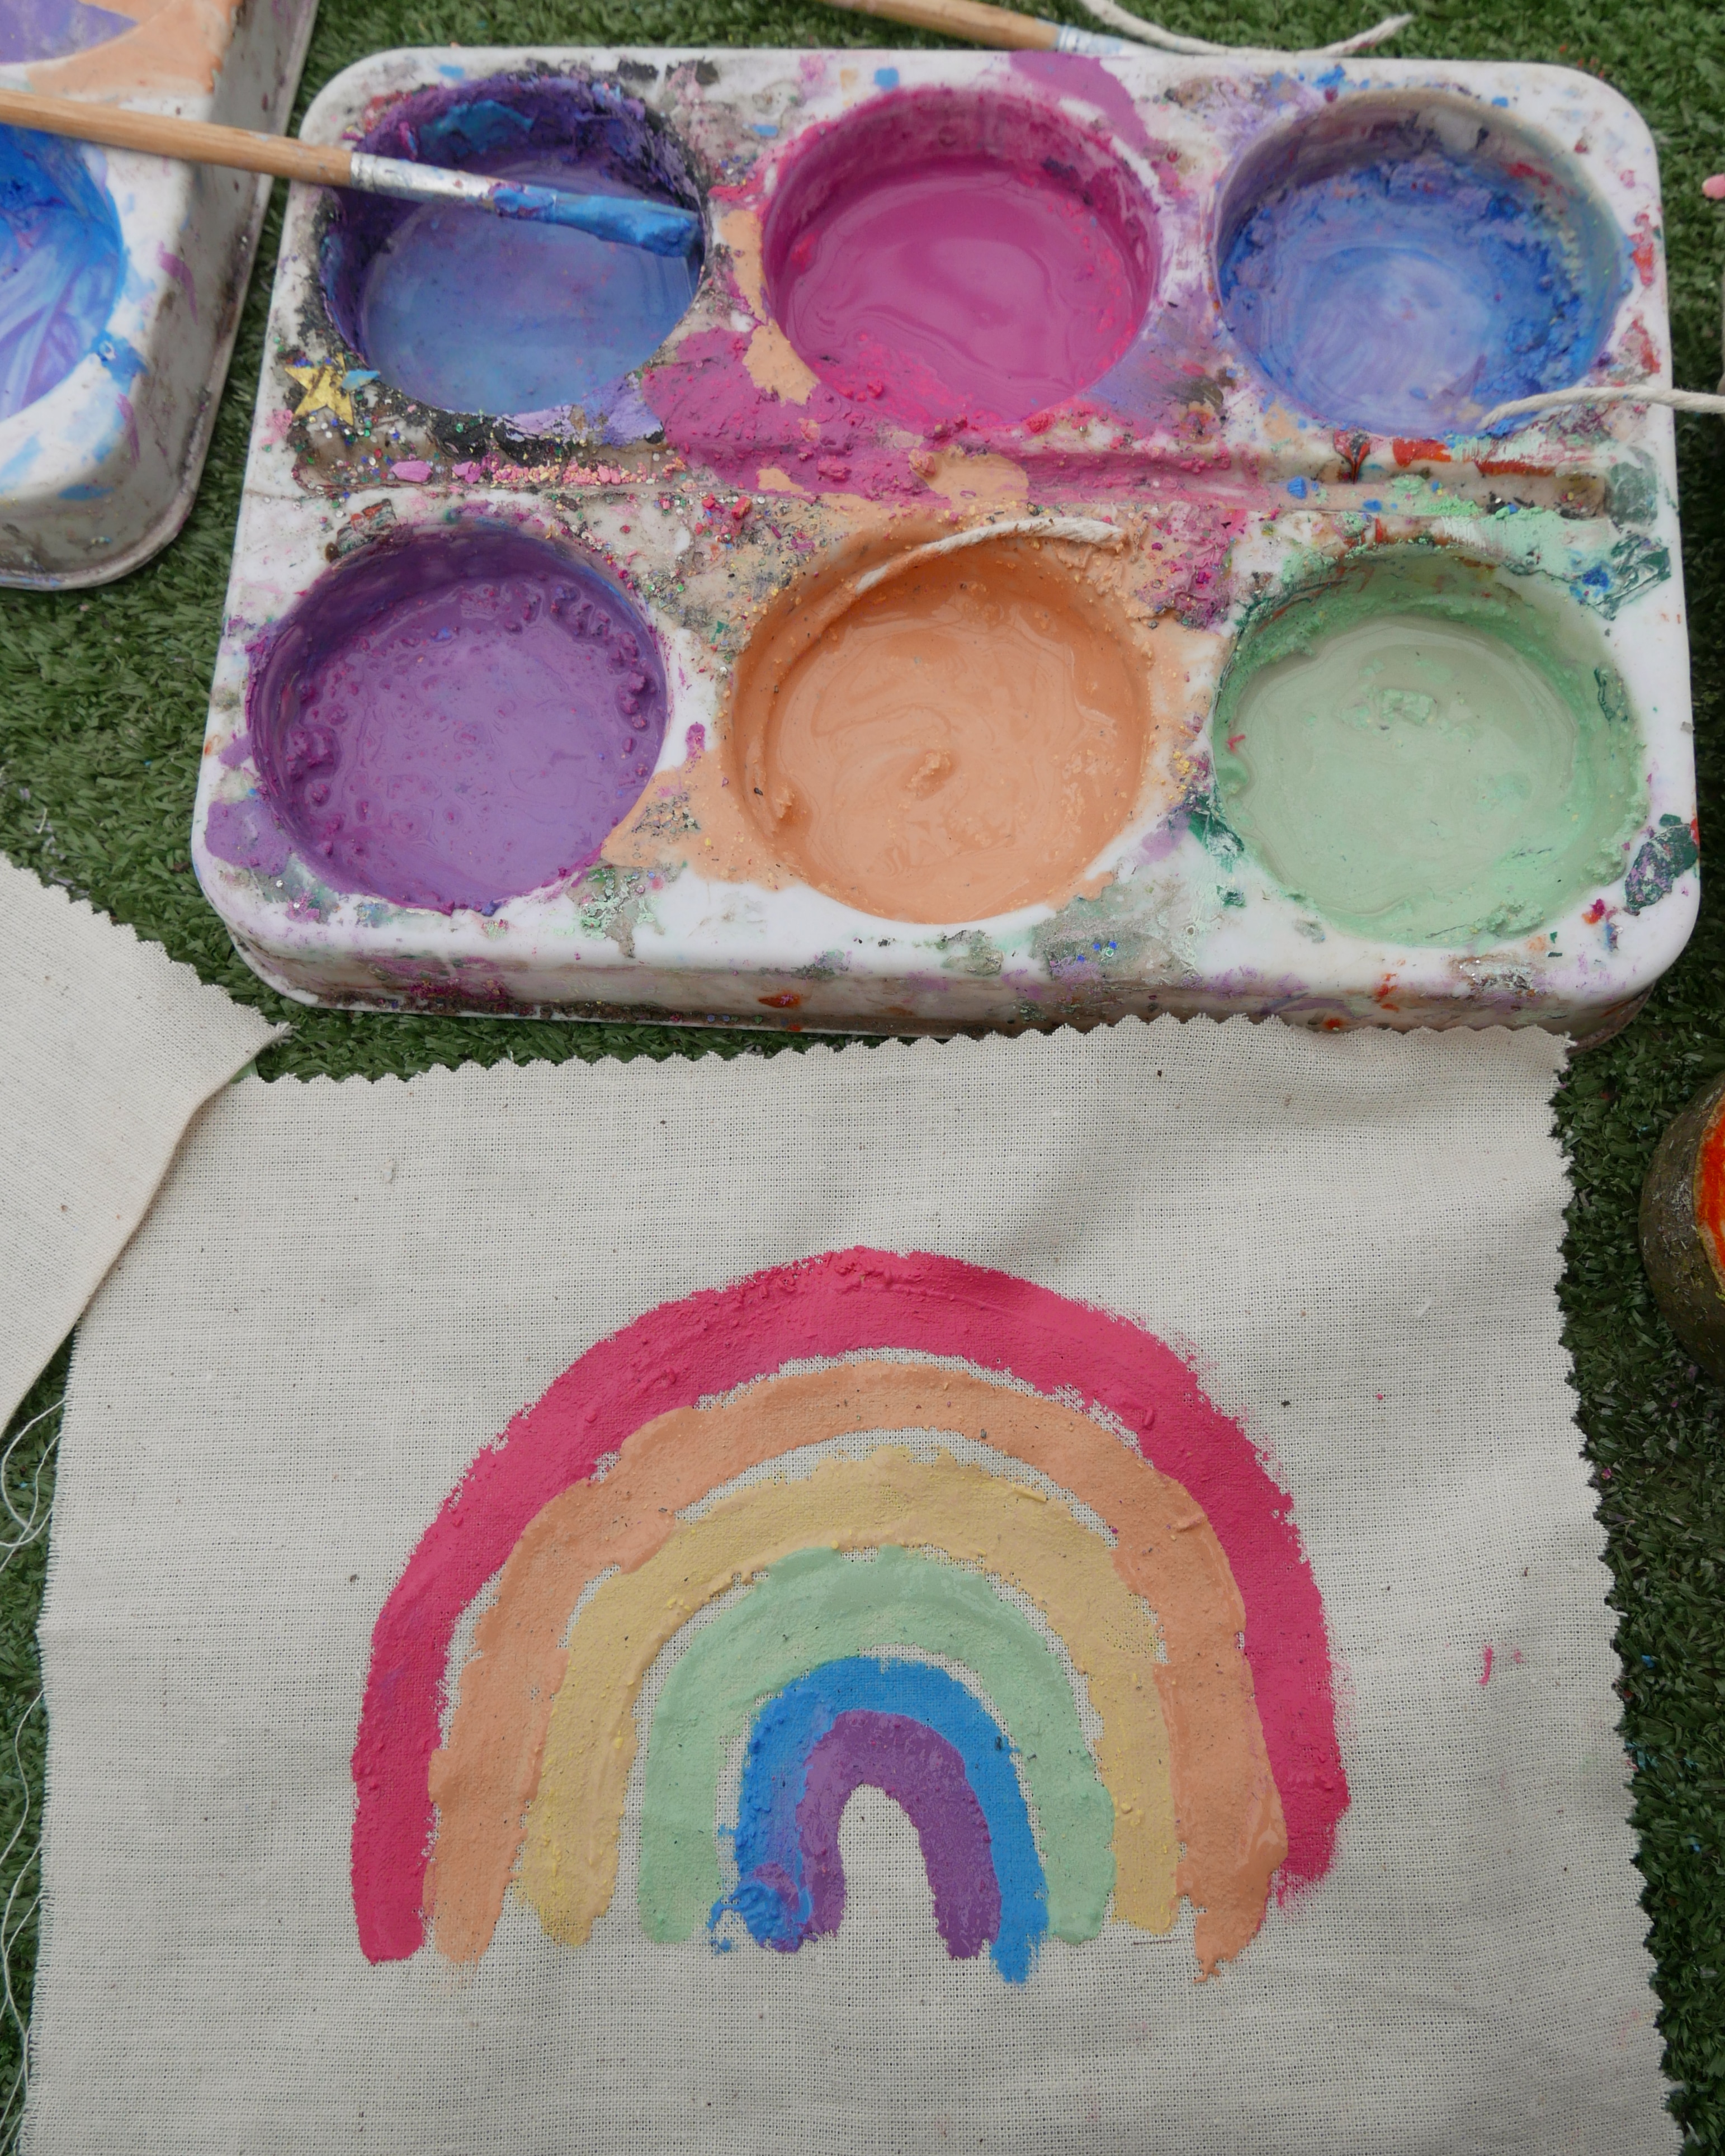
Drawing or painting all the colours of a rainbow is a great and simple way for younger children to learn to recognise and identify different colours. You can also talk to older children about why the colours in a rainbow appear in the order they do, with red having the longest wavelength of visible light and violet having the shortest wavelength of visible light.
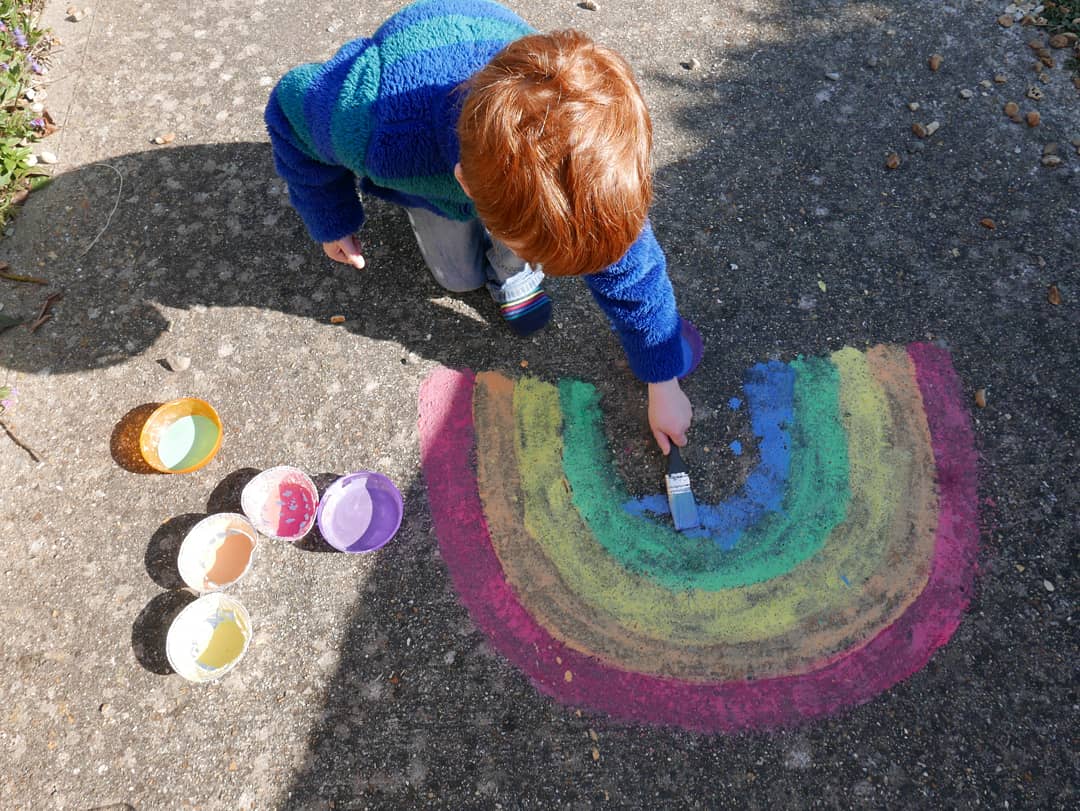
You could use chalk paint to paint your rainbows with. Chalk paint is really quick and simple to make and so much fun to play with. All you need some chalk and water. First you need to crush the chalk into a container. Then just add water and stir until you get a smooth paint like consistency. You can then use your paint to paint onto any surface you like including fabric, paper, paths, tree, rocks, shells, leaves, walls and fences.
2. Rainbow colour matching game
You can also explore colours by playing a simple colour matching game. All you need for this game is some sheets of coloured paper or colourful containers laid out in the shape of a rainbow. You can then have fun filling up the sheets or containers with as many colour matching objects as you can find.
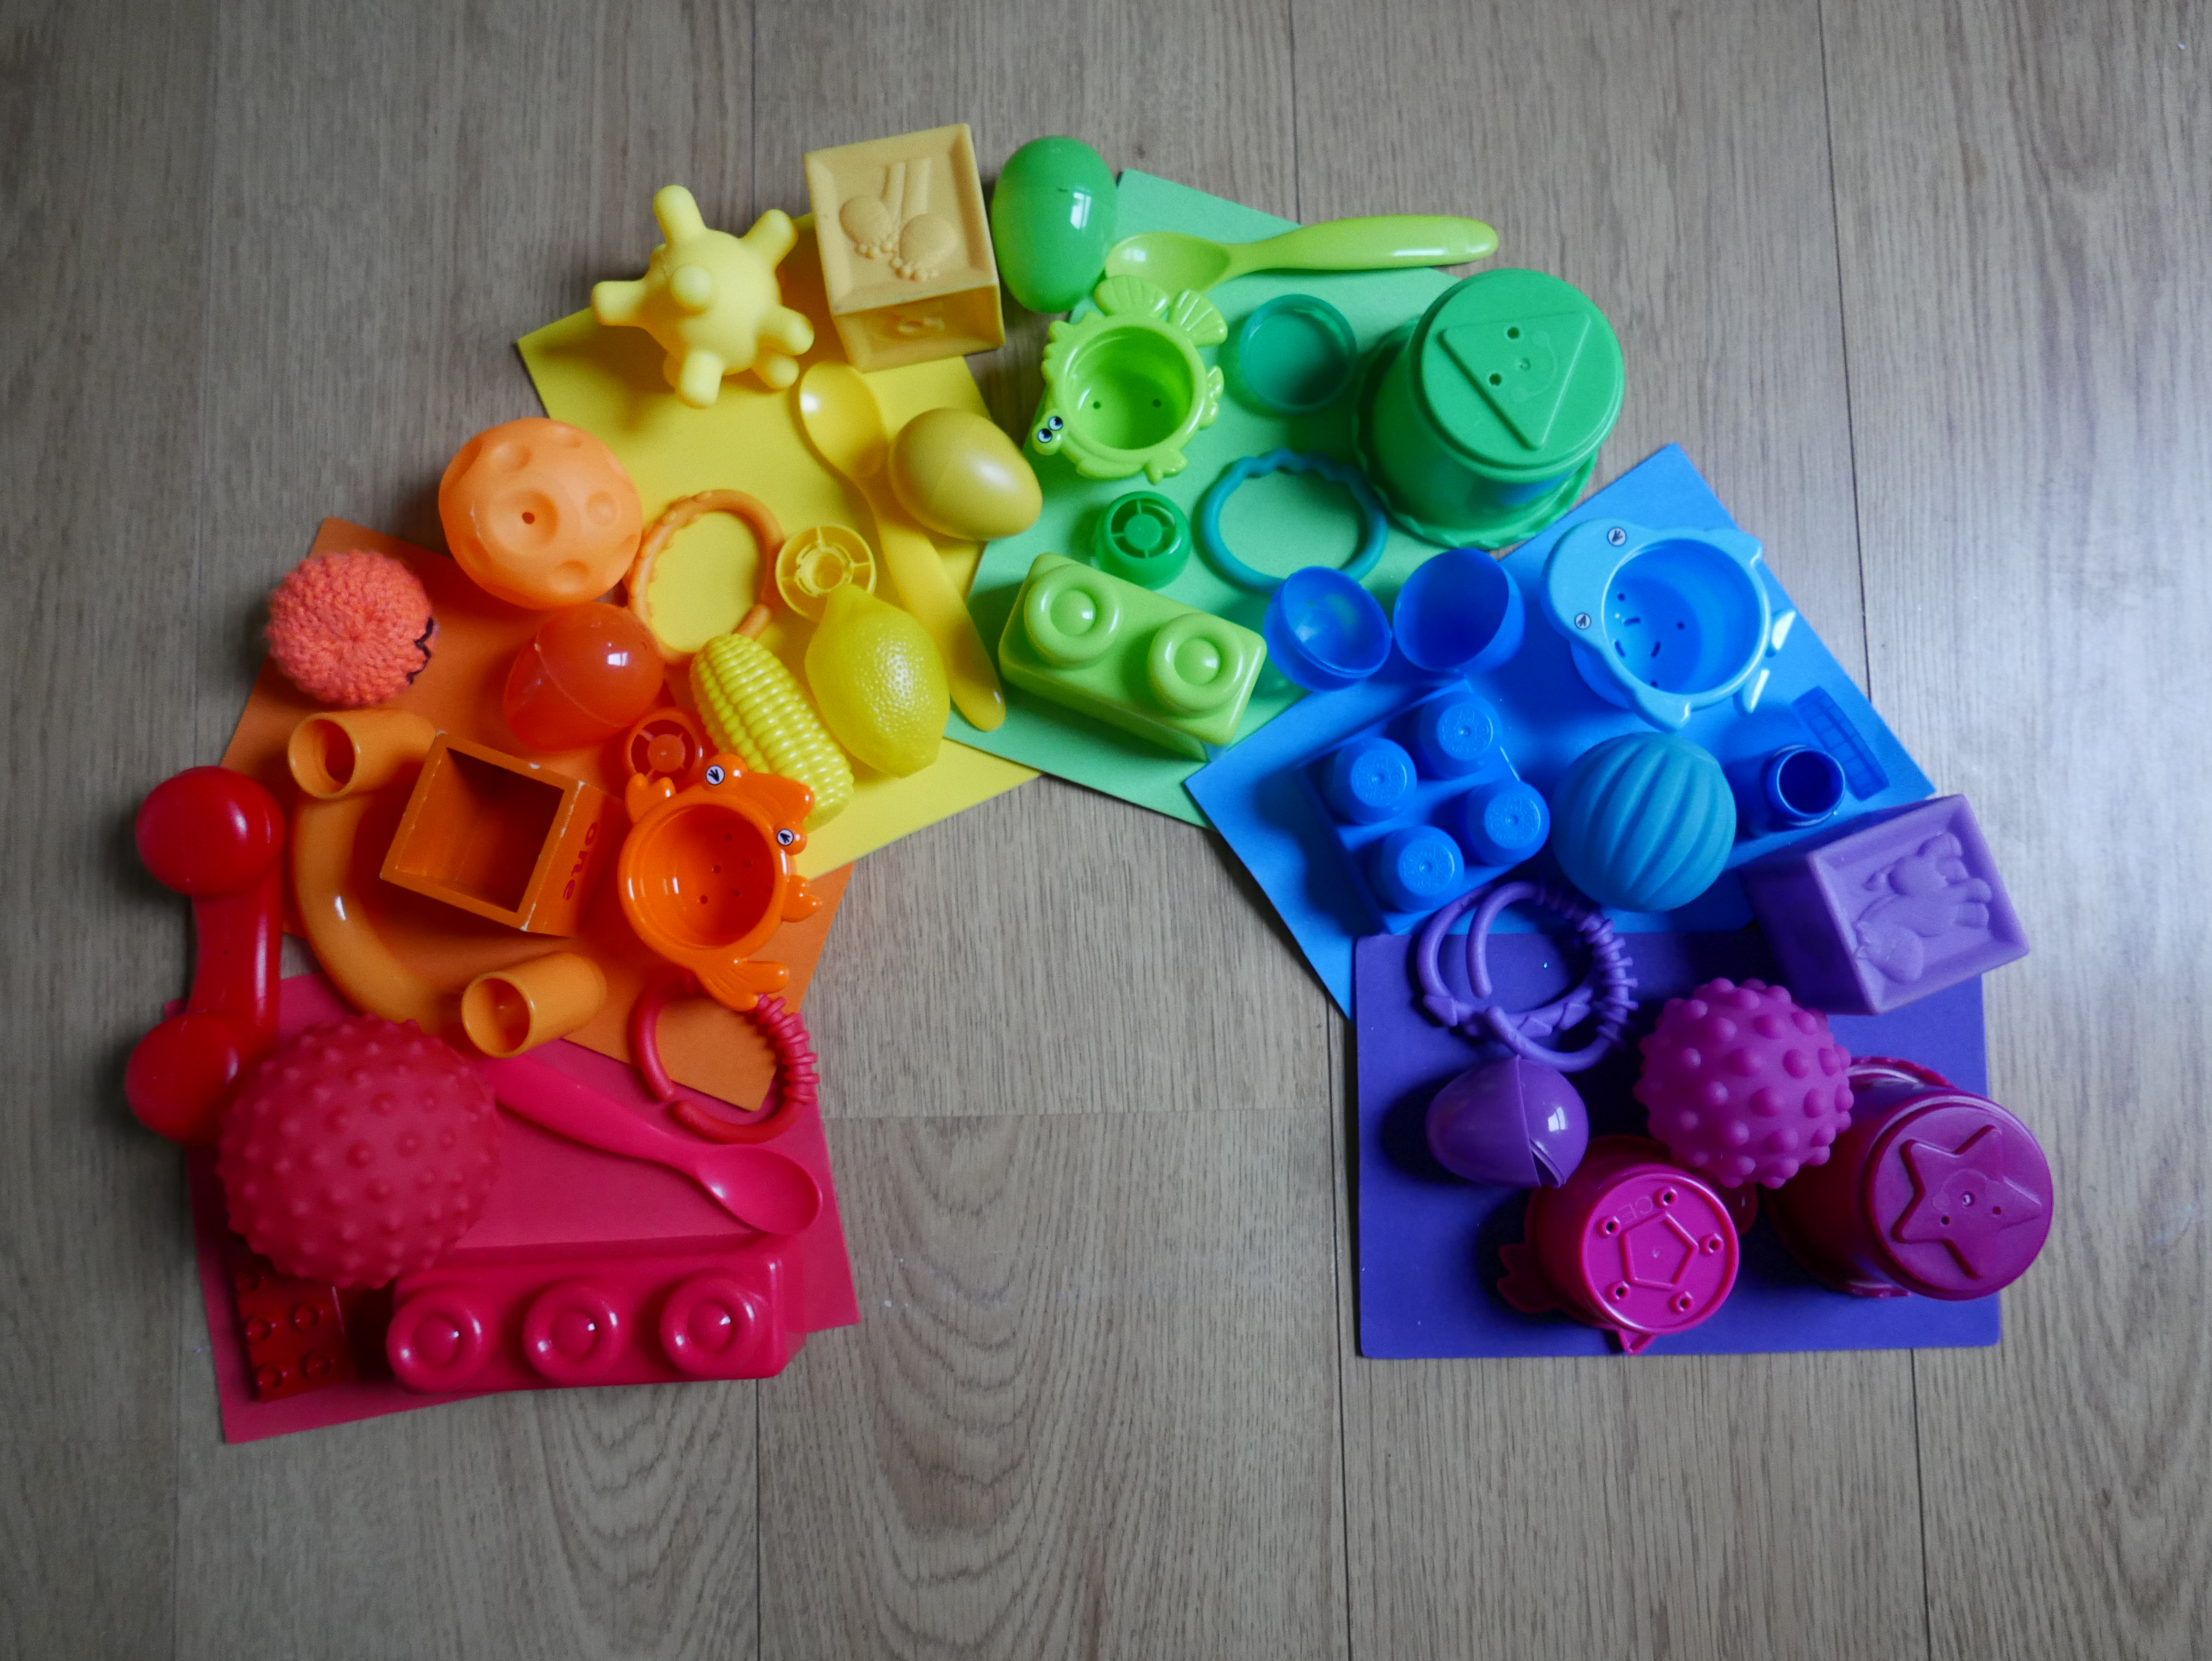
After you have matched your objects talk about the different colours you have found. Are some colours harder to find? Are some colours easier to spot? Do some colours make you happier? Which colours do you prefer? Have a look at other objects around you or out of the window like building signs or road signs if you can see any. Are some some colours used to mean danger? Are some colours used to mean safe, okay, or go?
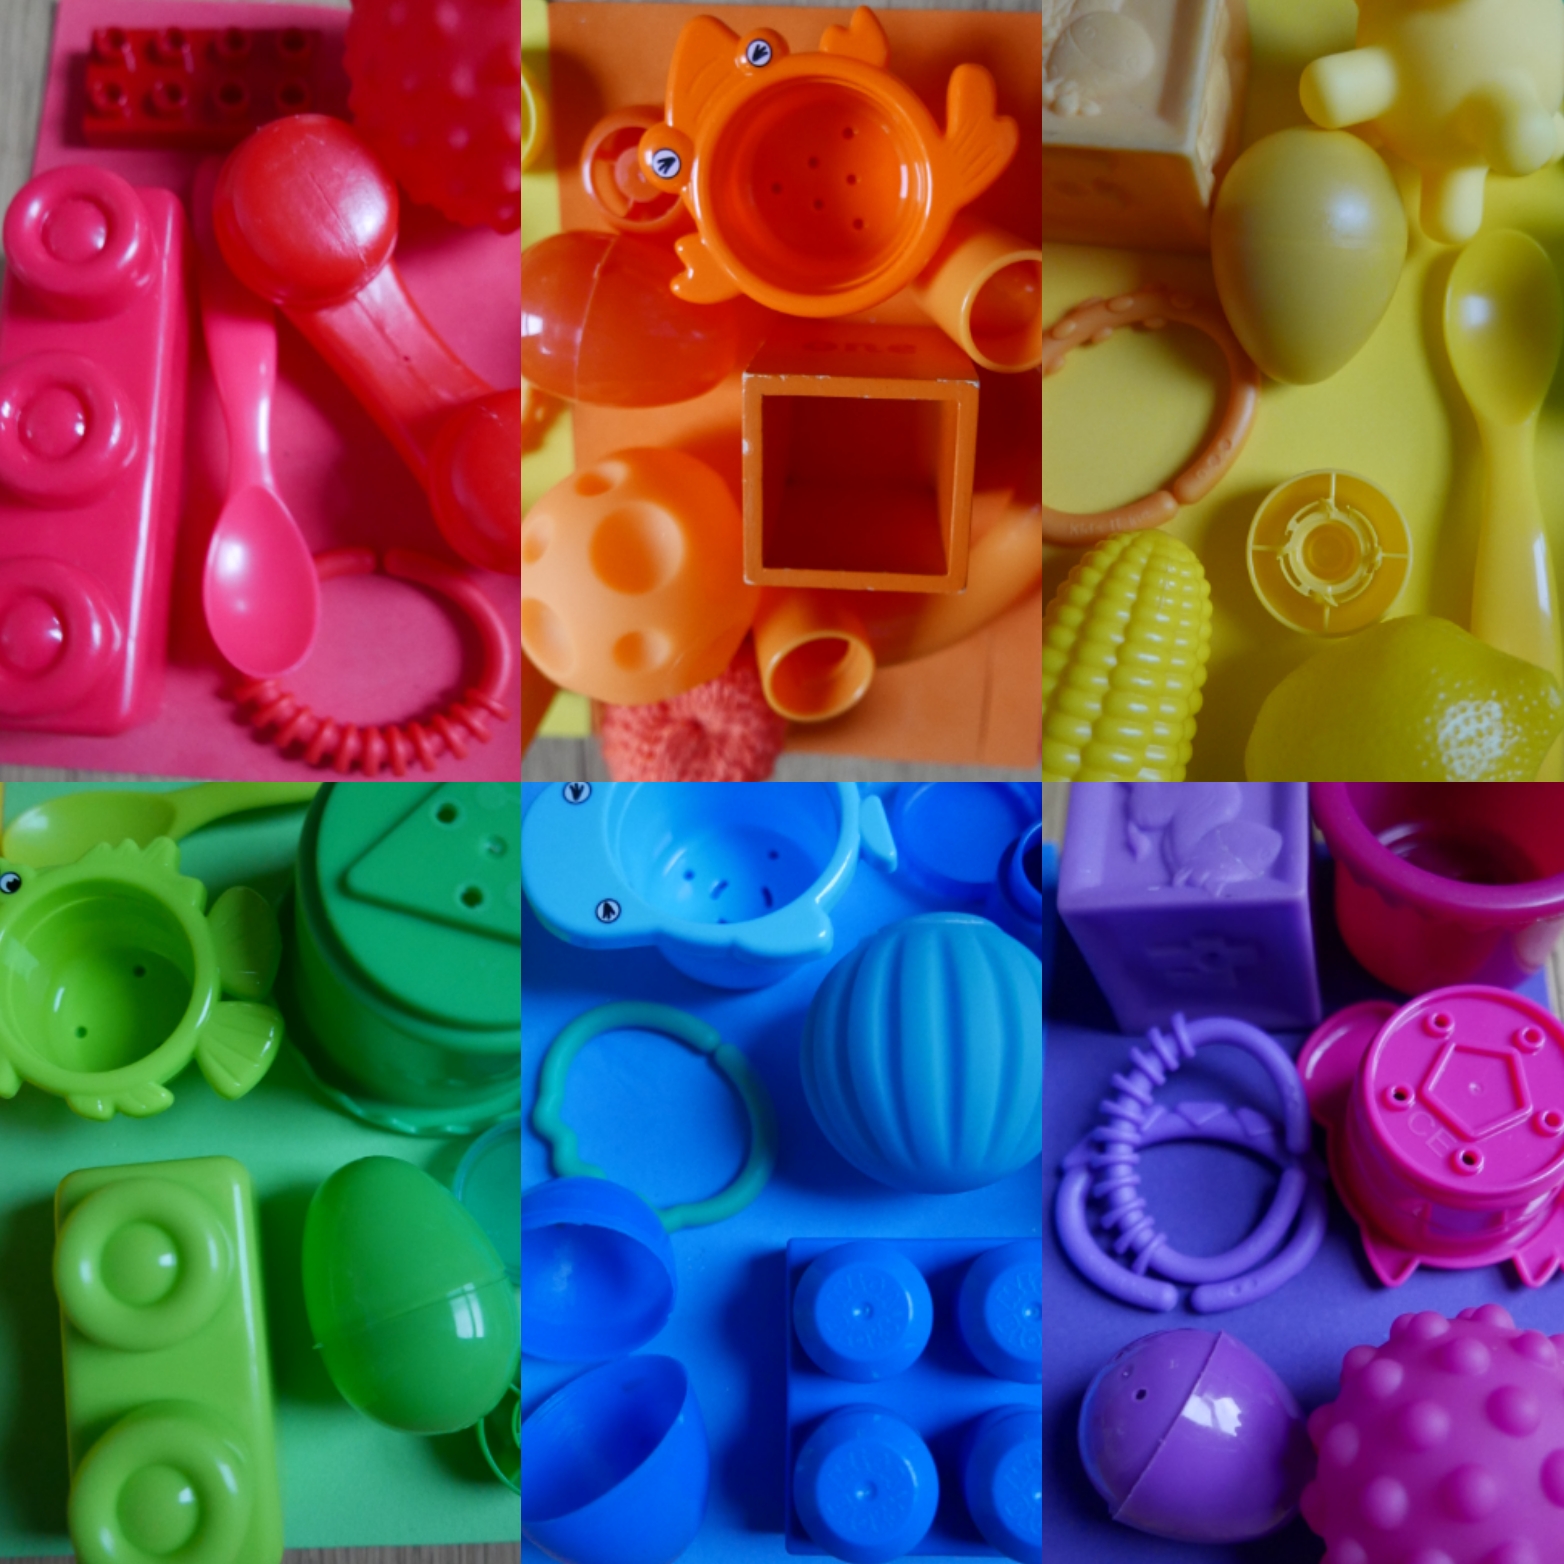
With older children you could ask them to paint sheets of paper in the colours they need to find first. You could use this as an opportunity to talk about colour theory. Colour theory is when you use primary colours like red, blue and yellow to create secondary colours like purple, green and orange. For example red and yellow makes orange. Yellow and blue makes green. Blue and red makes purple.

3. Rainbow nature hunt
You could also explore all the colours of the natural world by going on a nature rainbow hunt using just recycled cardboard and tape. Simply cut a simple rainbow shape out of cardboard. Then paint or draw all the colours of the rainbow onto your cardboard shape. When the rainbow is coloured in you can either put double sided tape, doubled up sellotape or glue across the surface. Or stretch elastic bands round the rainbow to keep your nature finds in place.
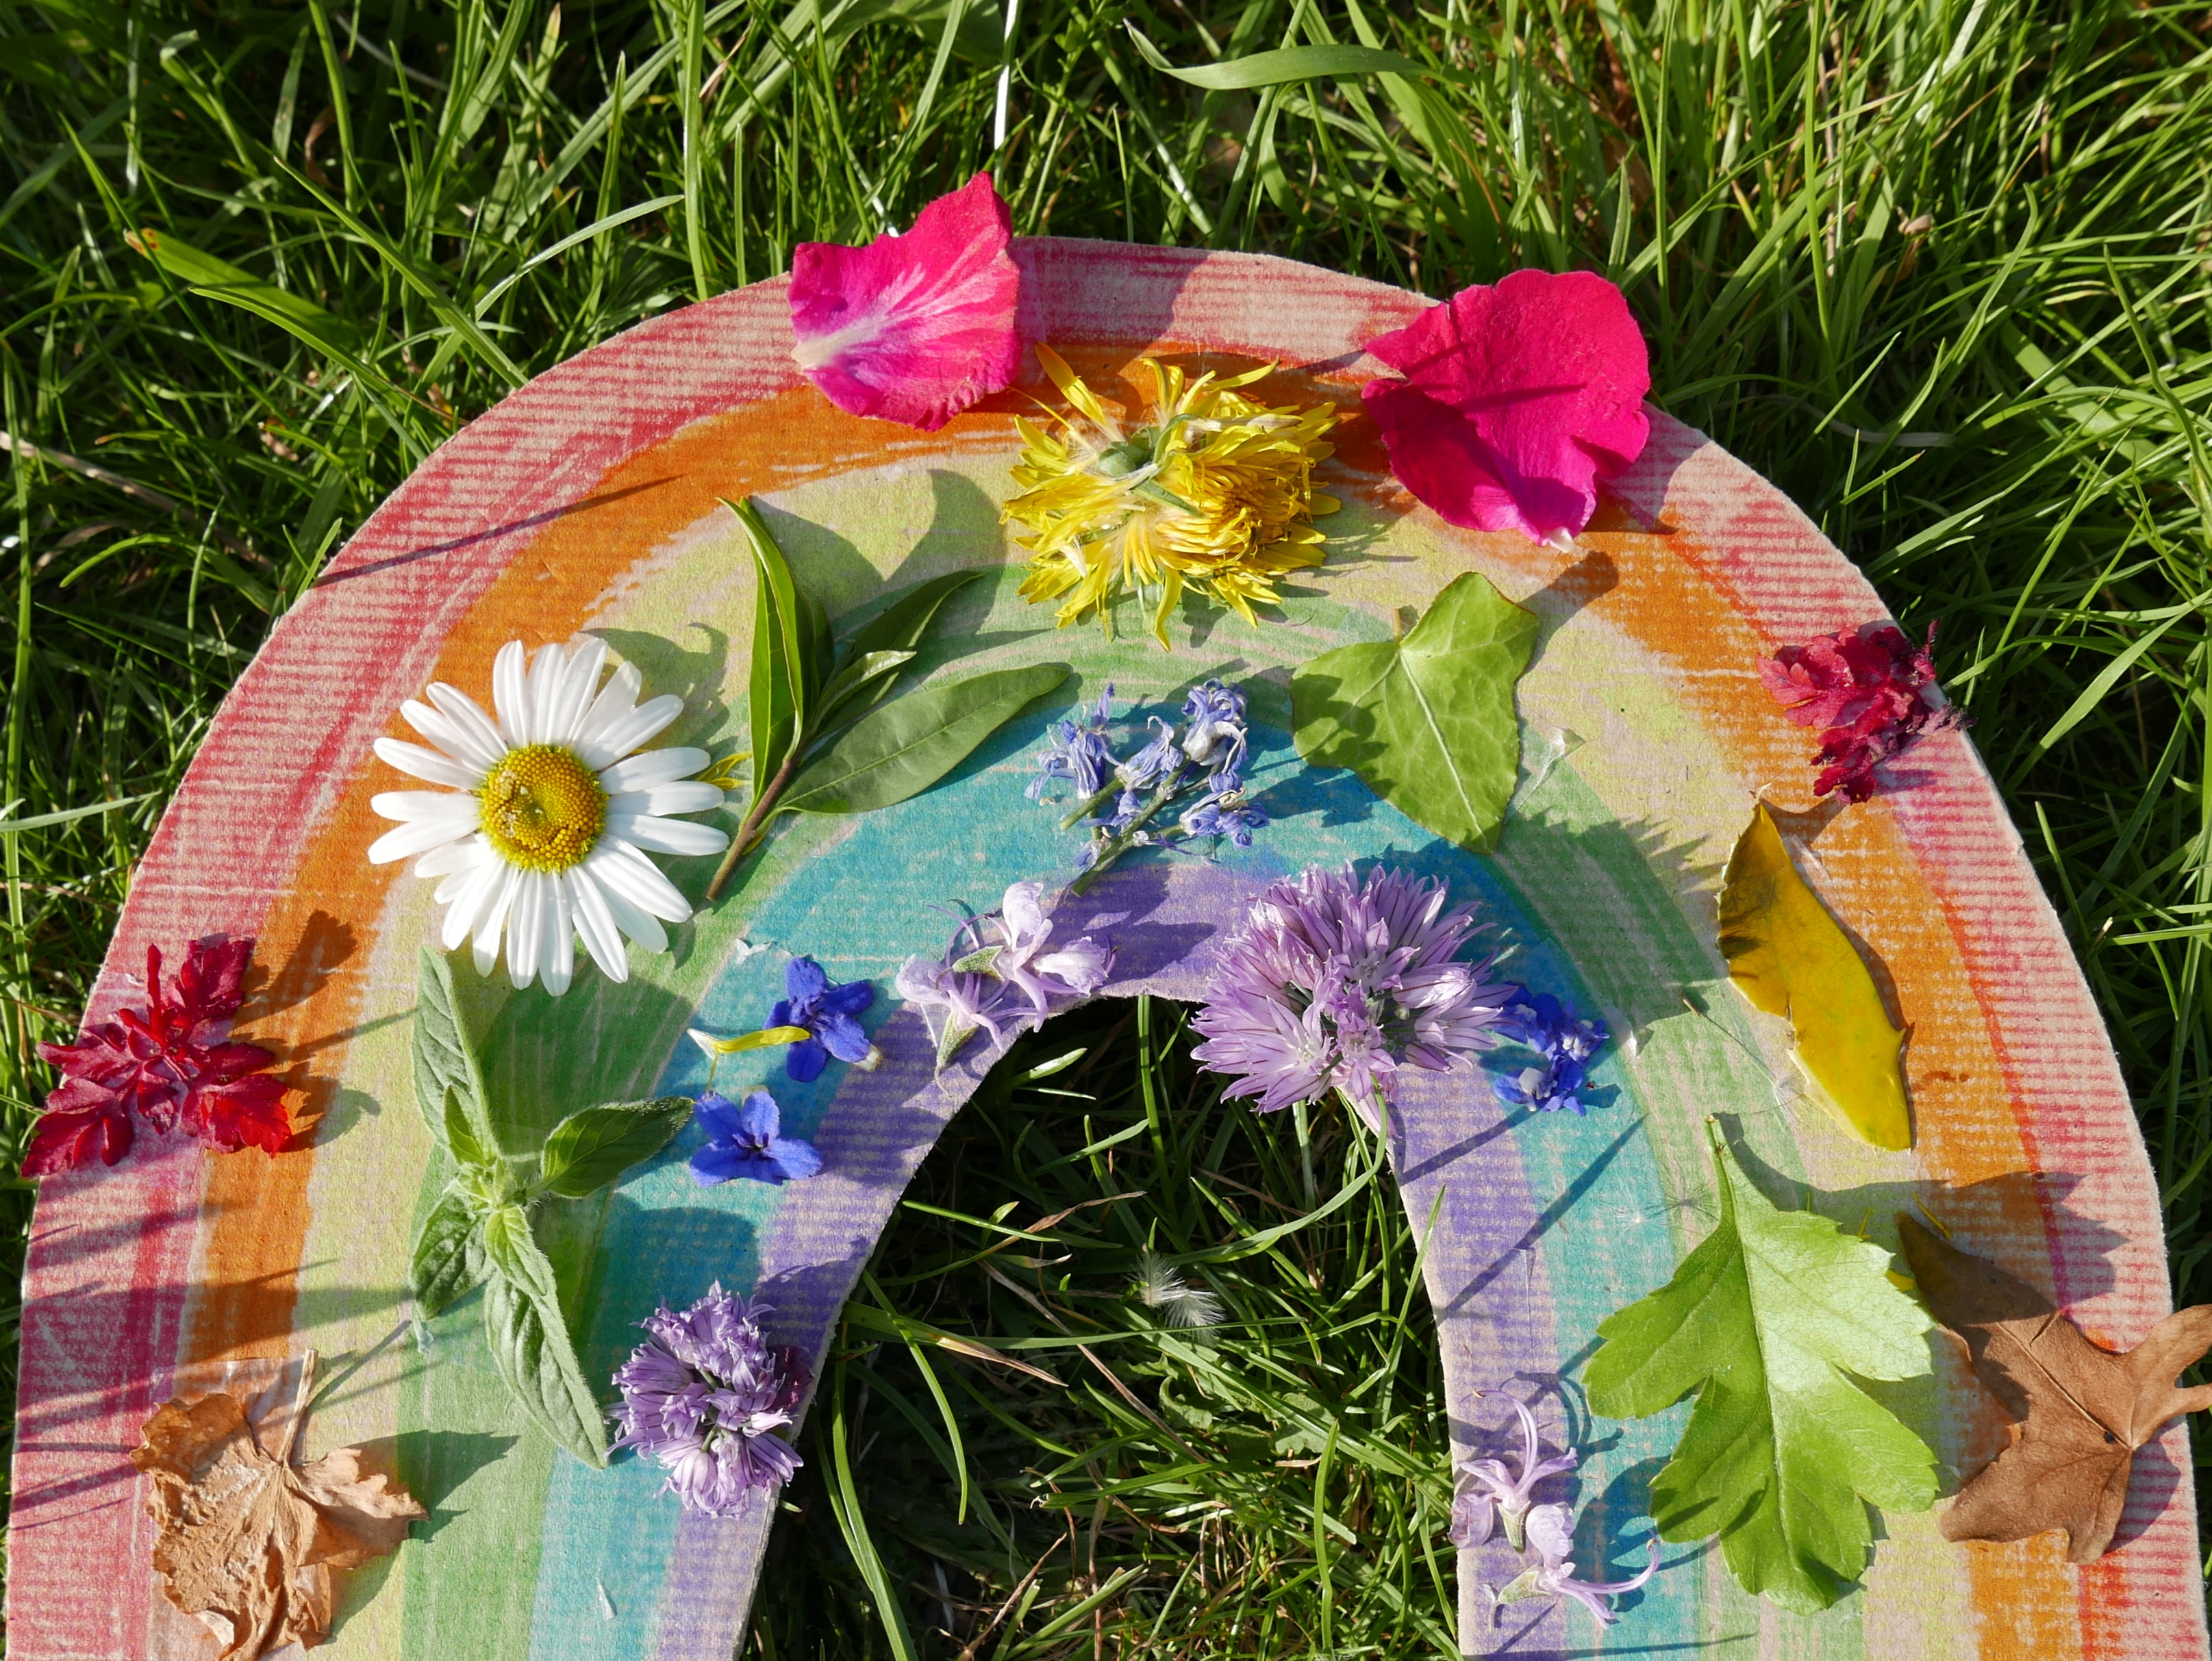
Now you can have fun going on a nature hunt to collect as many natural objects as you like. Use the tape or thread your finds through and under the elastic bands to attach them to your board. *Pretty please however don’t pick any wild flowers as these are an important source of food for wildlife, only collect flowers you have grown yourself in your garden or fallen ones you find on the floor.
Alternatively if you are playing in your garden you could draw or paint a chalk rainbow onto paths, patios and boards. Again you can then match natural objects to the colours of the rainbow.
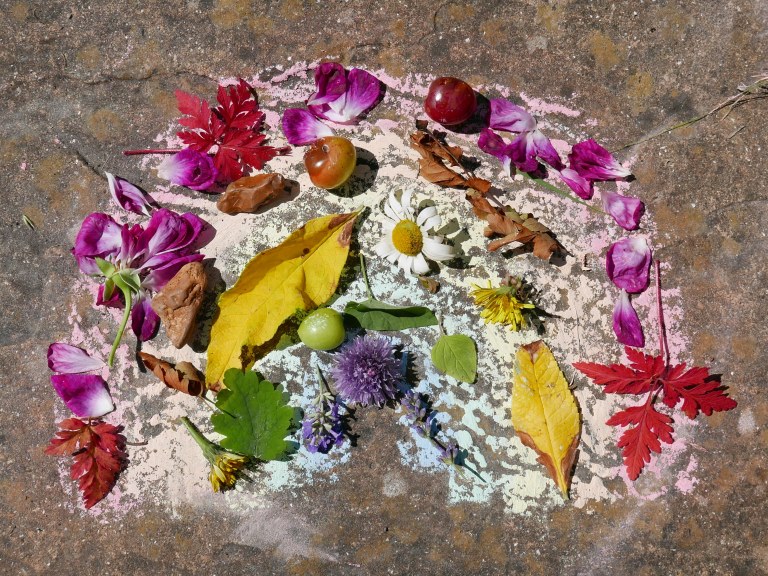
Can you get a whole rainbow? What colour did you struggle the most to find? Which colour was the easiest to find? Which colour do you like the most? It is a good opportunity to talk about why things are all different colours. For example flowers are brightly coloured to attract pollinators like bees and butterflies, grass and leaves are green because of the chlorophyll in the cells which is busy turning sunlight into food.
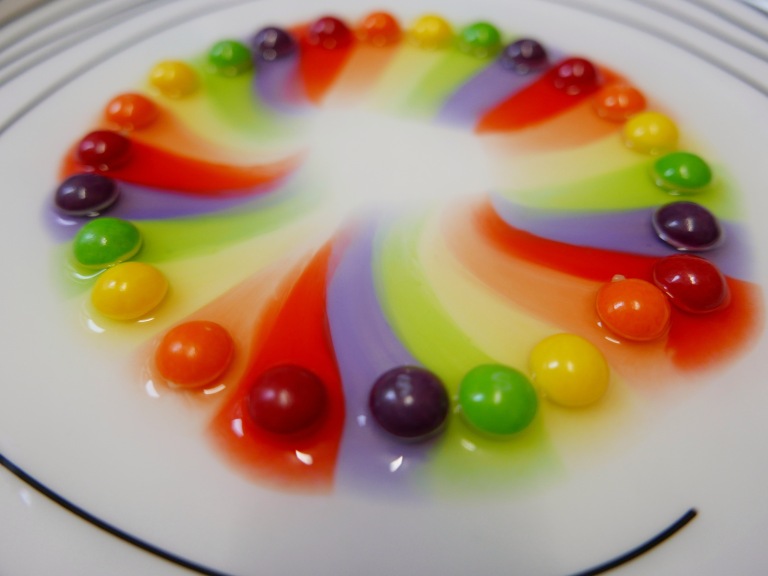
4. Skittle rainbows
Making patterns, pictures and mosaics using skittles is simple and fun activity that helps develop fine motor skills. (Please be aware of the choking hazard skittles may present for younger children.) Simply pour some onto a plate and let them enjoy playing around with them. After you have finished making your pictures and patterns you could bring them to life and create rainbows of colour simply by pouring some warm water onto the plate of skittles.
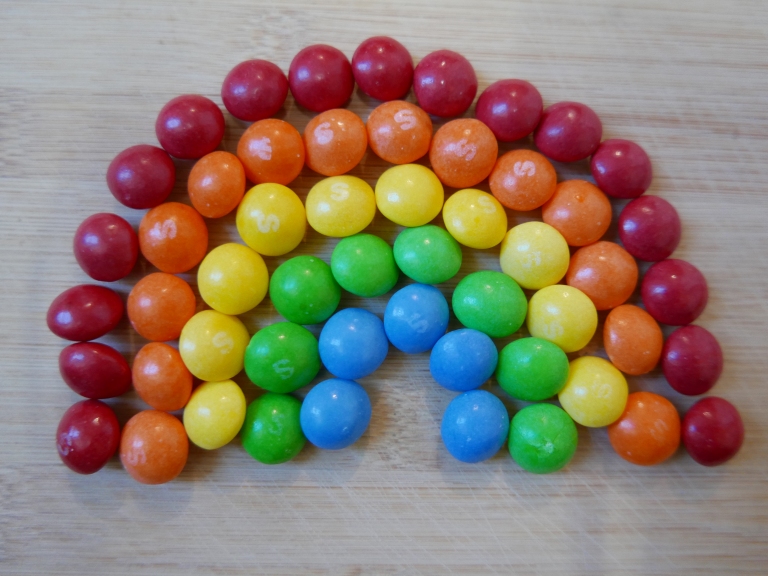
As the warm water melts the coloured coating on the outside of the skittles it spreads out across the water. If you place the skittles in a circle you can create a beautiful rainbow of colours that run together as they meet in the middle.
5. Rainbow density experiment
You can also try a really simple and colourful rainbow experiment that demonstrates density in liquids using just skittles and water. The different densities of liquid create a beautiful layered rainbow. Firstly you will need to separate the skittles into different colours on a plate. You will then need a bowl (or cup) for each different colour of skittles you are using. Pour 50ml of warm or hot water into each bowl.
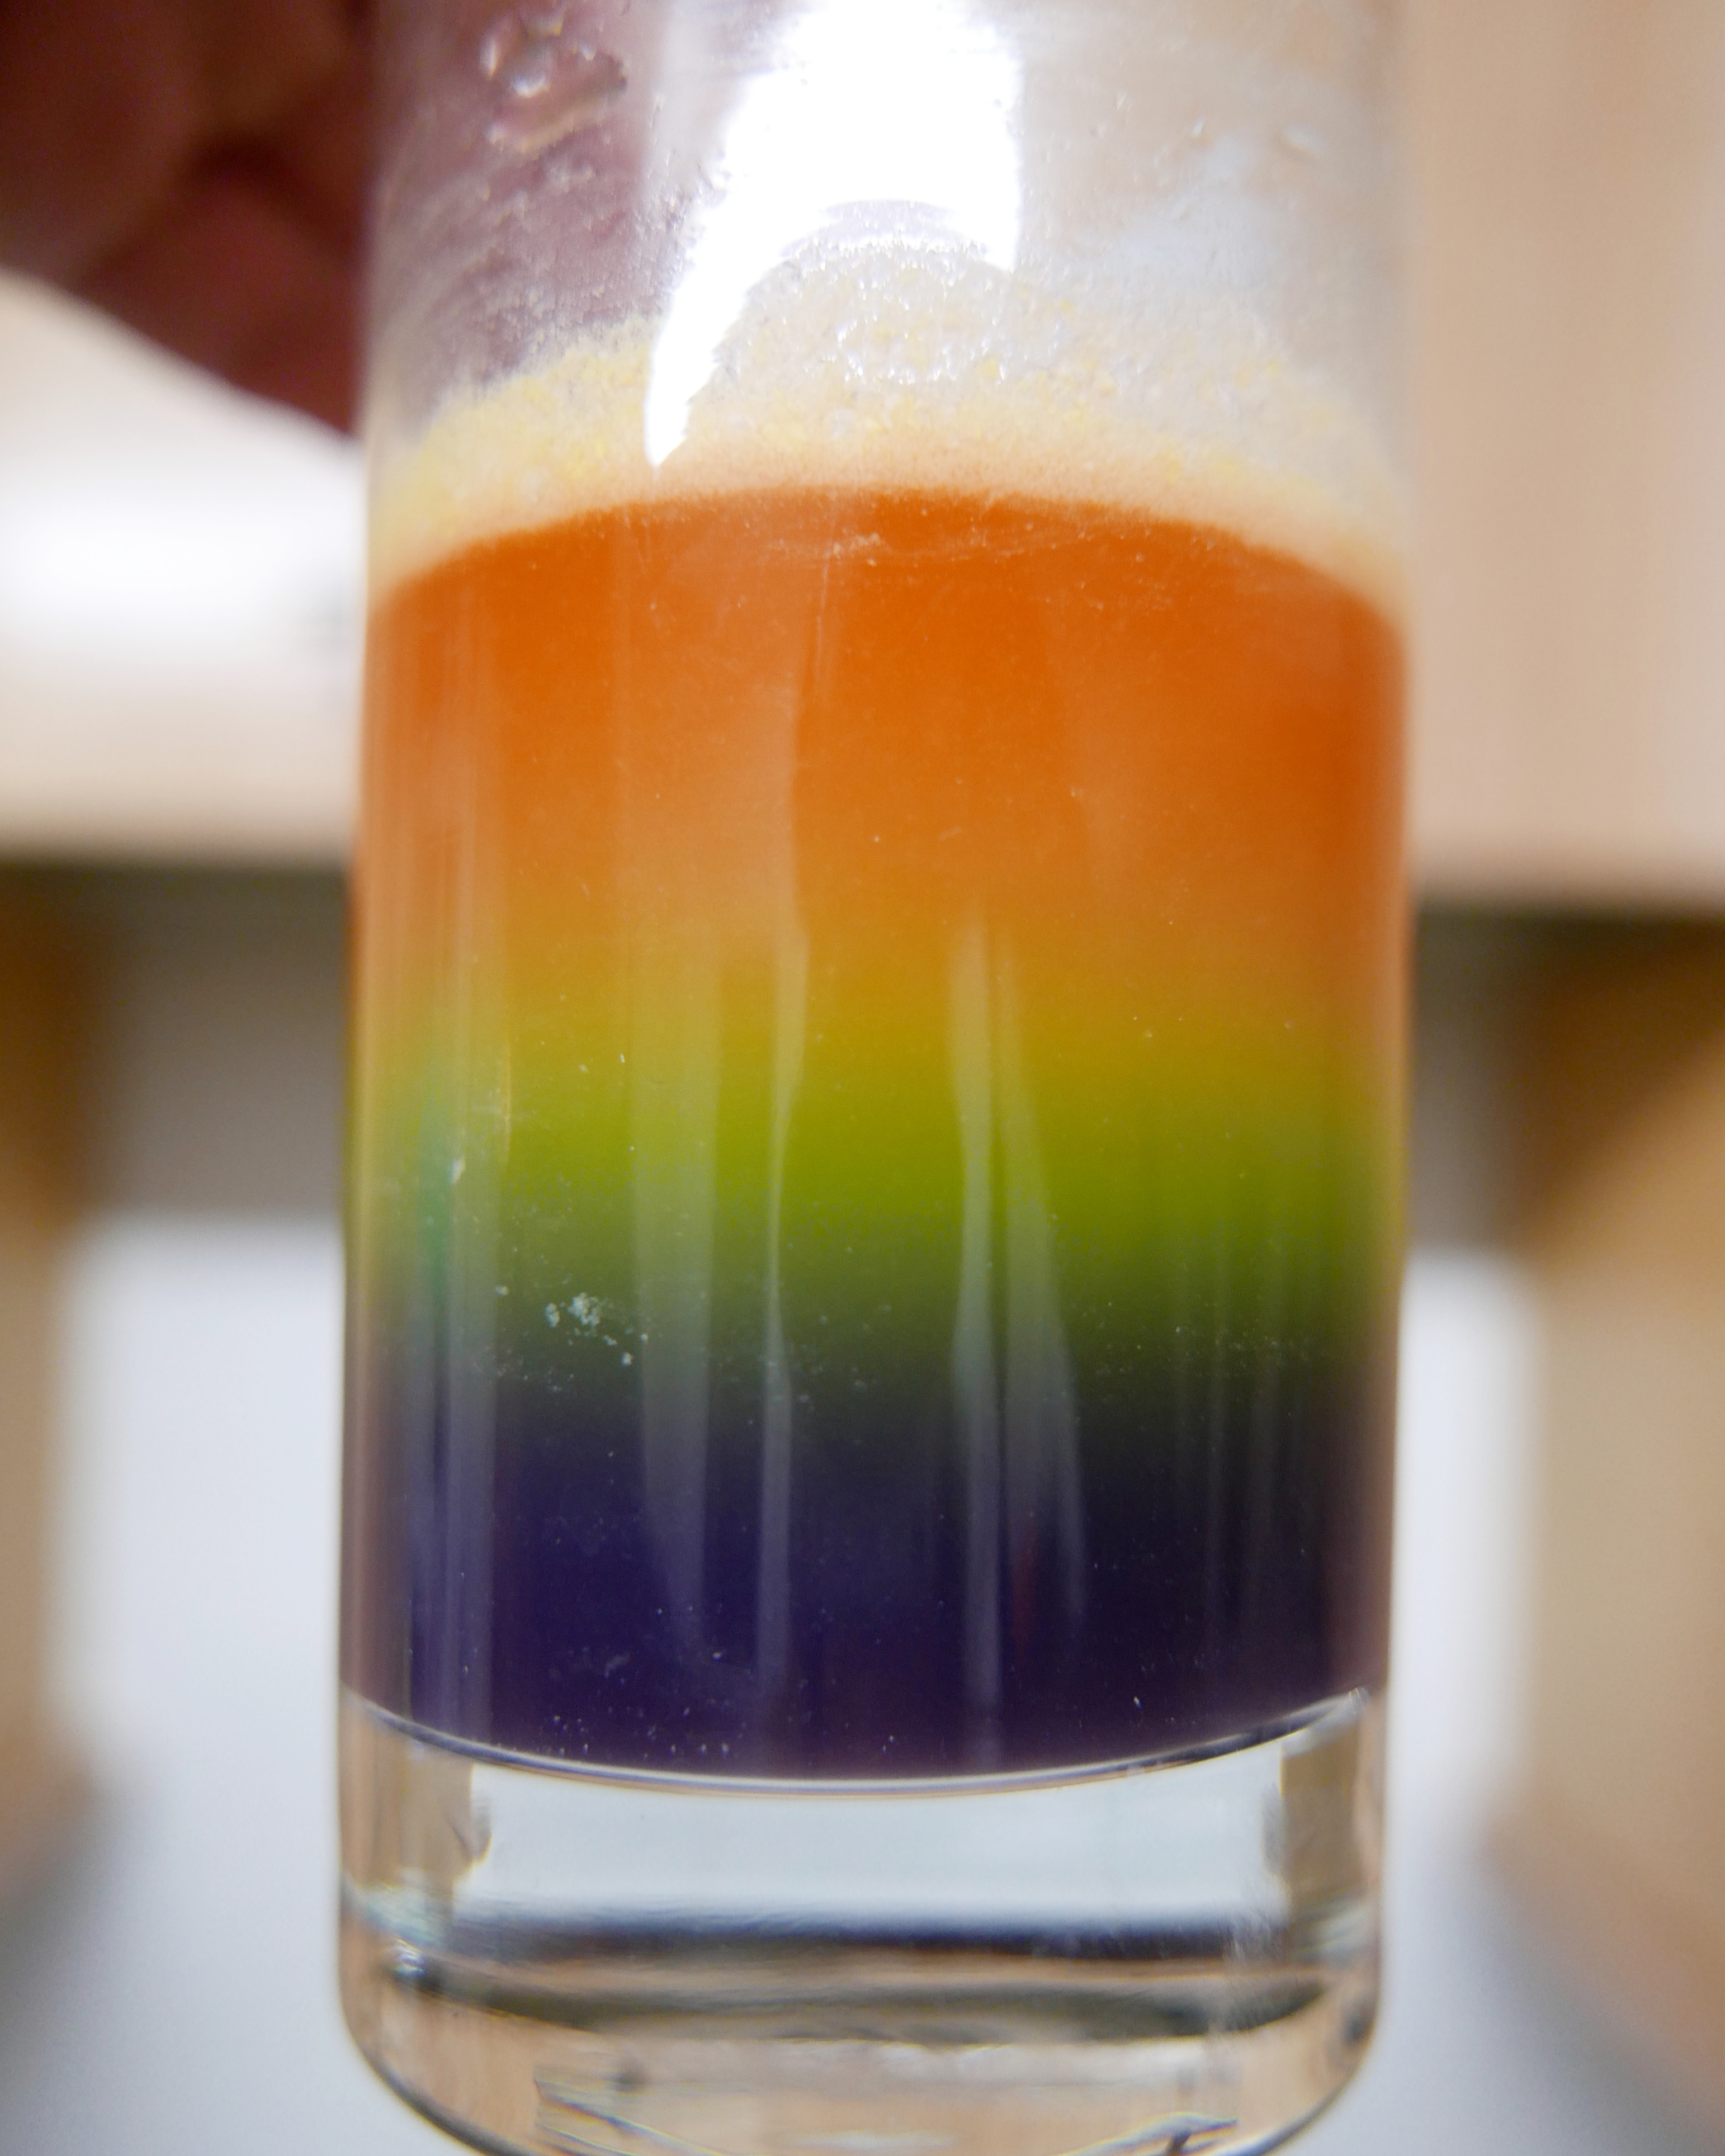
You can then add 2 skittles of one colour into one of the bowls, then for each following bowl and different colour you increase the amount of skittles by 2. For example we placed 2 red, 4 orange, 6 yellow, 8 green, 10 blue and 12 purple skittles into 6 separate bowls. Leave the skittles in the bowls for a few hours or until they have completely dissolved into the water.
Now your colours are ready to poutr into a clear glass. The water with the most skittles disolved into it will be the most dense and heavy liquid. Pour this into the glass first. Then carefully pour in the next colour with the second most amount of skittles in it and so forth and so forth.
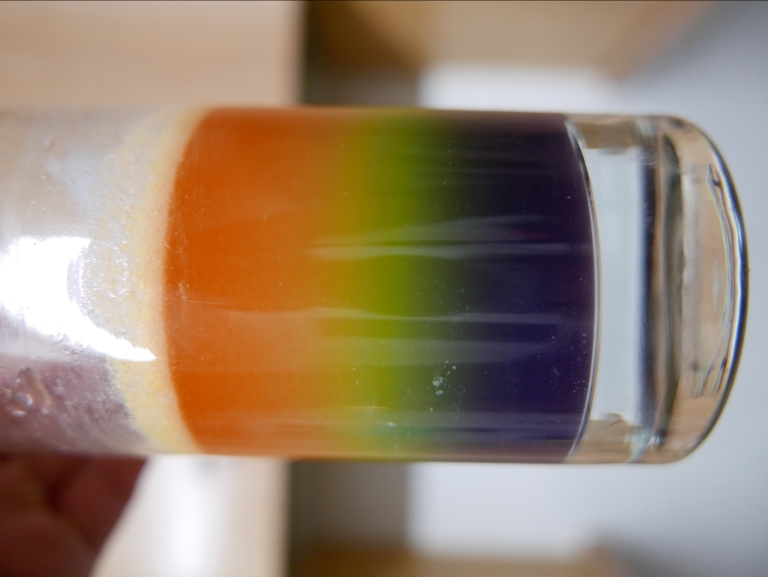
The liquids should create a beautiful layered density rainbow. You can swirl and rock the water around gently in the glass and the layers should still move and settle back into the layers. This is because each liquid layer has a different density depending how much solids they contain. Heavy and denser liquids sink to the bottom and lighter less dense liquids float to the top.
6. Experiment with reflecting and refracting light
You can easily demonstrate and explore the way light travels by using reflective surfaces or water to reflect or refract sunlight in different ways. Light travels in straight lines so when a beam of light hits a mirror it will reflect of the surface at the same angle it entered. You can experiment by angling a mirror in sunlight to reflect light across different surfaces. If you are using paper or carboard you could draw and record the angles of the light beams in relation to the angles of the mirror.

You can use a glass full of water placed on paper to both reflect and refract sunlight. As the light travels from air to glass to water it moves from a less dense substance through two much denser ones. This changes the speed and angle of the light refracting and reflecting at the same time. You can see the light has now been scattered into lots of little patterns of beams and rays of light on the paper. You could also experiment changing the density of the water by adding large amounts of sugar to see if changes the angle of refracted light.
7. Make a rainbow of sunlight
You can also experiment with splitting sunlight into a rainbow of colours by shining the sunlight through the bottom of a glass of water or alternatively through a prism. When sunlight traveling through the air hits the surfaces of the water and glass it slows down and changes direction, this is called refraction and it happens because the water and glass is denser than air so light can’t travel as quickly through it. As the different colours have different wavelengths they change speed and direction at slightly different rates splitting them into a rainbow of colours.

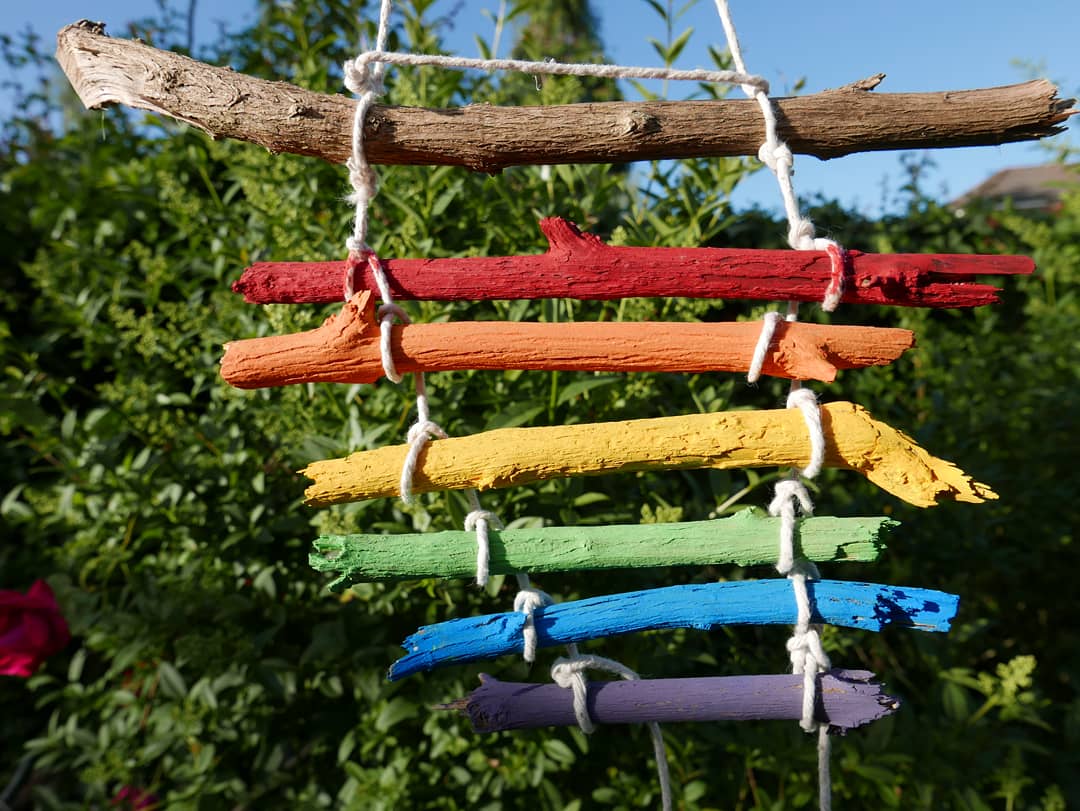
8. Rainbow stick mobile
Rainbow stick mobiles are surprisingly simple to make. You just need to find 6-7 sticks and then paint them in the colours of the rainbow. When they are dry you then tie them together using a piece of string, ribbon or wool. You could even tie on some seashells or feathers underneath to look like raindrops.
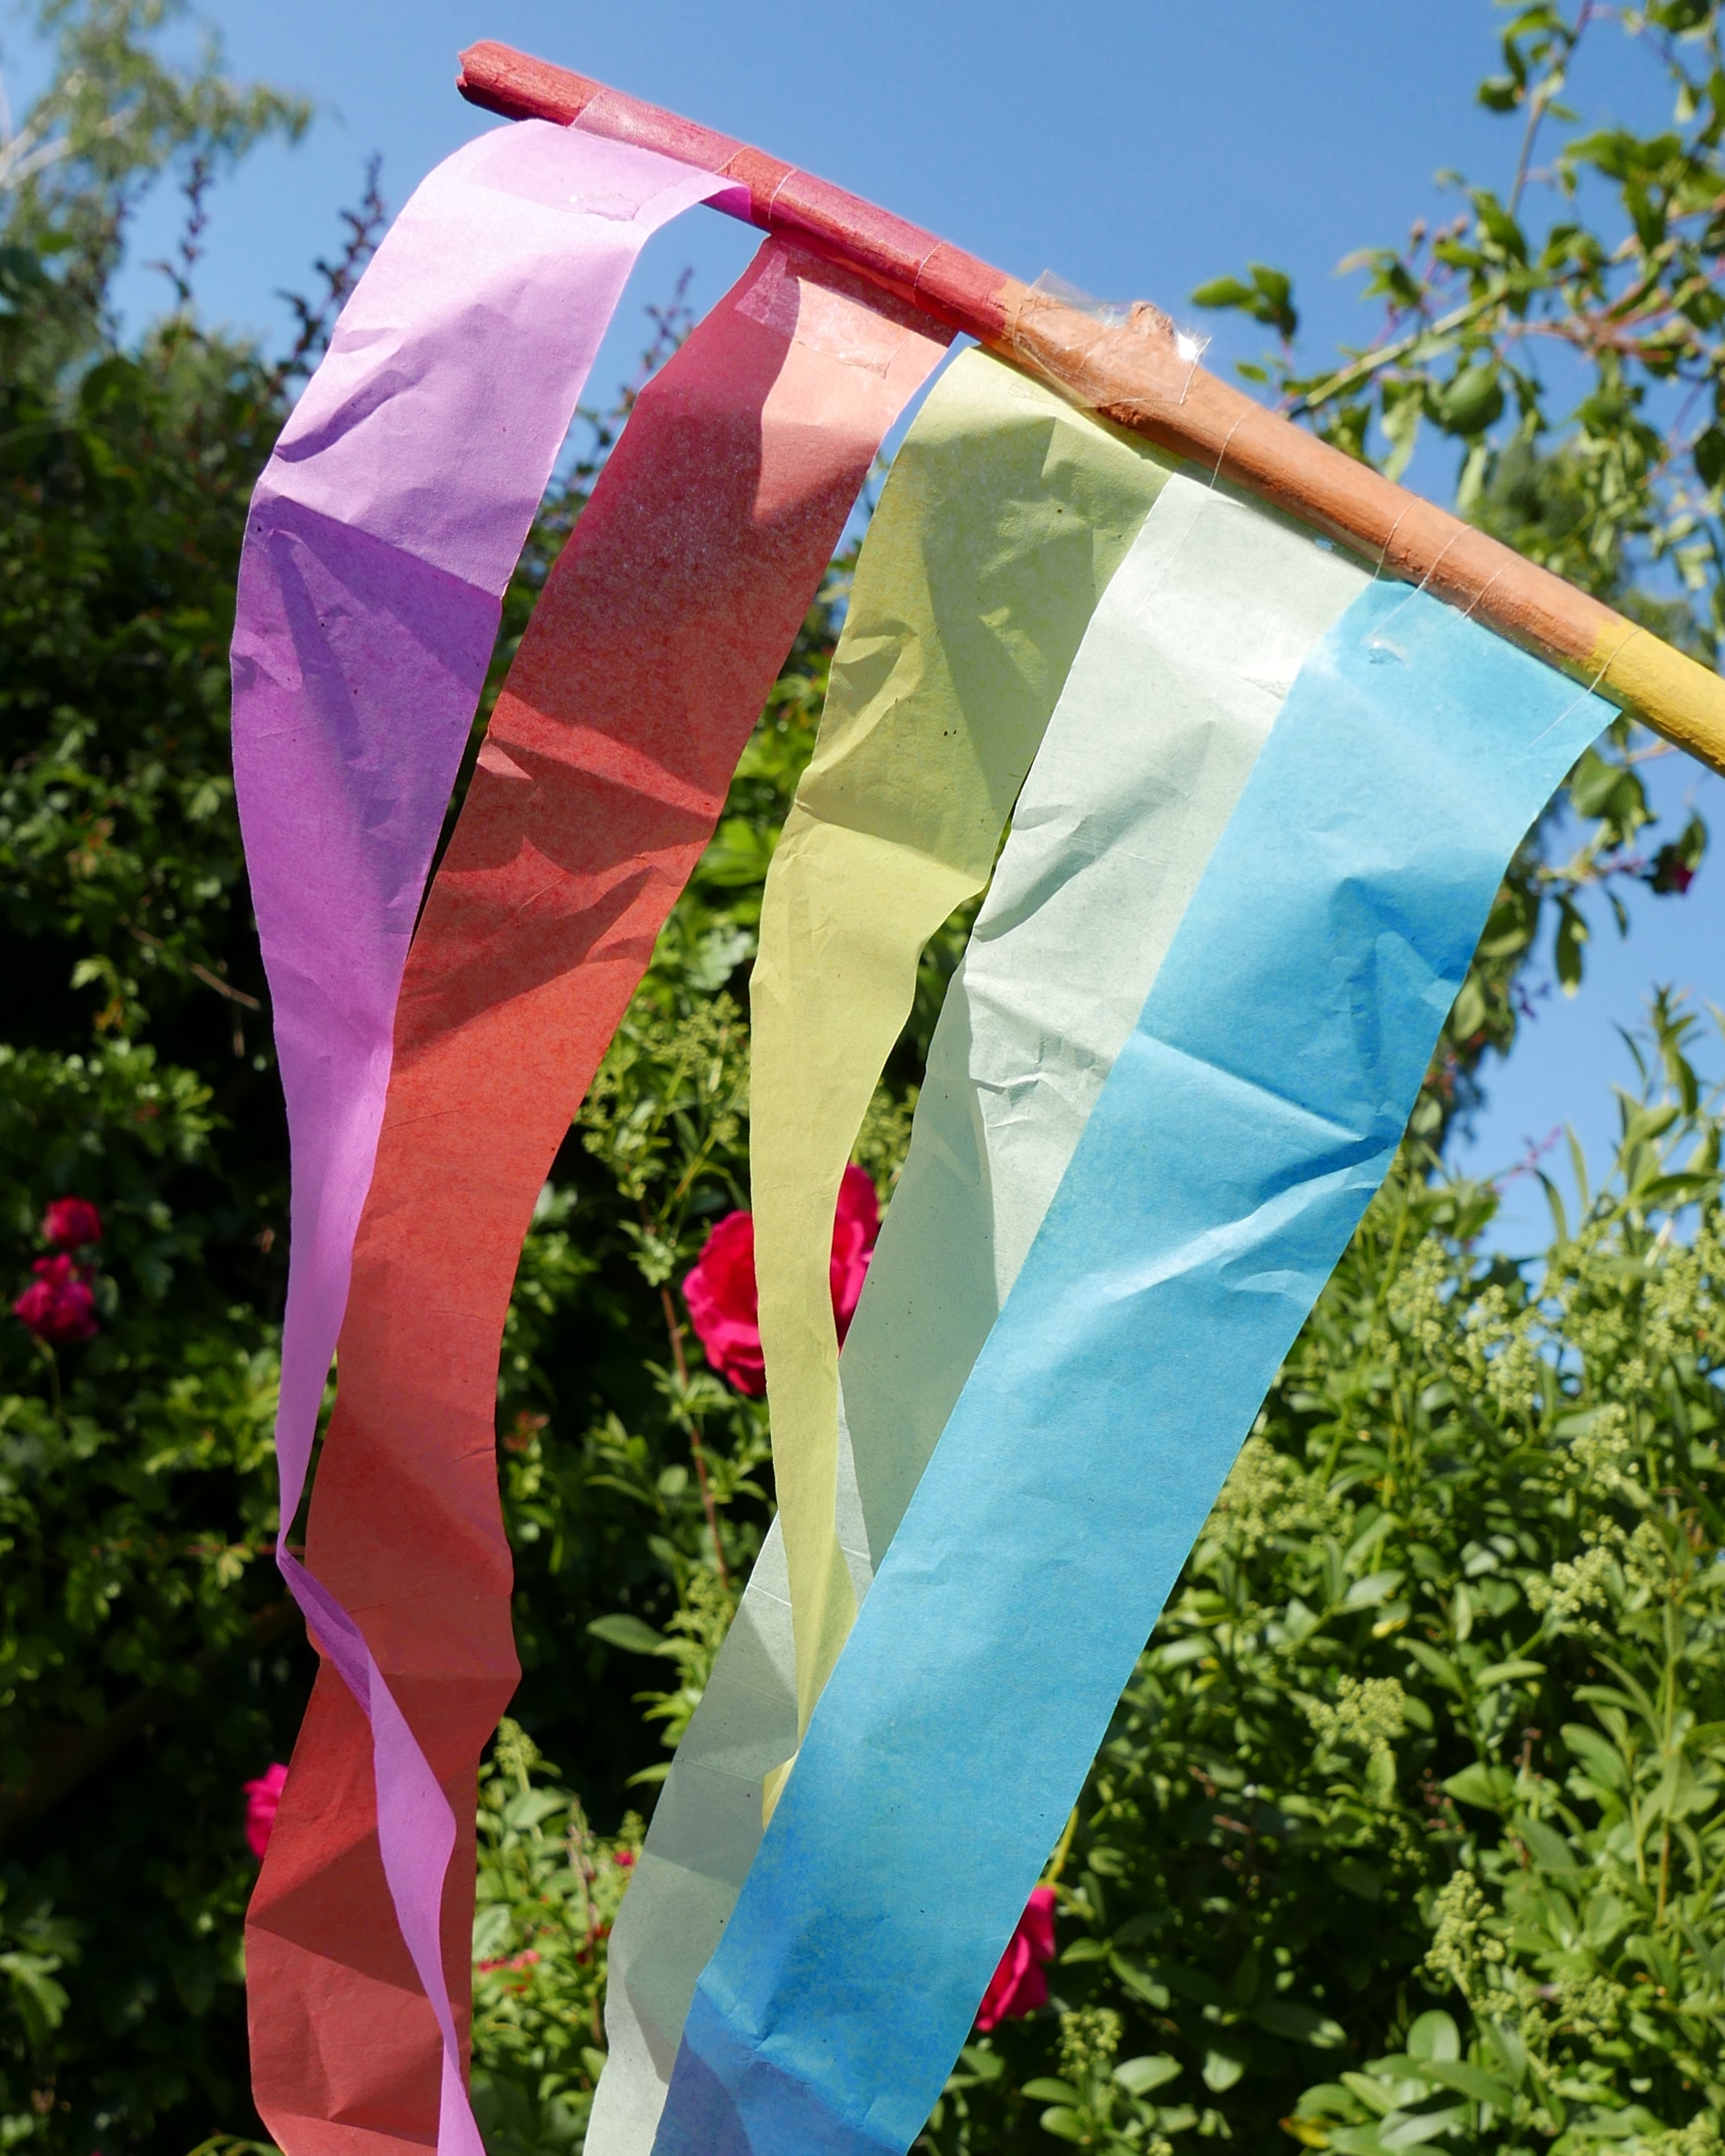
9. Rainbow streamers
Another quick and simple activity, Rainbow streamers are great fun for twirling, playing and dancing with. You could also use them as garden or party decorations. You just need long stick which you can either decorate and paint or leave plain, you then tie or tape rainbow coloured materials to the stick. You could use crepe paper, fabric, ribbons wrapping paper, painted newspaper or plain paper strips to the stick.
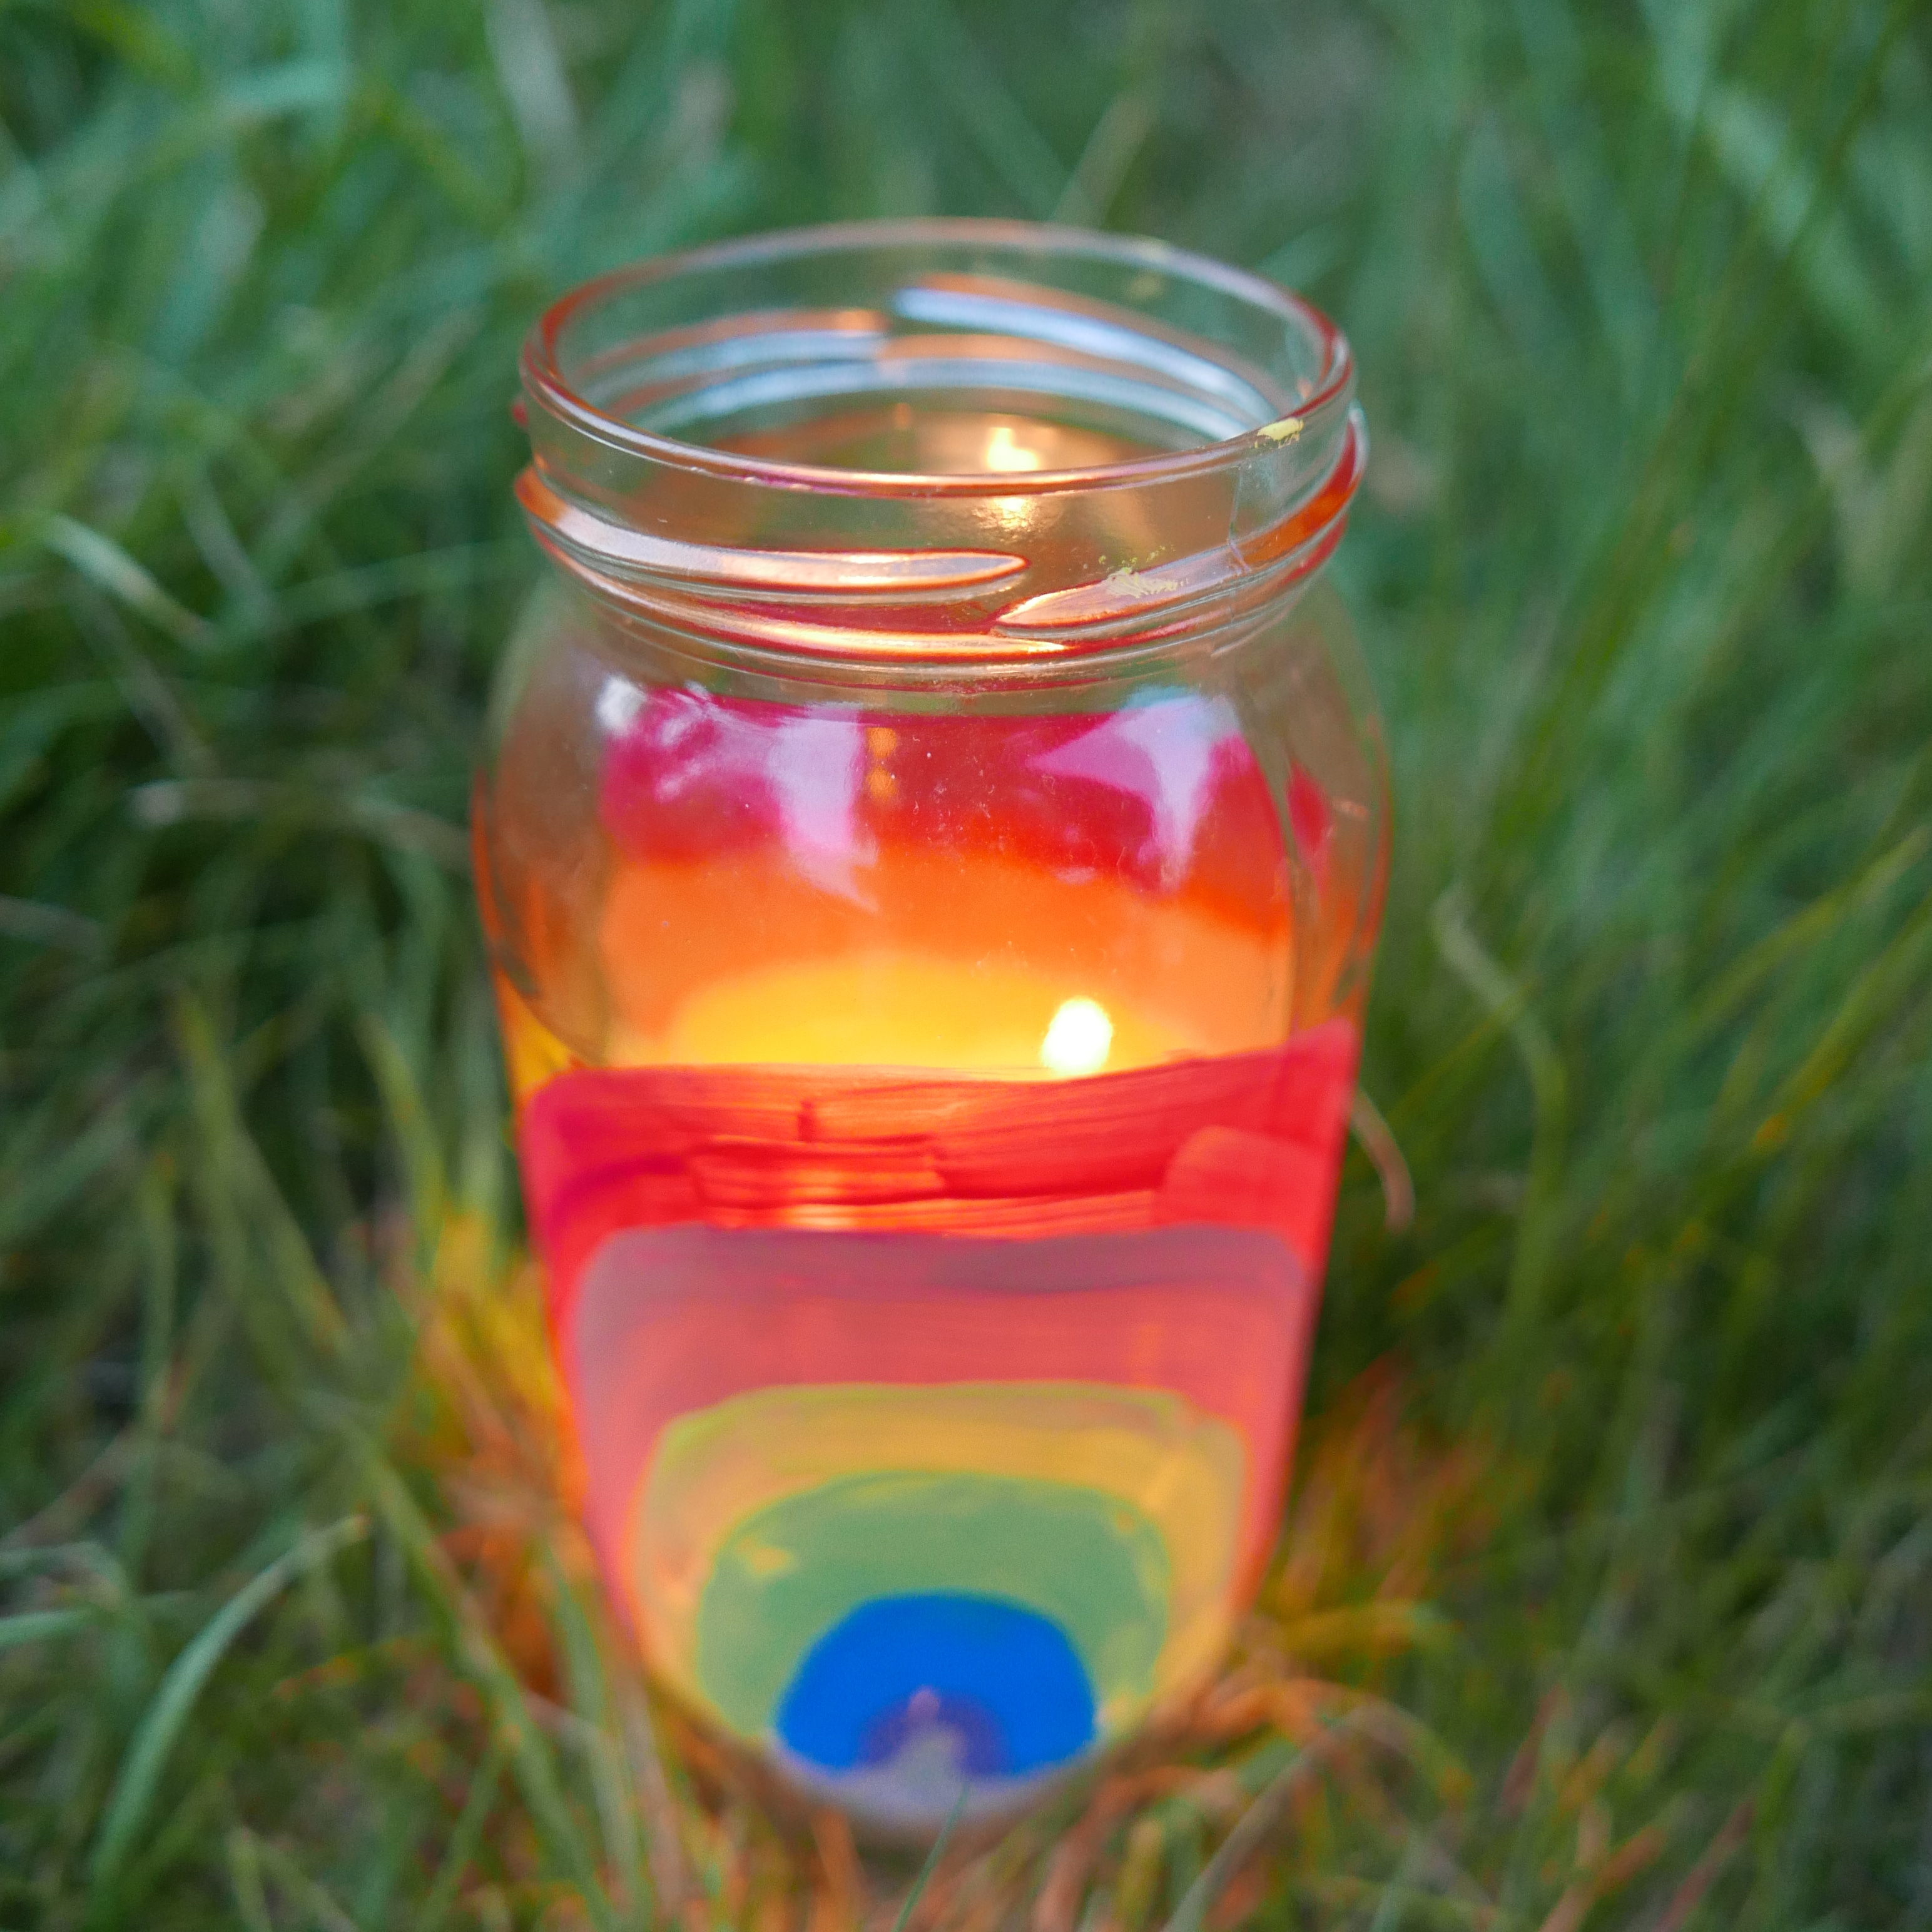
10. Rainbow lanterns
A great activity for recycling glass jam jars. First you need to carefully wash and clean an empty jam jars. When its dry you can then use paint or marker pens to paint or draw a rainbow designs onto the outside of the jar. When the designs are dry you can then carefully light and place a candle* into the decorated jar to turn it into a beautiful lantern.
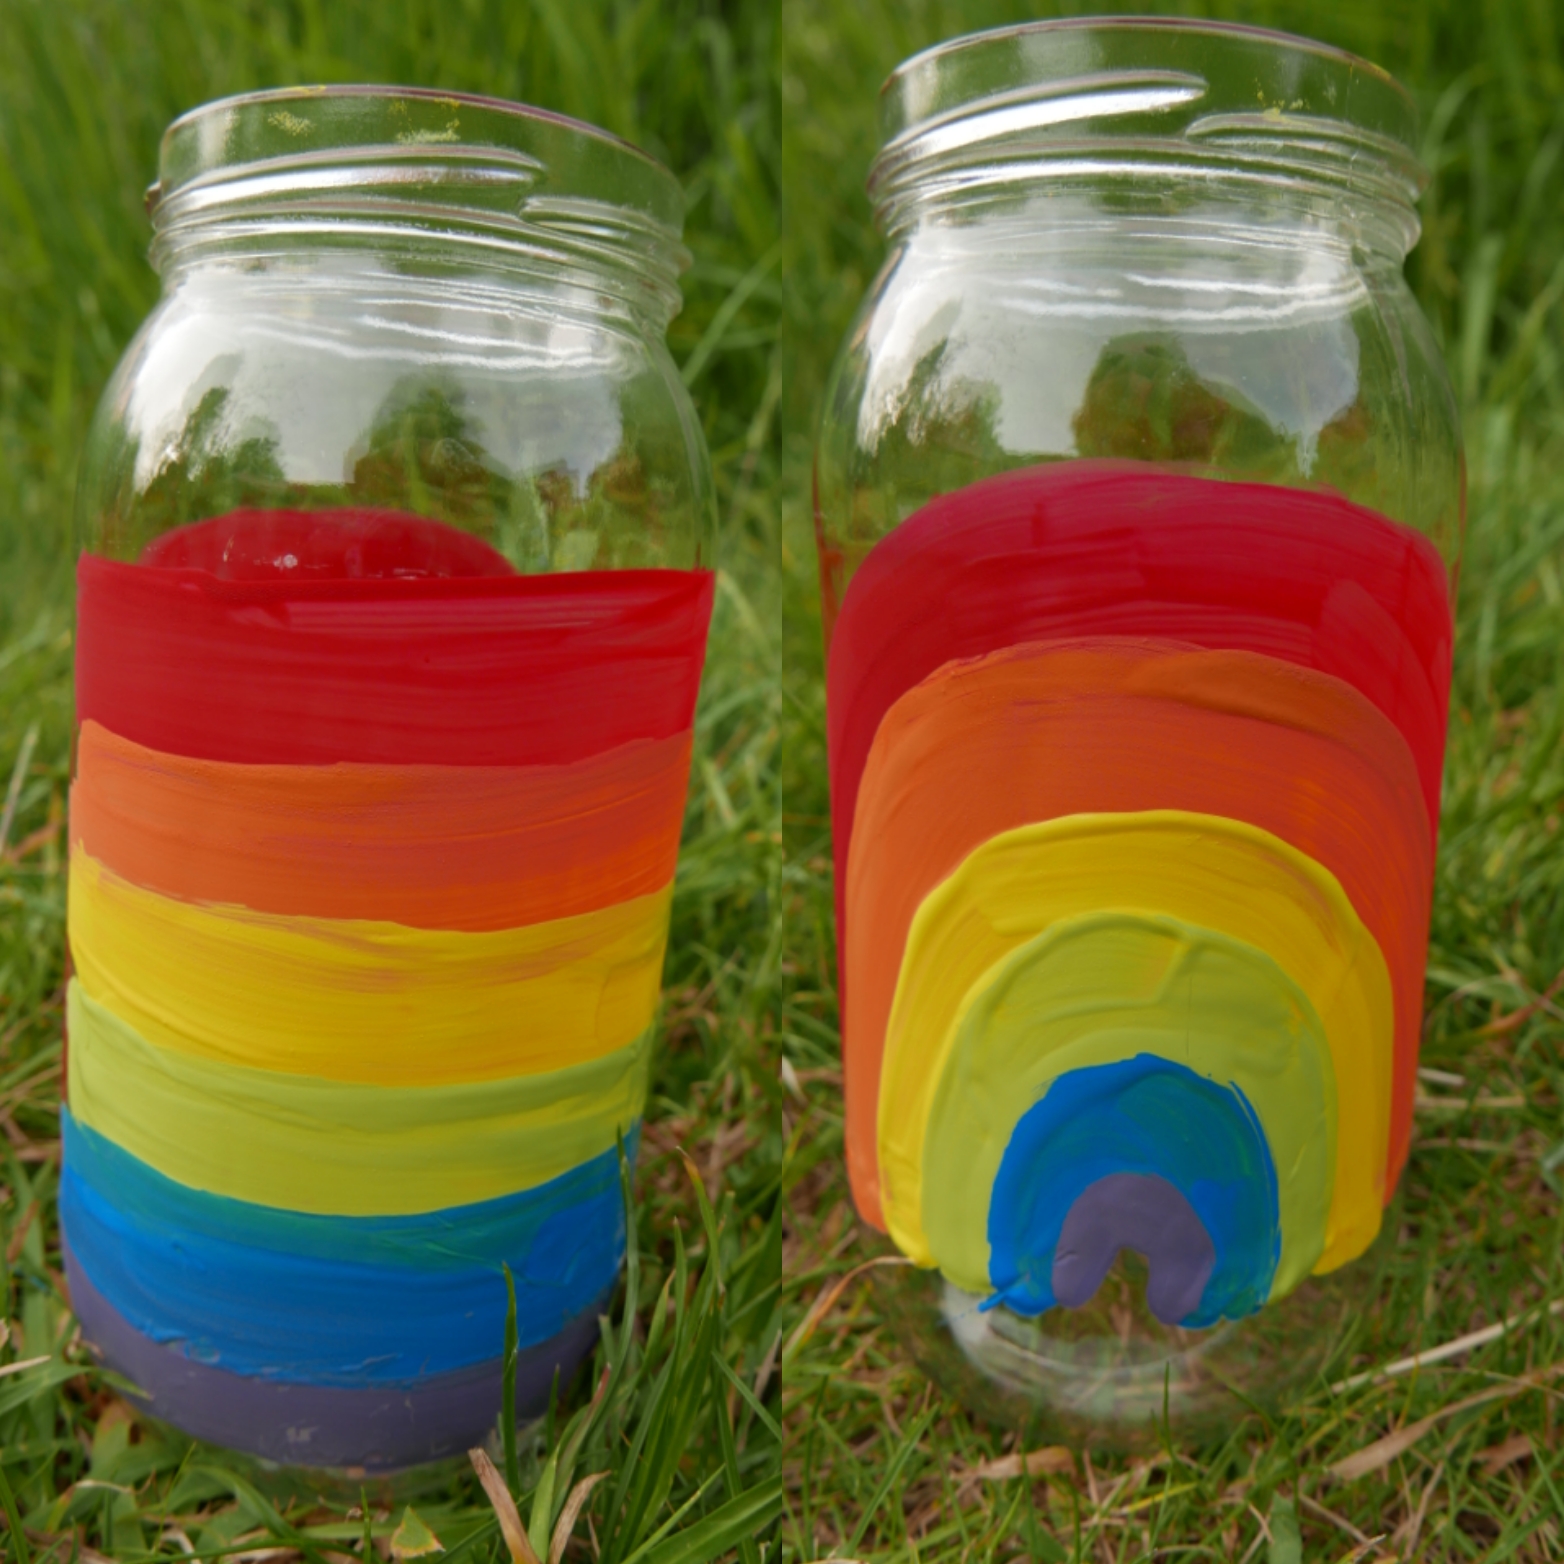
*Please note: The glass may become hot so avoid touching it and make sure its placed on a heat proof surface out of the reach of children. Please never leave a naked flame unattended and always be aware of the hazards of fire and glass. Children should be fully supervised at all times with this activity.
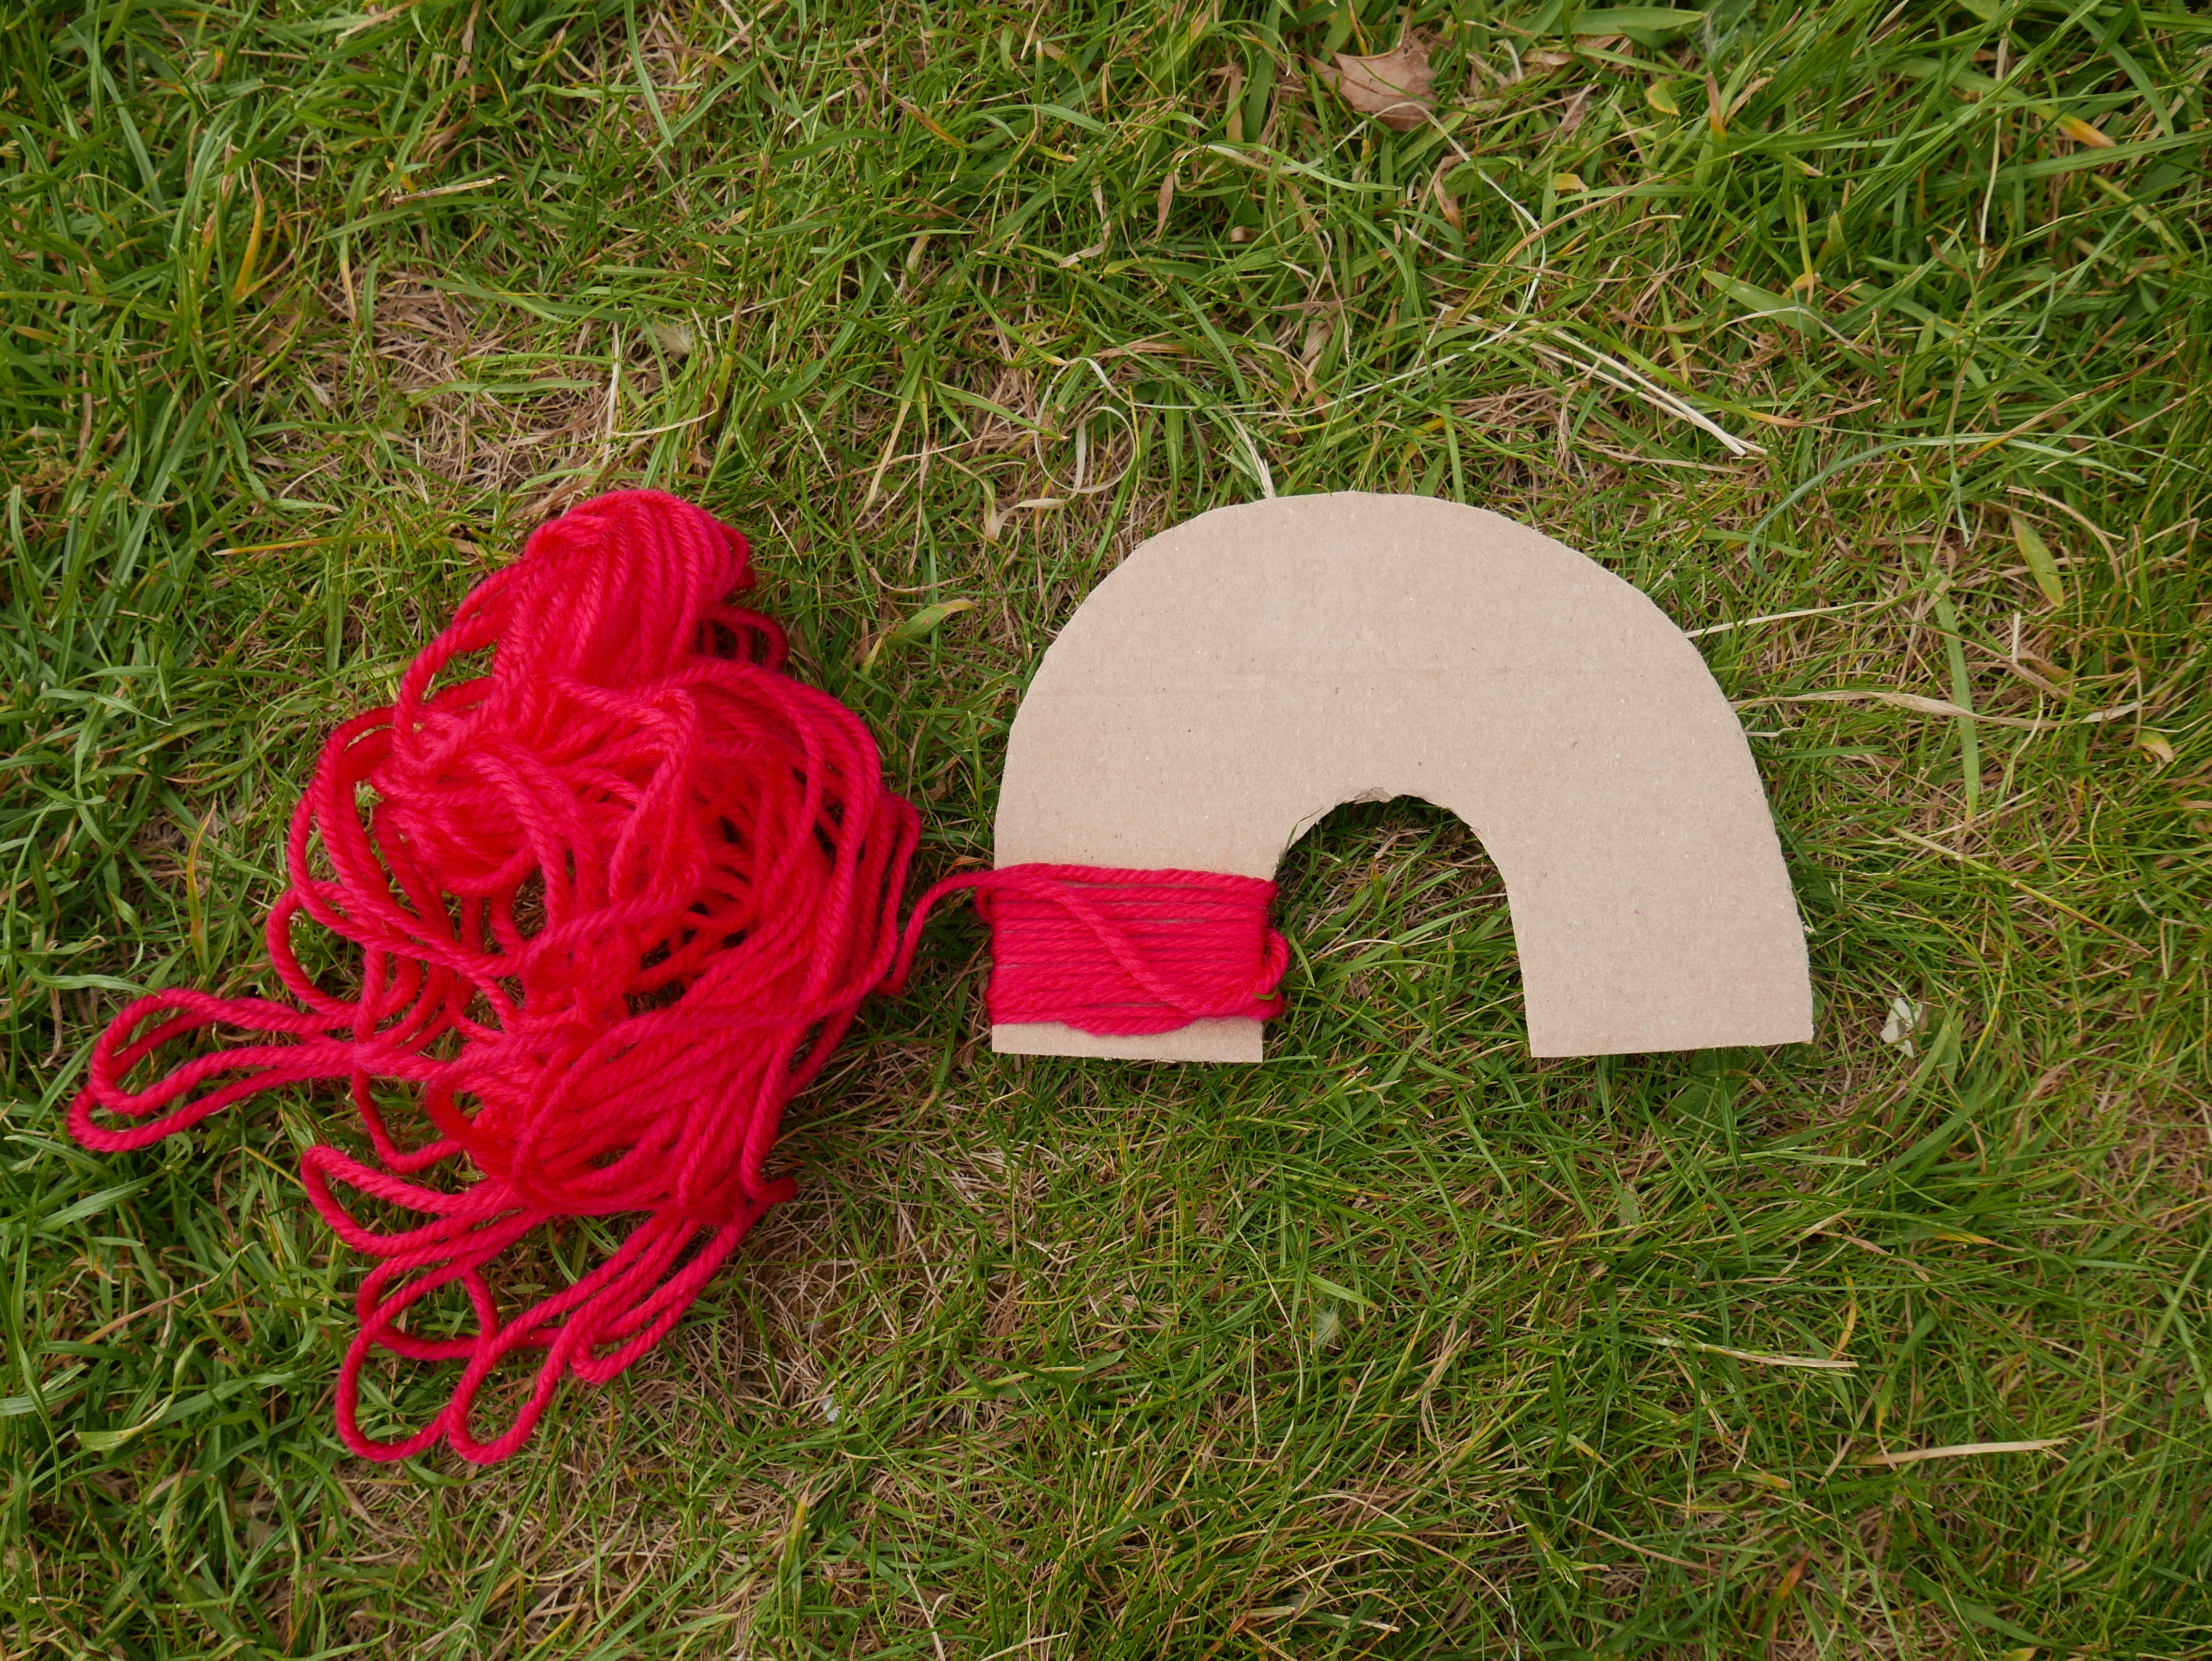
11. Wool wrap rainbow
Making wool wrap rainbows is a great activity for developing fine motor skills and concentration. All you need is a piece of cardboard cut into the shape of a rainbow and several different colours of wool, string or ribbon.
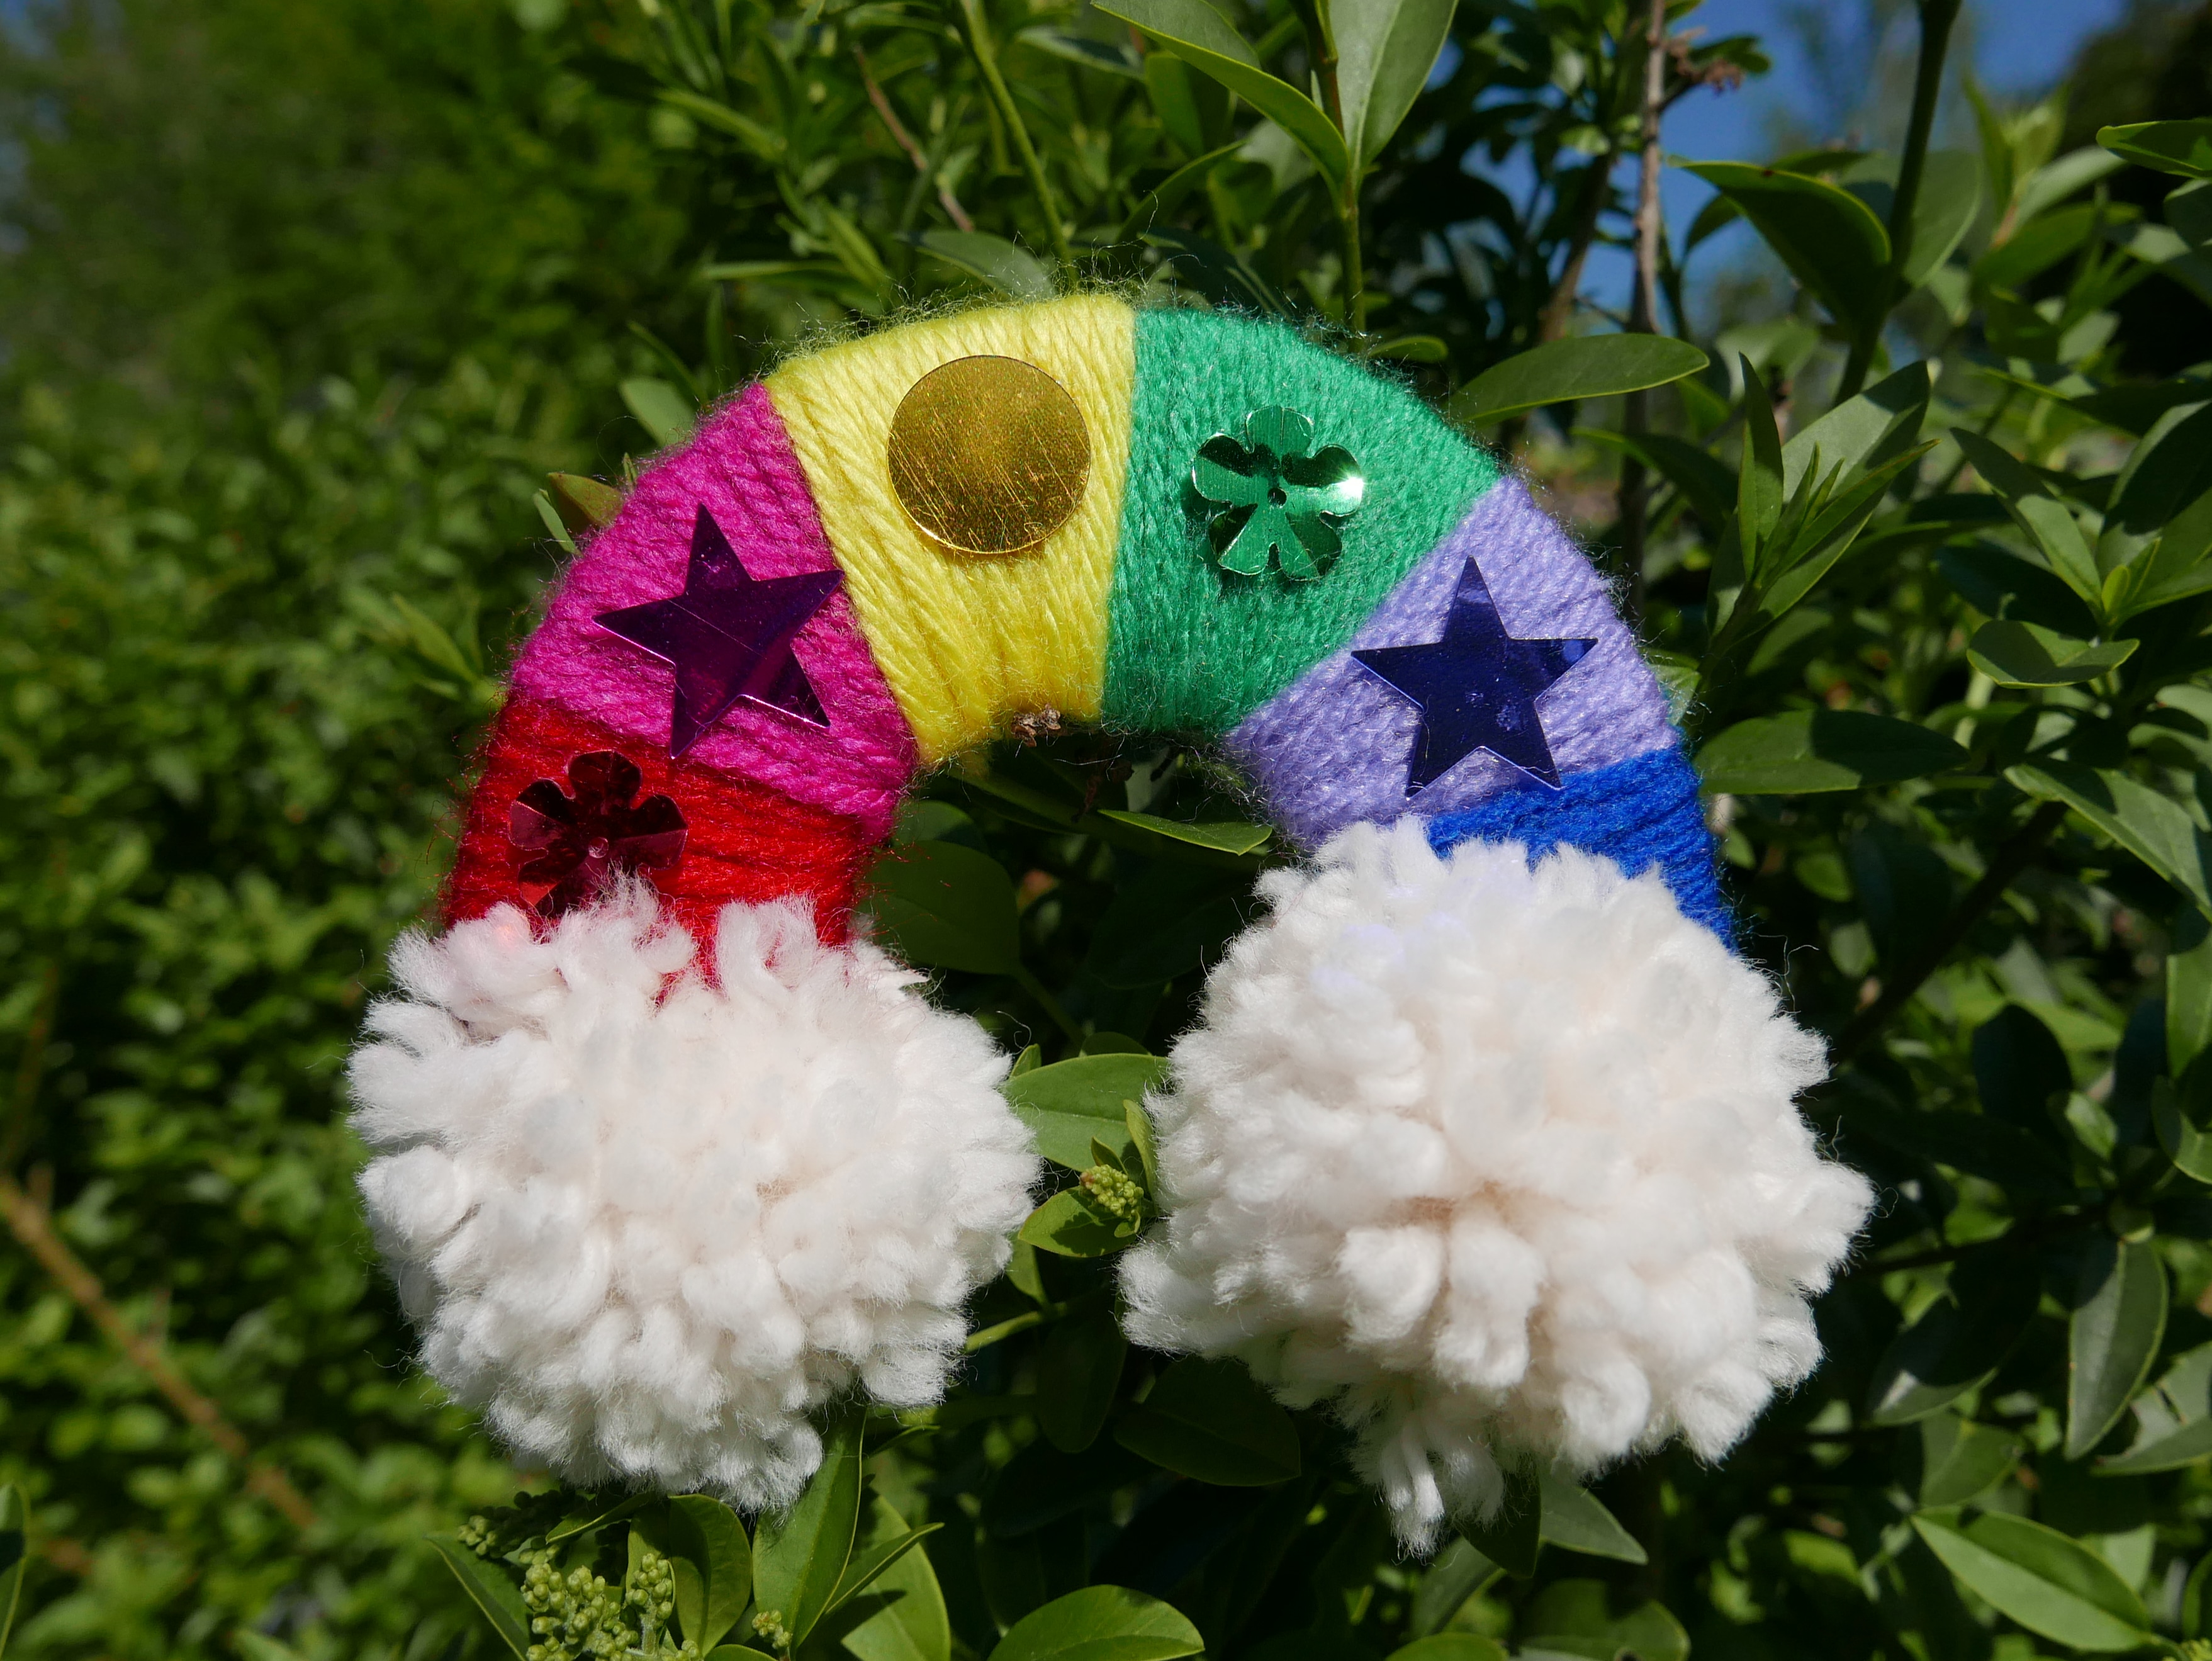
Simply wrap the wool, string or ribbon round the cardboard rainbow one colour at a time. Starting at one end and working your way towards the other. When you have finished you even could stick on extra decorations or glue pom pom clouds to each end to make clouds.
12. Rainbow suncatchers
You can easily make a rainbow sun catcher using sweet wrappers, crepe paper or old plastic packaging coloured in with pens. Simply cut a hole into a piece of paper or cardboard to create a frame. (We made ours heart shaped) Then glue or tape your sweet wrappers, strips of crepe paper or plastic across.

When you have finished making your sun catcher try holding it up to the light and looking through it. Or place it in a window or hang it up to see what colours of light come through. You could also shine a torch through it in a dark room to see what colourful patterns and shadows it casts.

13. Rainbow play pasta
Rainbow play pasta is really easy to make and it keeps for ages if you keep it dry and in a sealed container. Older children can use the pasta for counting games or threading onto string to make jewellery or pretend snakes. Younger children can enjoy filling up containers and bottles, making shakers, using spoons to scoop and stir or pretend play at cooking.
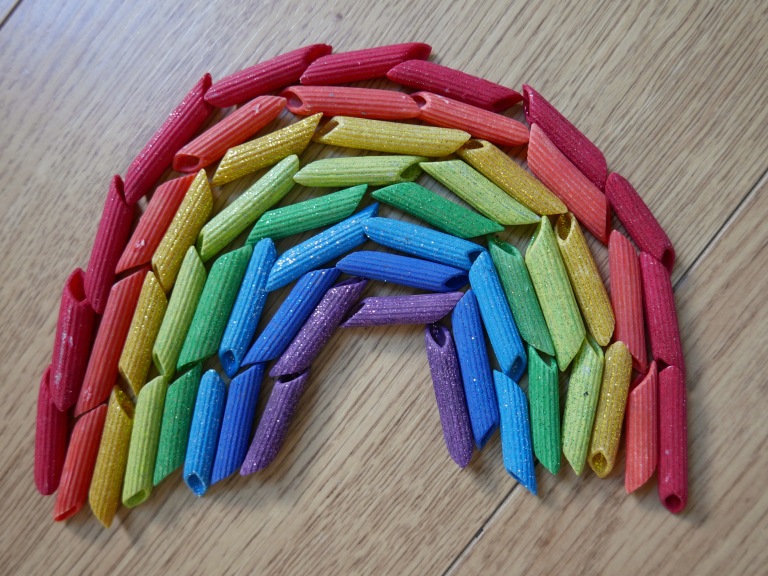
First pour some old or out of date pasta out onto the side and divide it into separate piles for each of the different colours you wish to make. Next you need some paint, we found acrylic paints work best as they preserve the pasta for much longer. You need roughly a teaspoons worth of paint, and a two tablespoons worth of water mixed together in the bottom of a plastic bag. Please note: You only need to use one plastic bag for all the colours, as you can wash/rinse it out after each batch and resuse it again and again for each new colour.
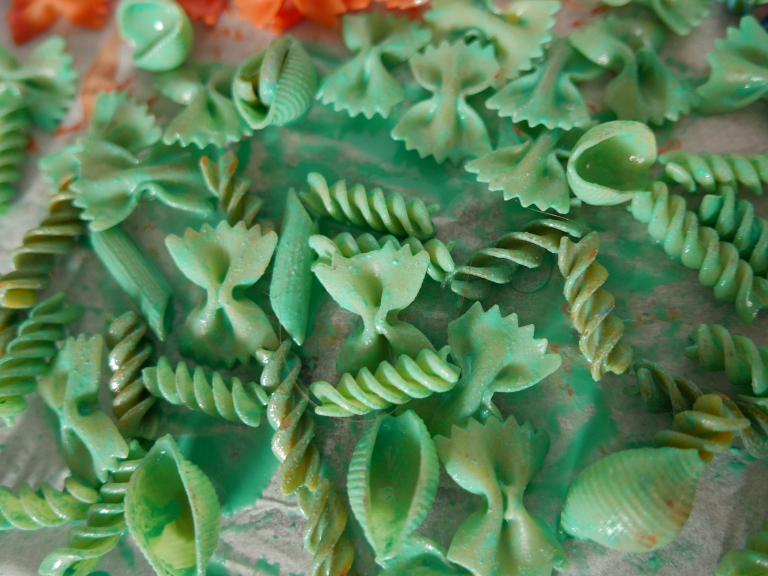
Place your pasta in with the paint and the water in the bag. Tie up the bag tightly so no paint can escape then massage, rub and shake the pasta around inside the bag until it’s entirely covered in paint. If for some reason there isn’t enough paint to cover the pasta/it comes out looking patchy, just simply add more paint and water into the bag and put you pasta back in the bag for another coat. When it’s fully coated lay it out on recycled paper (we used grease proof paper recycled after baking) to dry. You need to spread it out carefully so the pasta shapes don’t stick together as they dry. It only takes an few hours to dry and then it’s ready to use straight away.
14. Rainbow Oobleck
Oobleck is great sensory fun for children of all ages. All you need to make it is cornflour and water but you can also add colour and extra sensory elements with food colouring, scented herbs, flavoured oils, flowers and other natural materials.
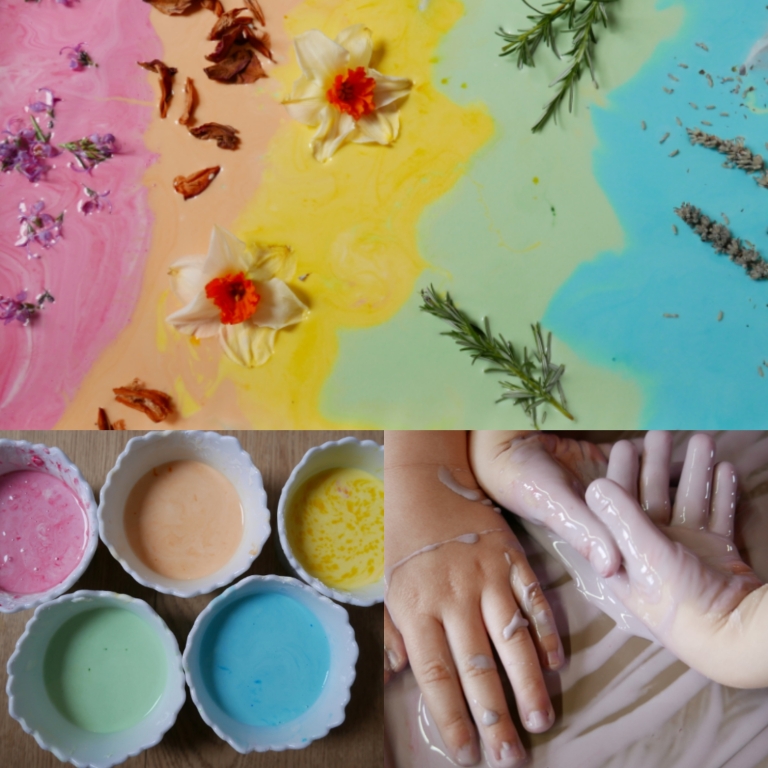
Oobleck is named after a Dr Seuss story and its a non-Newtonian fluid. This means it acts like a liquid when its relaxed or being poured, but when you push, squeeze or exert any kind if force onto it, it becomes temporarily solid. This makes it a fantastic material for tactile and sensory play. It’s also taste safe and non toxic (although I wouldn’t let any children try to actually eat it.)
To make basic Oobleck all you need is cornflour and warm water. Simply add and stir small amounts of water into the cornflour until it forms a thick gloopy liquid. You can also add colour to your ooblock by mixing in small amounts of food colouring or non toxic paint. How about making a rainbow by mixing up several colours and then carefully pouring them one by one into a tray.
You can also add additional tactile and sensory elements to the oobleck using scented herbs like mint, rosemary, basil, sage and thyme. Flowers like lavender and rose petals are also great for sensory play. Or how about trying scents using spices like ginger and cinnamon, food flavourings like mint an
15. Sensory rainbow rice
Multi sensory scented rainbow rice is such a wonderful invitation to play, It smells divine, looks beautiful, is really tactile and fun to run your hands through and it even makes interesting sounds when you pour and shake it. The best thing is that’s it’s so cheap and easy to make. All you need is some rice, food colouring (or paint) and some herbs, spices or baking essences for the scent.
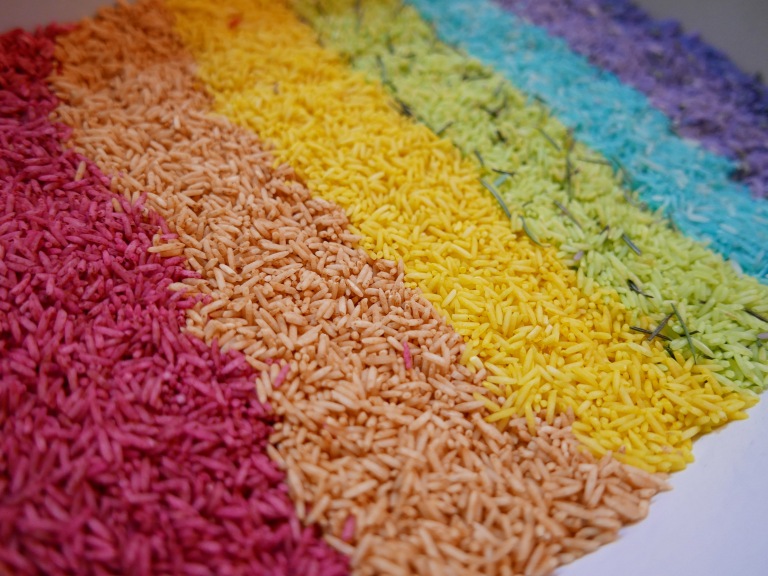
Simply add one teaspoon of food colouring and four tablespoons of water into a bowl. Add the rice and stir until the rice is well coated with the colouring. You could also use paint instead of food colouring, both work equally well. Next all you need to do is add a tablespoon or two of whichever spice, herb or essence you wish to use for the scent. Then simply spread the rice out on a tray to dry for a few hours.
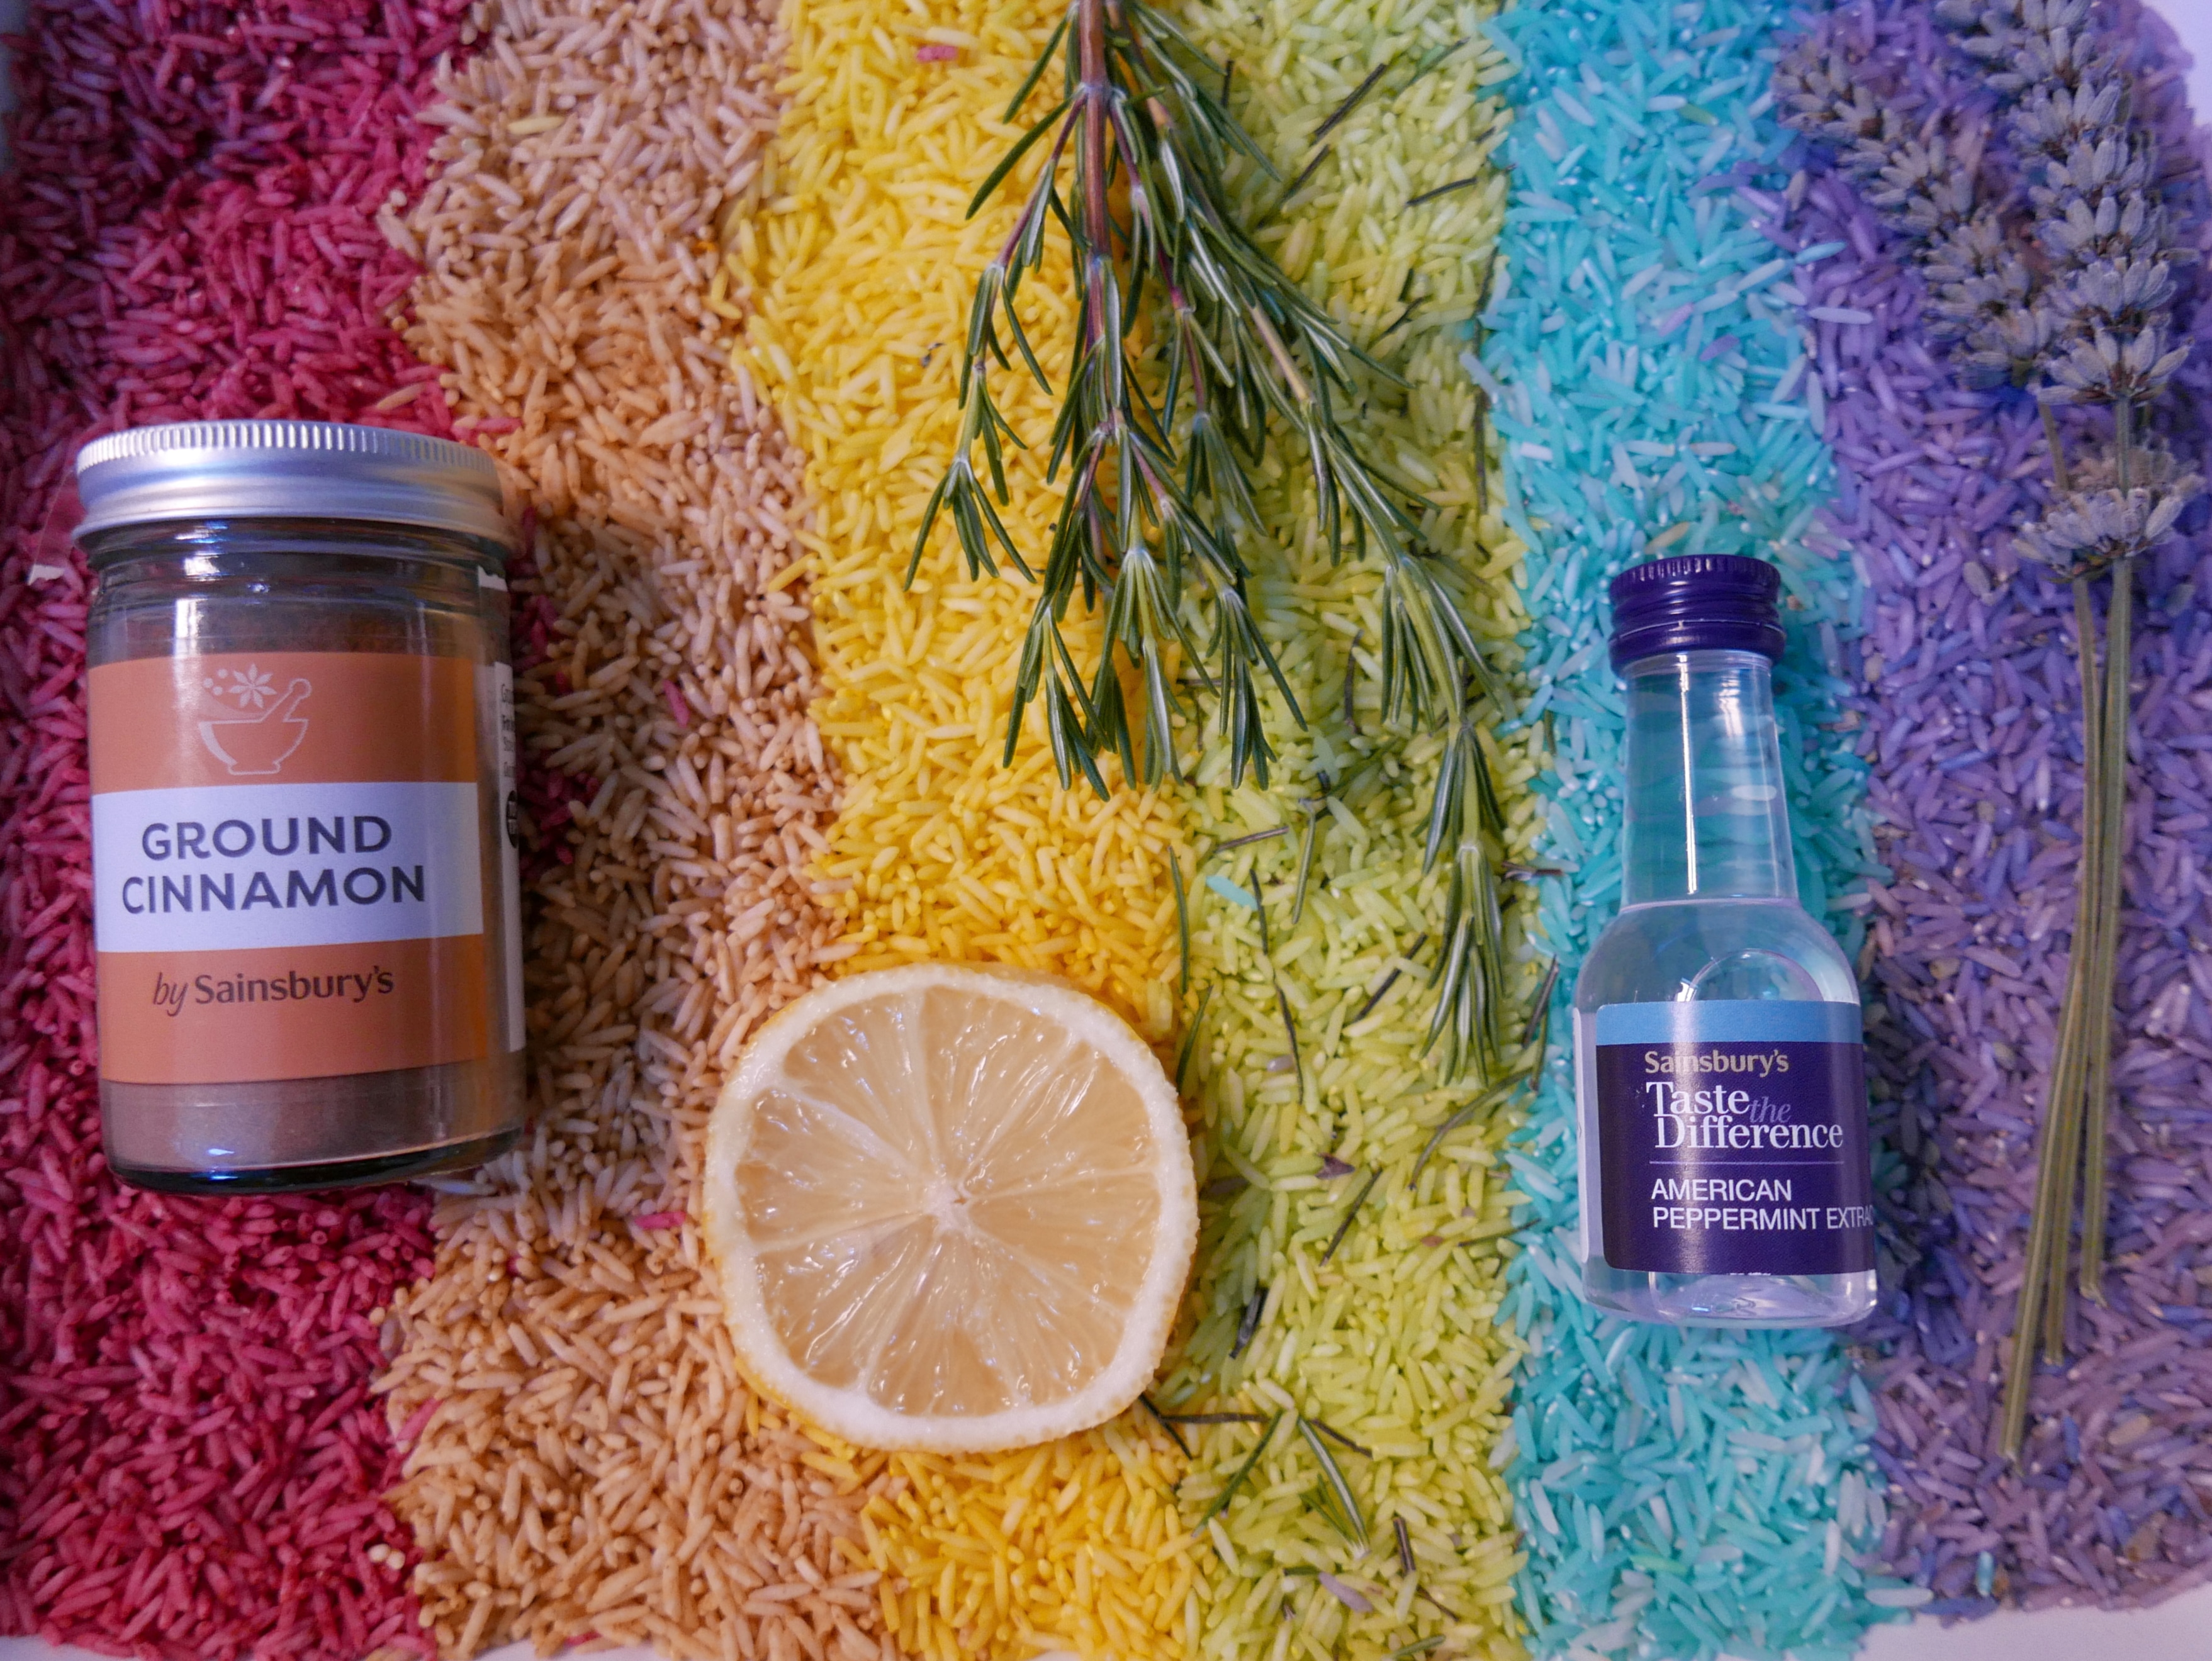
We made a rainbow of different colours and scents. But you can make as many or as few as you like. How about mixing the rice up to make pretty and environmentally friendly confetti to sprinkle or use in arts and crafts as decoration. You can also use the rice in sensory trays, mud kitchens or even as part of a small world set up.
16. Rainbow ice blocks
Rainbow ice blocks are fun to play with, easy to make and look beautiful. You can use them for building and STEM activities as well as sensory and exploratory play. To make a rainbow ice block simply mix water based paint or food colouring with water. When you have mixed up a range of colours you can then carefully pour and freeze each layer of colour in a plastic container. You need to freeze each layer one at a time, one after the other.
Or you could make simpler ice blocks in seperate colours by pouring each colour into a yogurt pot or silicone mould. Children will then have fun finding all the different ways to build and play with them as well as having fun to sliding them around on the tray as they melt.
17. Sensory rainbow ice cubes
Ice is a wonderful material for sensory play and exploration. All you need for this activity is an ice cube tray, water and a range of edible sensory materials like scented herbs, edible flowers, fruits or food flavourings. Lavender and mint also wonderfully calming herbs to use, but you could also use uplifting fresh citrus fruit slices. You can find a handy list of edible sensory material ideas below for inspiration.

-
- Scented herbs like Lavender, Basil, Rosemary, Lemon Balm, Marjoram, Sage, Thyme, Oregano, Parsley and Chives.
-
- Edible flowers like Roses, Dandelions, Elderflower, Marigolds, Nasturtiums, Borage, Pansy’s or Primroses.
-
- Citrus fruit slices or citrus peel play shapes like oranges, lemons, limes or grapefruit.
-
- Other chopped fruits like strawberries, melon, raspberries, blackberries, apple, plum, peach or grape quarters.
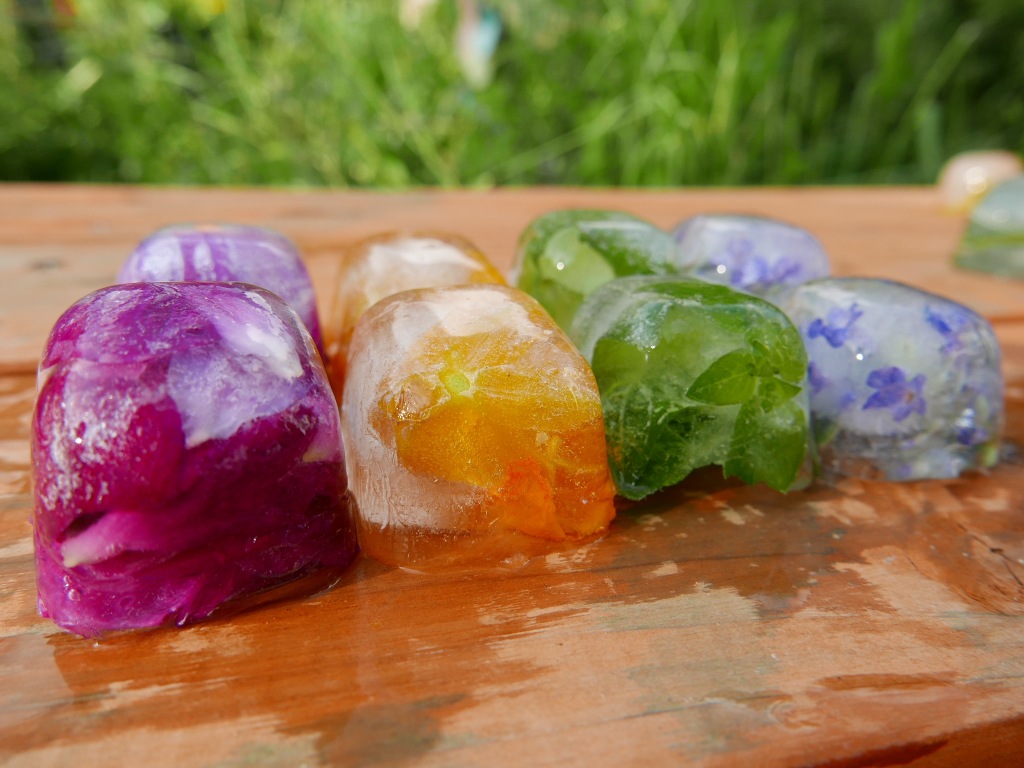
Simply place a selection of different coloured sensory materials into the ice cube tray and then fill it with water. Place the tray in a freezer for a few hours or overnight to freeze. Then pop out the ice cubes and enjoy them in sensory play. You could also incorporate them into water play or use them in pretend play with mud kitchens. The children will enjoy exploring all the different scents, tastes and textures as the ice melts. *Please just be aware of the choking hazard of the ice cubes or any other materials you use with small children.
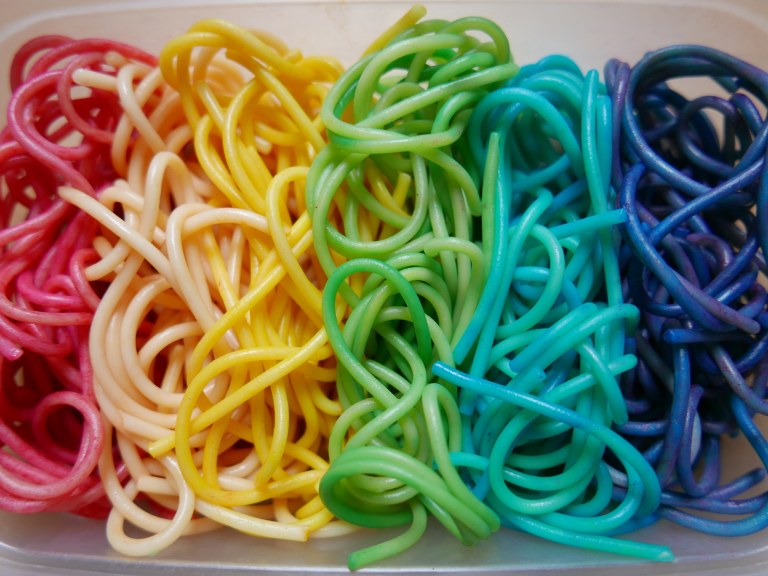
18. Rainbow Spaghetti
Rainbow Spaghetti is a great taste safe and inviting sensory play material. We love making sensory play things from kitchen cupboard ingredients as it’s cheap, easy to make and environmentally friendly. (You can easily compost it after use.) All you need to make this it is some cooked spaghetti and food colouring. It helps to cook the spaghetti for 2 minutes less than you normally would, so it’s a bit firmer and keeps it’s shape better during play. Simply stir the spaghetti into some food colouring until it’s fully coated. You can always add in more food colouring and or water if needs be, or drain off any excess liquid if you accidently add too much. Leave the spaghetti to dry off a little so the food colouring has set. Then keep it in an airtight container in the fridge until you are ready to play.
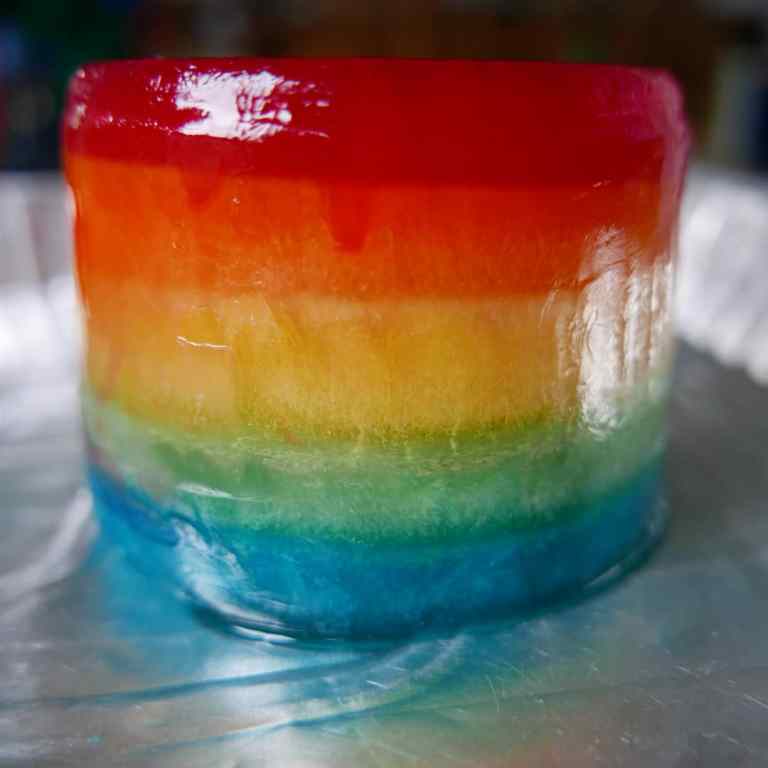
19. Rainbow jelly
Rainbow jelly is a bright, colourful and tasty addition to sensory play. You can easily use ready to make packets or cubes of coloured jelly or make your own using Gelatin or Agar Agar and food colouring. All you need to do is make up the jelly in a range of rainbow colours. If your making your own jelly (using gelatin or agar agar) you could also add in different flavourings and scents.

When your jelly is set and ready to play with simply set it out on a tray for the children to explore and enjoy. It’s great for sensory play, small world and science experiments as it’s tactile, edible, smells great and also very versatile.
20. Rainbow Cardboard Puzzles
It’s so incredibly easy to make your own rainbow puzzles using just cardboard, glue and paint. These are great for encouraging problem solving and fine motor skills. You can make them any shape you like, we choose to make ours heart shaped. First you need two pieces of cardboard cut to equal size. Cardboard boxes cut up work perfectly for this. You can make your puzzles as big or as small as you like.
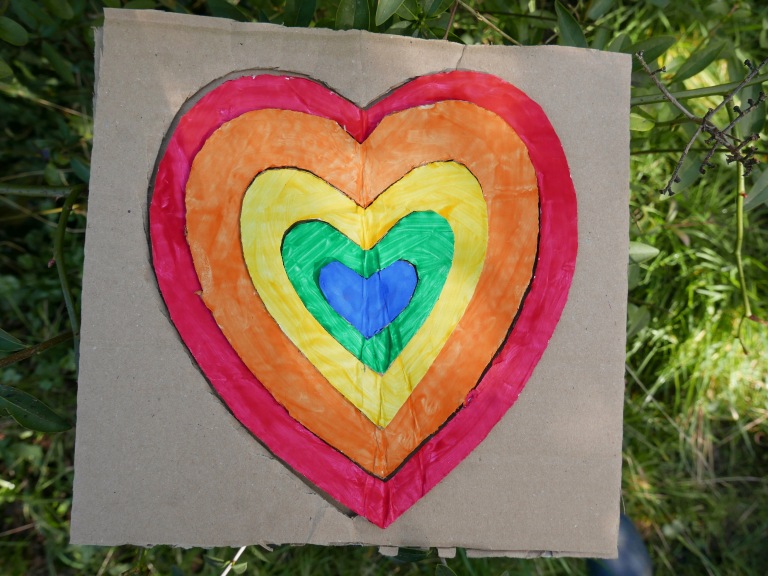
Fold one of the cardboard pieces in half. Then cutting from the edge of the fold, cut half a heart shape or a rainbow stripe shape. Then cut a smaller heart or rainbow stripe inside or under that shape and so on and so forth until you have 5 heart or rainbow shapes.
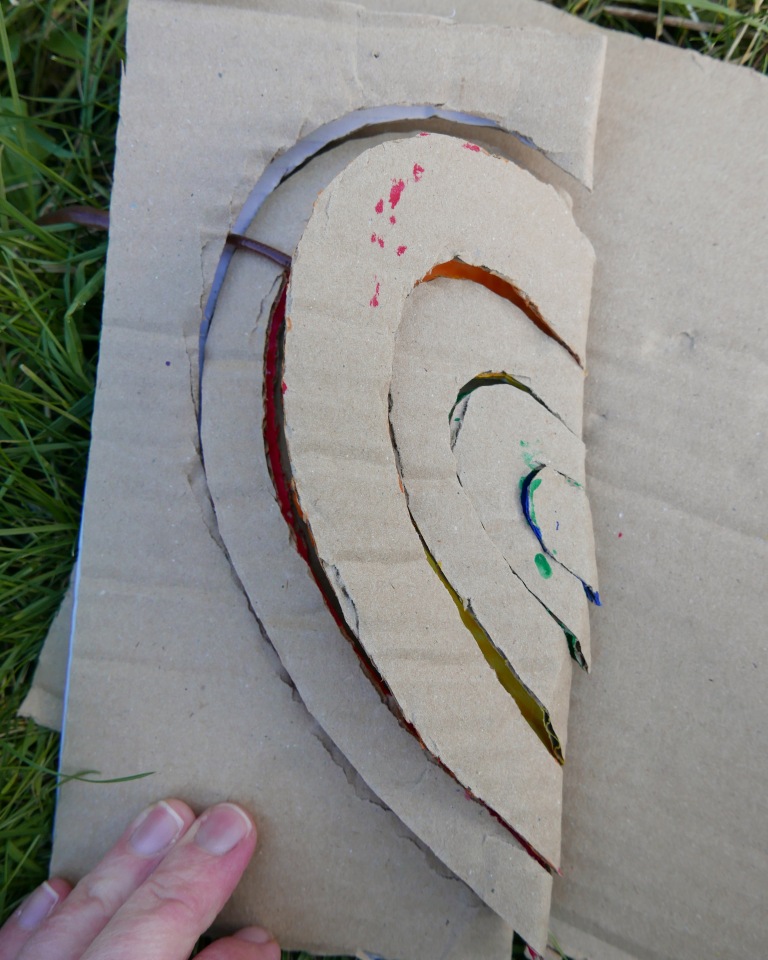
When you unfold the cardboard you should now have 5 complete heart rings and a square piece of cardboard with a large heart shaped hole. Glue the square piece with the heart shaped hole onto the other original piece of cardboard. Now you you can paint each heart shaped ring a different colour of the rainbow and then leave them to dry. When your puzzle is dry its ready to play with. Have fun arranging and fitting the heart rings into your puzzle. The puzzle pieces are also fun to use separately in loose parts play. Children will enjoy finding their own different uses for the shapes in play.

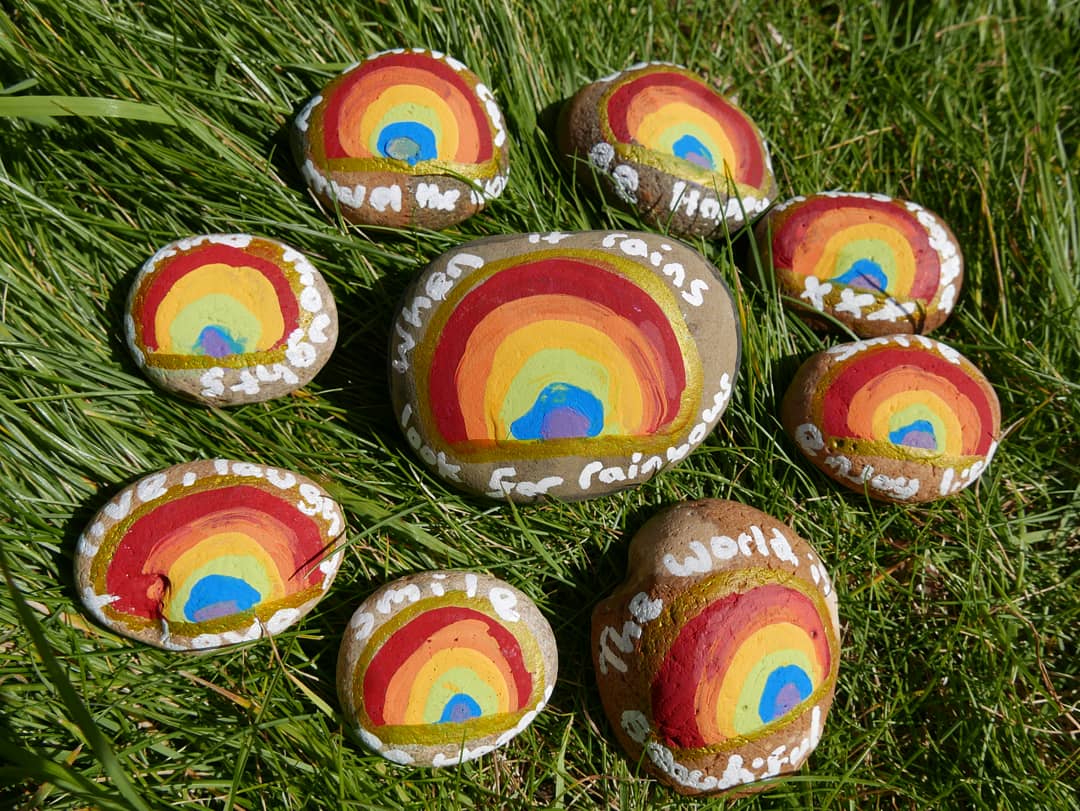
21. Rainbow painted pebbles.
We love finding painted pebbles when we are out and about, it’s wonderful to see the creativity and love that people put into them and they always brighten our day. You can easily find pebbles to decorate yourself by looking in your garden, on a nature walk or along the shore. All you need then is some paint or permanent markers to paint or draw colourful rainbow designs onto the pebbles. How about writing some positive messages on the pebbles as well to brighten someone’s day. Once you have finished painting your pebbles you could hide them in your garden or around a local park for other people to find. You could even use them counters for games like noughts and crosses, snakes and ladders and checkers.
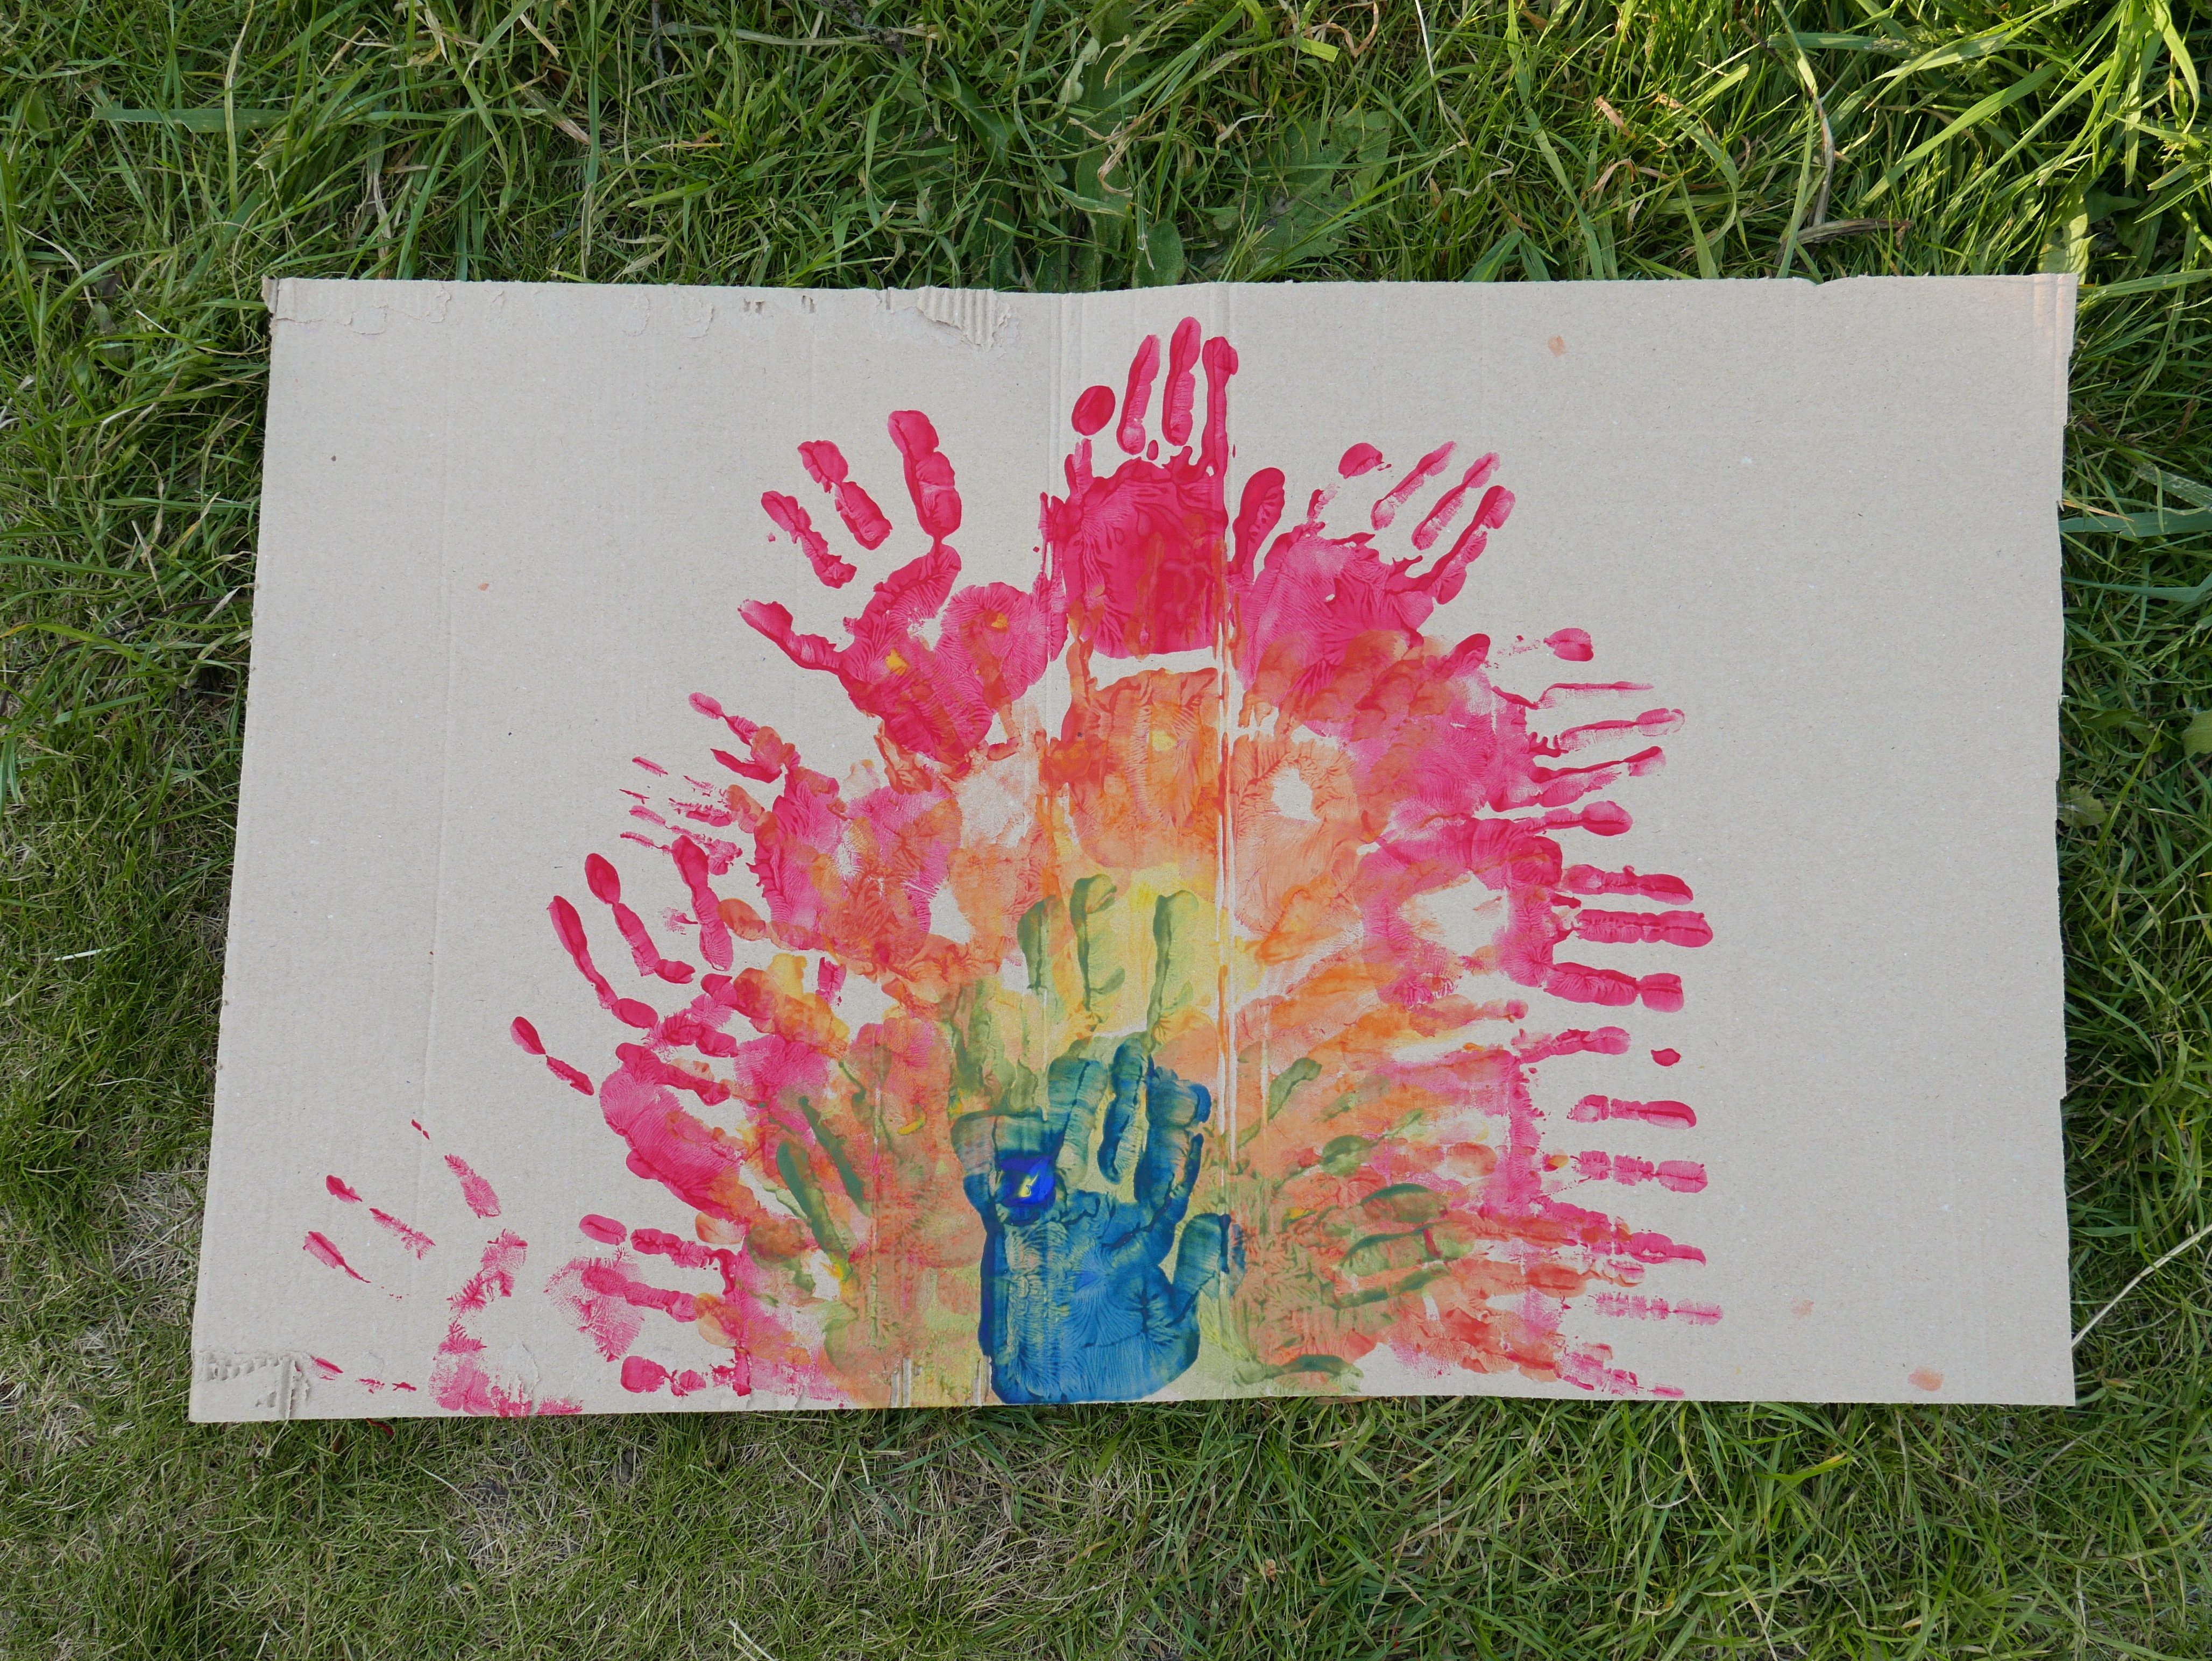
22. Handprint rainbows
A messy fun activity that only requires paint and a surface to paint on. We used a recycled piece of cardboard but you could paint onto any surface you can think of. Simply dip your hands in paint (one colour at a time) and print them onto the surface in a rainbow like arch shape. Starting with red and then moving through, orange, yellow, green, blue and violet until you have printed all the colours of a rainbow.
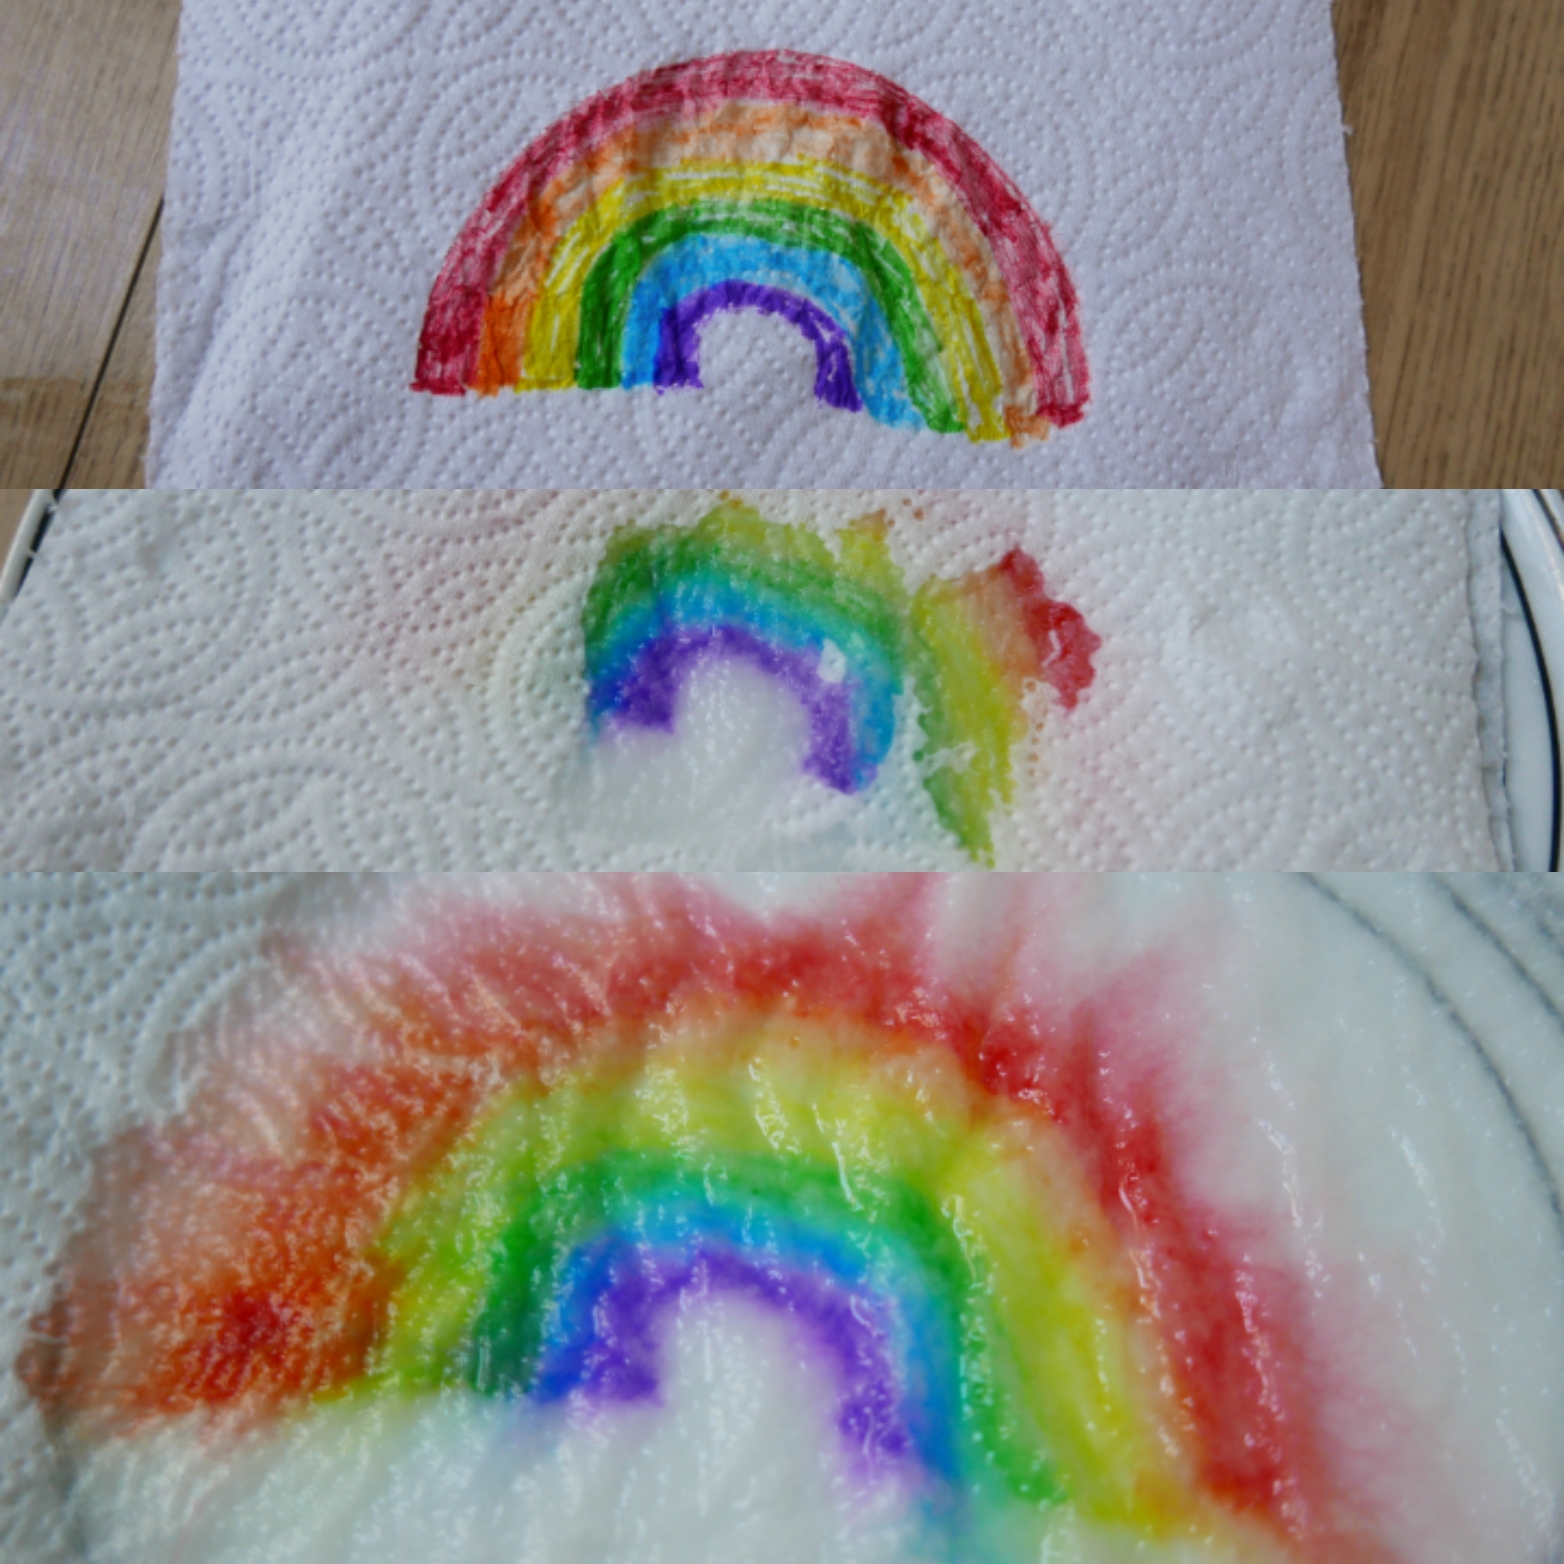
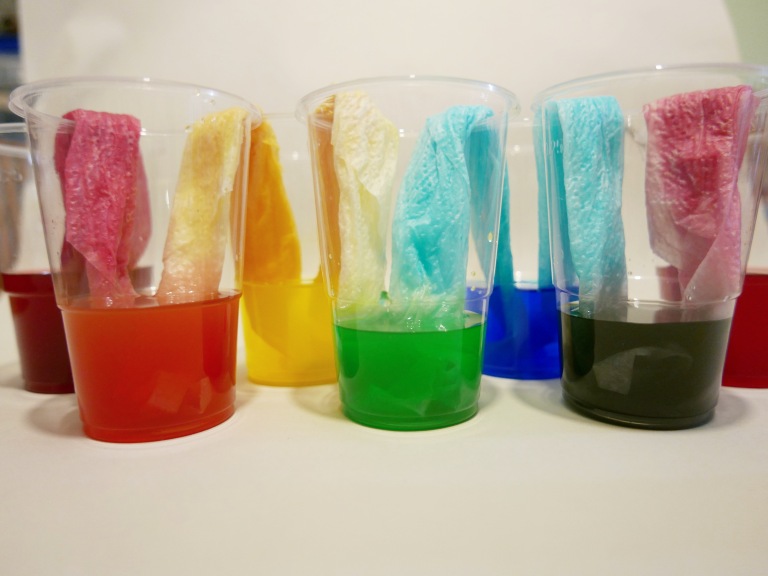
23. Magic rainbow trick
A really quick activity using just paper towels, pens and water. Simply draw a rainbow onto a paper kitchen towel. Then cover the drawing with another paper towel to hide it. Place both towels together onto a plate covered in water. When the towels absorb the water the colours of the rainbow seem to magically appear.
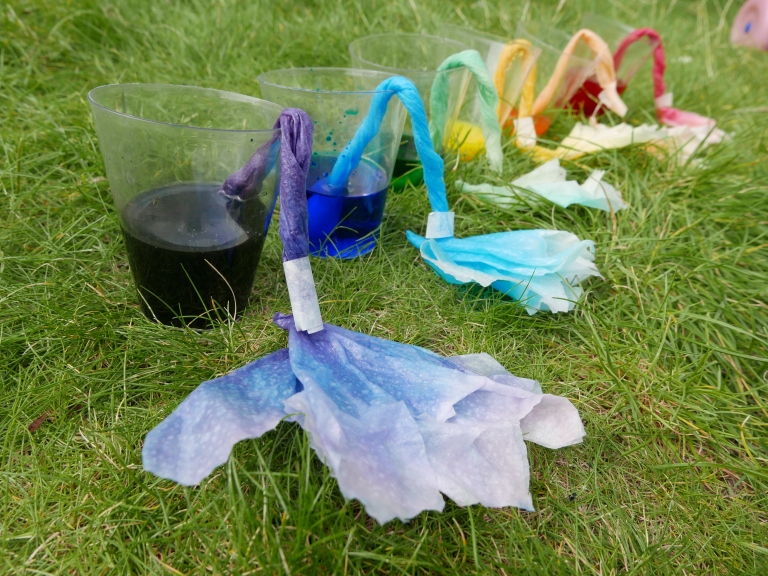
24. Walking water experiment
A colourful science experiment that demonstrates colour theory and the capillary action (which is how water moves up plant stems.) The water walks ‘magically’ from cup to cup and mixes the colours as it goes. First line up 3 empty containers on a tray, then fill the remaining 4 containers with water (over half full) and mix food colours into each so that you have a line of colours in this order red, yellow, blue and red again. These are your primary colours, primary colours are colours that can’t be made from mixing other colours but you can make new colours when you mix them together.
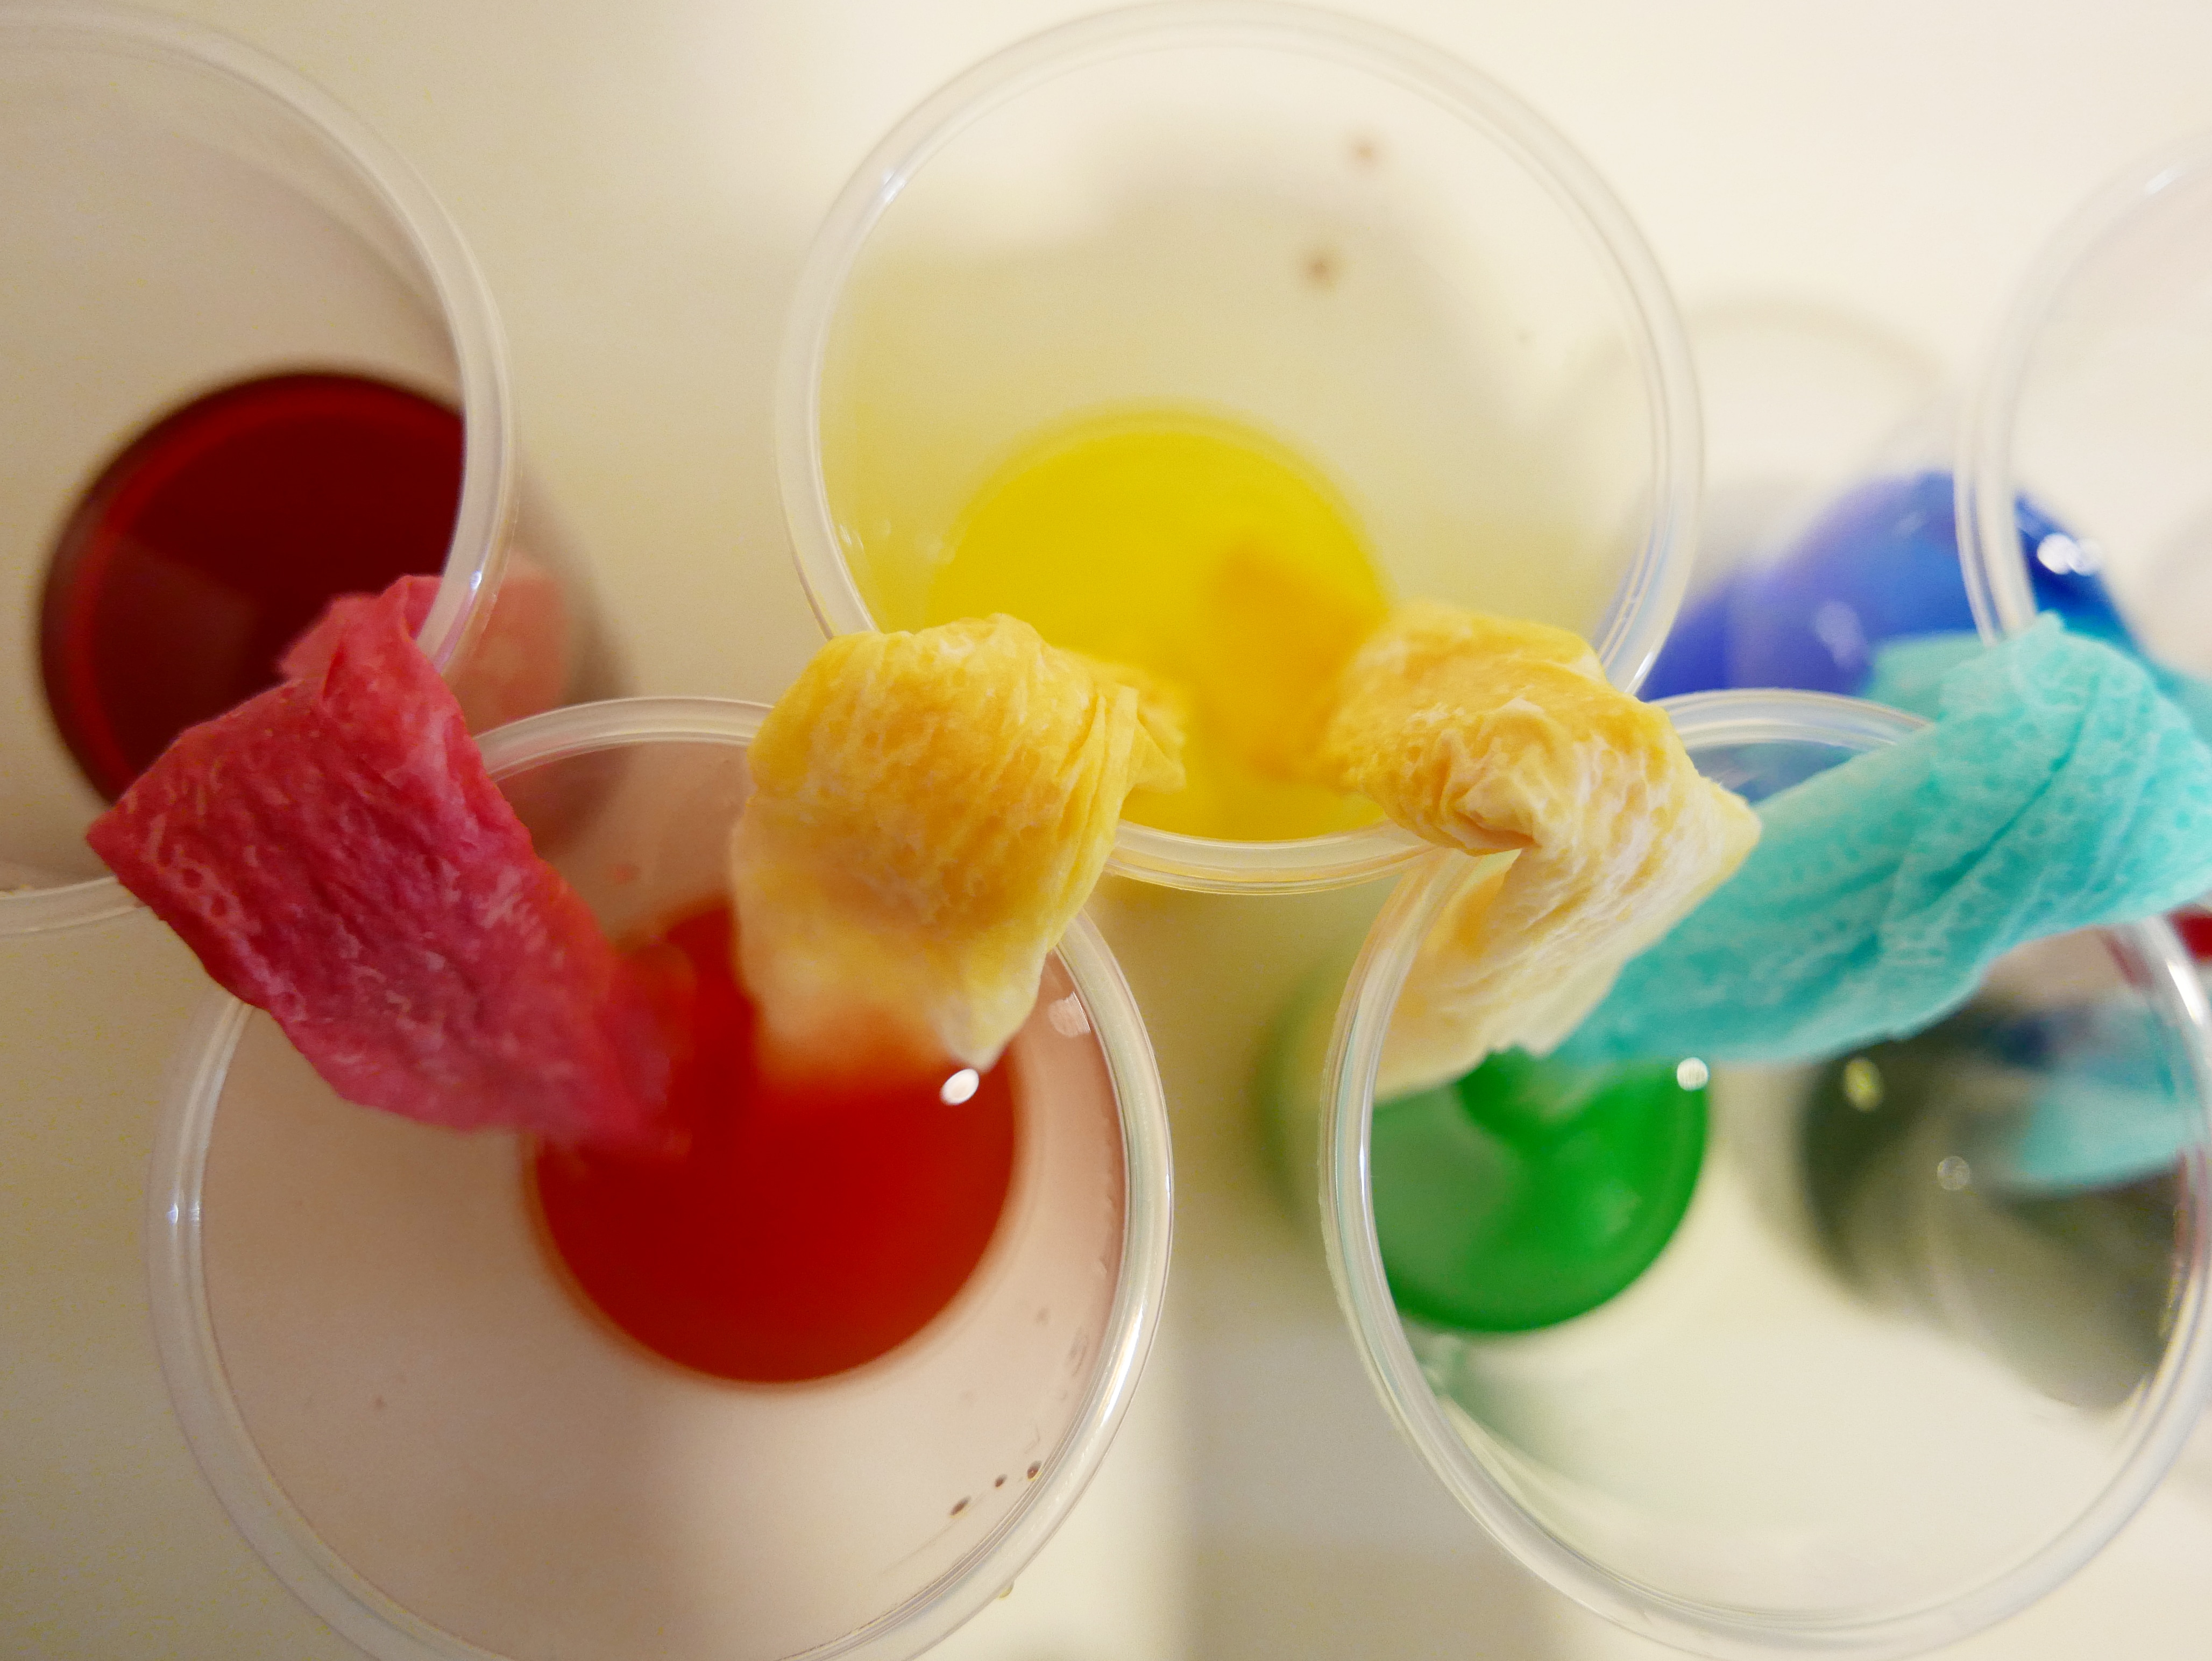
Line your 7 containers up in the following order 1. red, 2. empty, 3. yellow, 4. empty, 5. blue, 5. empty and finally 7. red. Take your 6 paper towels and individually fold it twist each one into a strip. Fold the strip in the middle and place it over the edge of two containers. Starting from red to empty. So one end dangles in a coloured liquid and the other dangles into an empty container. Then place another from the empty to the yellow. Do this repeatedly along the row until each container is connected in line of towels. The paper towels will start to soak up the water and eventually the water will travel up the paper and over into the next container. This is called the capillary action.
If you leave the containers for a few hours eventually all the empty cups will have filled part way up with water. As each of the different primary colours mixes together they form new secondary colours. Your red and yellow should have combined to make orange, the yellow and blue should have made green and the last blue and red should have made purple. This is a lovely visual demonstration of colour theory in action.
25. Capillary action experiment
A simple, colourful experiment that demonstrates the capillary action in plants (a clever trick plants use to transport water from the roots, up the stem and through to the rest of the plant.) using just a few paper towels, food colouring and water. We will also teach you how to make some beautiful paper towel flowers to use in your experiment. Click here to find out how to set up this experiment.
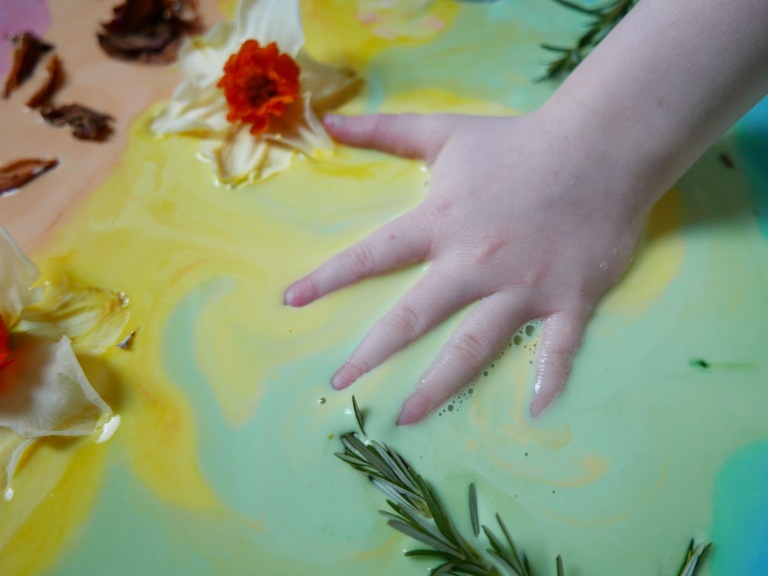
26. Rainbow marbled milk
All you need for this colourful activity is a bowl or tray of milk and either food colouring, paint or natural dyes. Simply squirt or drop colours into the milk using eye droppers or pipettes. As you squirt the colours into the milk they will swirl and move around to create a beautiful marbled effect as the colours create fine thin ribbons in the milk.


27. Rainbow acorns or conkers
Painting acorns is a great way to develop fine motor skills in children of all ages. You can use poster paint, acrylic paint or even nail varnish to paint your acorns. Or have fun decorating them with pens, chalk or collaging and gluing scrap pieces of paper or fabric onto them.

You can use your painted acorns in pretend play, loose parts play, as story props or decorations. You could even tie them to string, wool, or ribbon and hang them up as bunting or turn them into necklaces, bracelets or crowns. The possibilities are as endless as your imagination.

28. Rainbow painted conkers
You can use poster paint, acrylic paint or even nail varnish to paint conkers. Or have fun decorating them with pens, chalk or collaging and gluing scrap pieces of paper or fabric onto them. You can use your painted conkers in pretend play, loose parts play, as story props or decorations

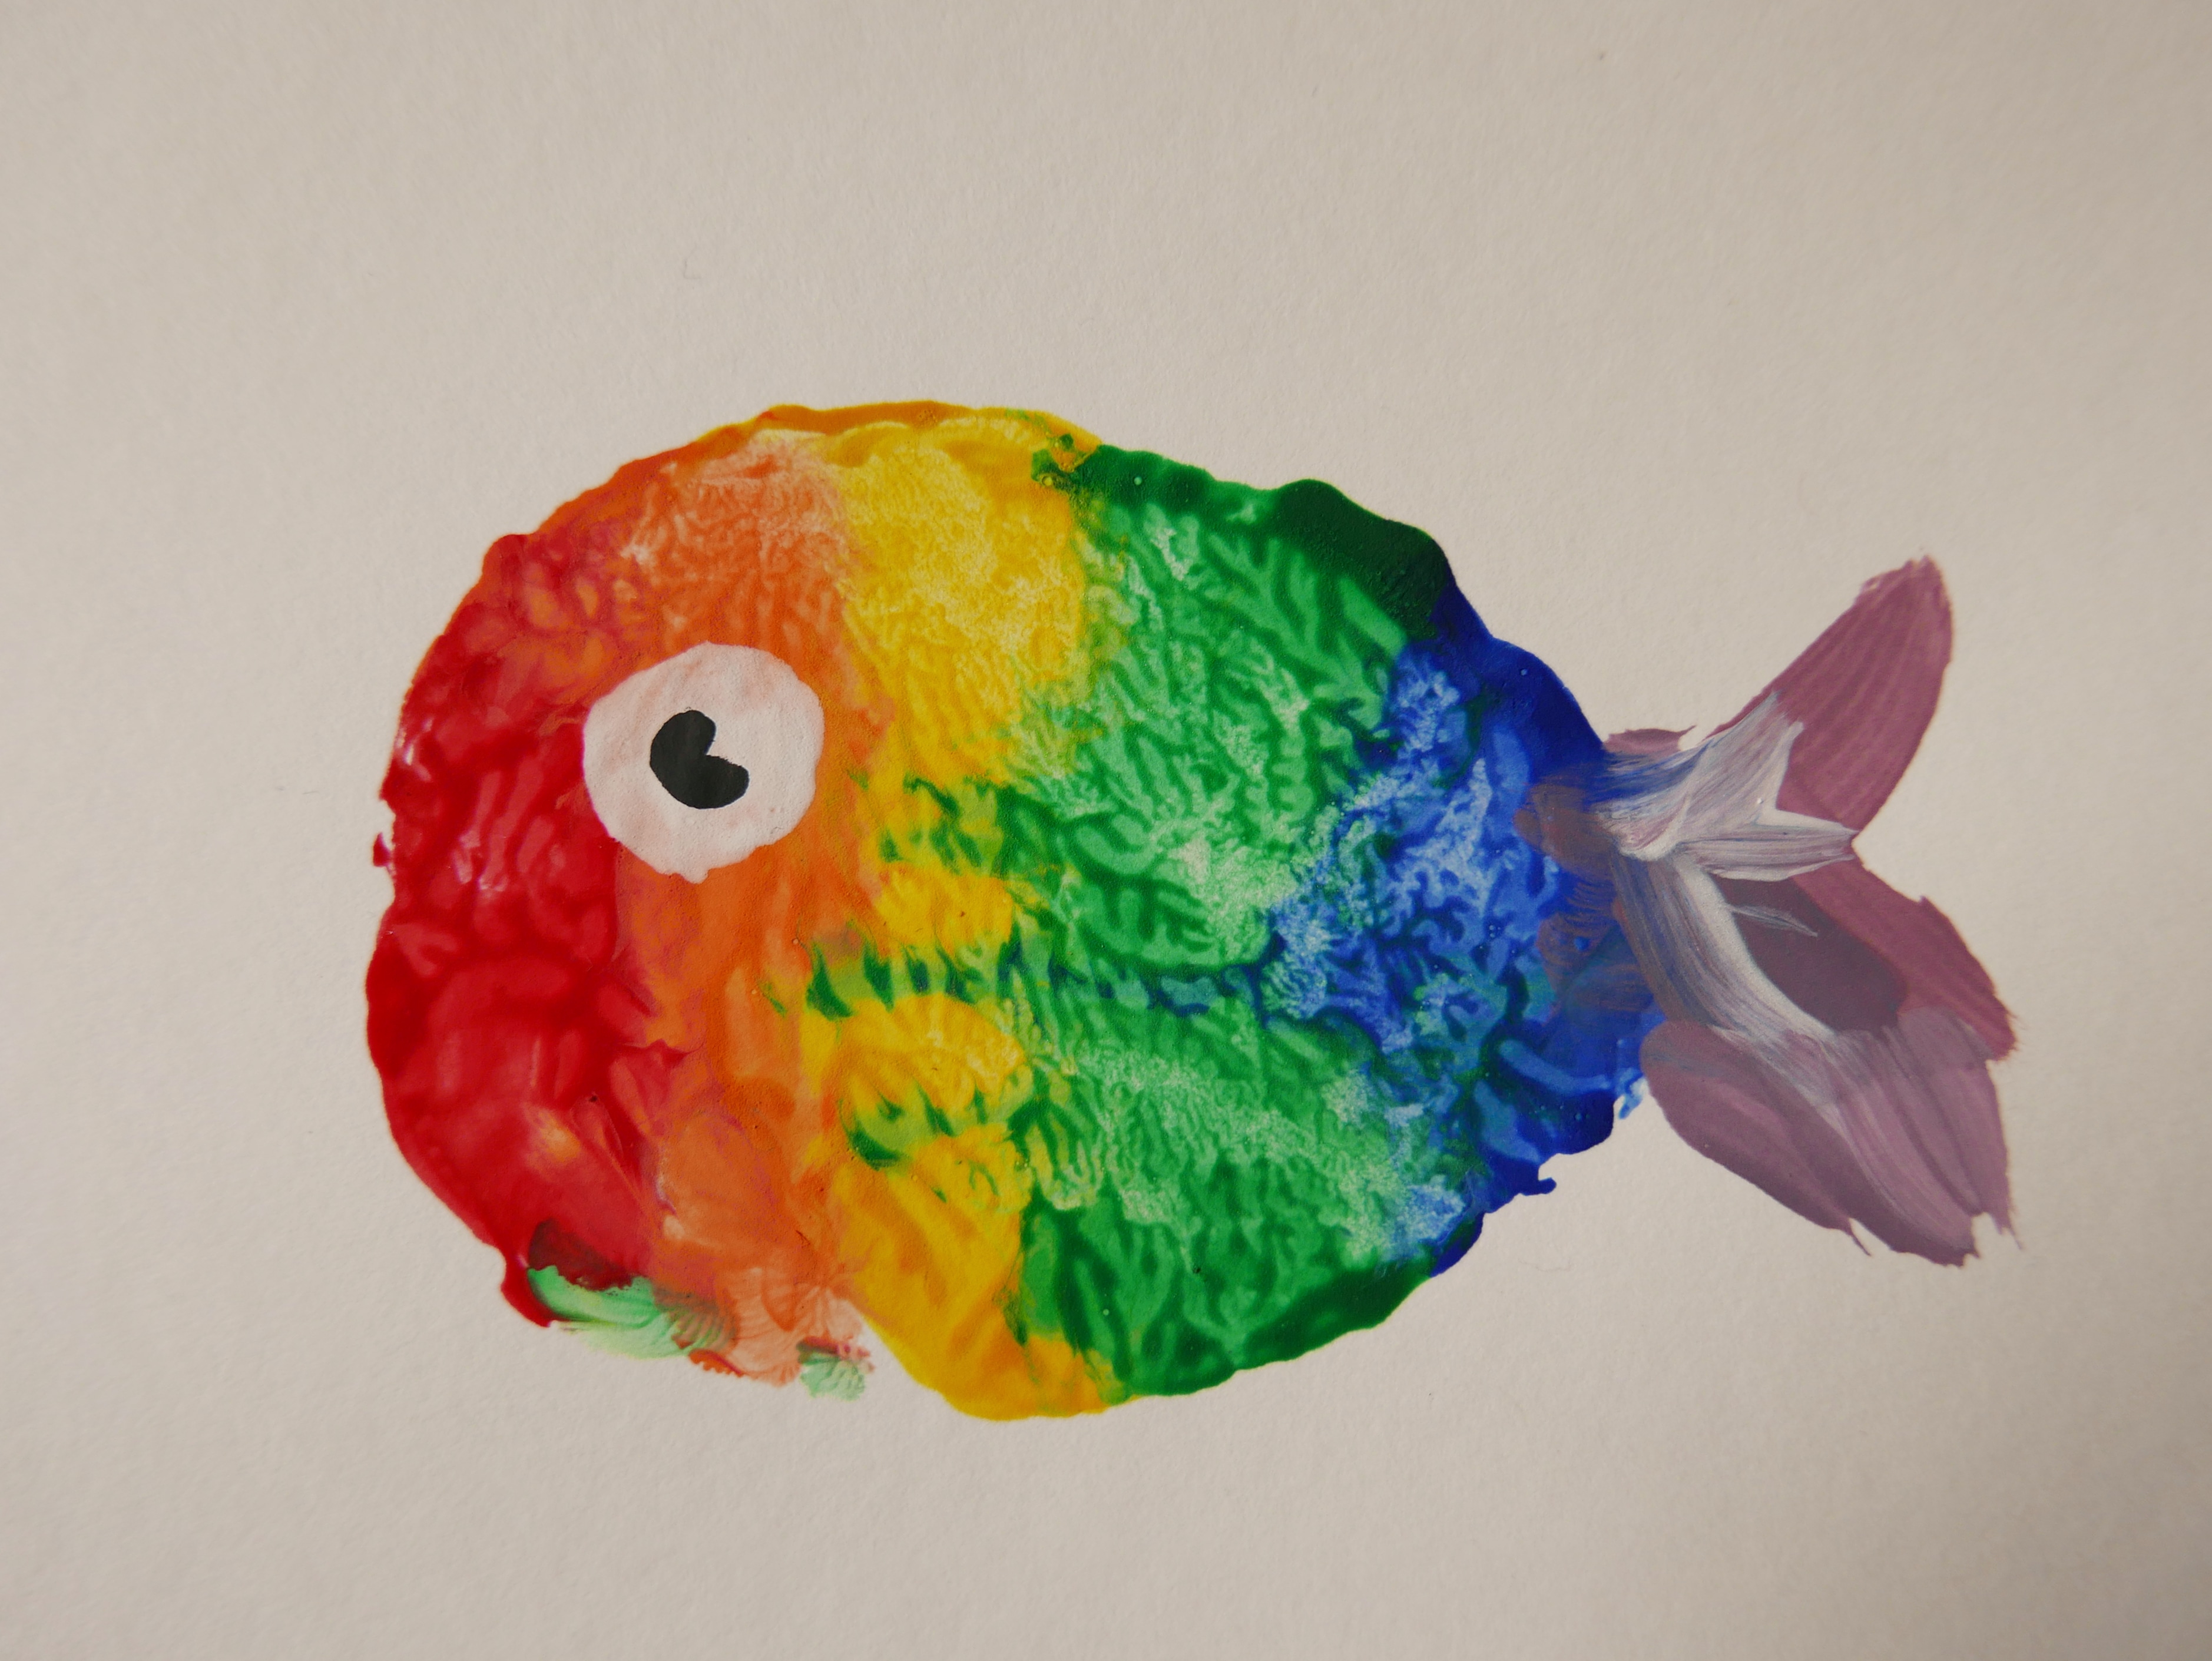
29. Rainbow fish potato prints
Potato printing is a simple activity for children of ages, all you need is a potato cut in half, a bit of inspiration and some paint to get started. You could use potato prints for sensory play or to make pictures, patterns cards and even recyclable wrapping paper. It can also fun to experiment printing on different types of surfaces and textures from paper to fabric, foil and wood. And as long as you use non toxic paint you can even print on outdoor surfaces like paths, trees and leaves.
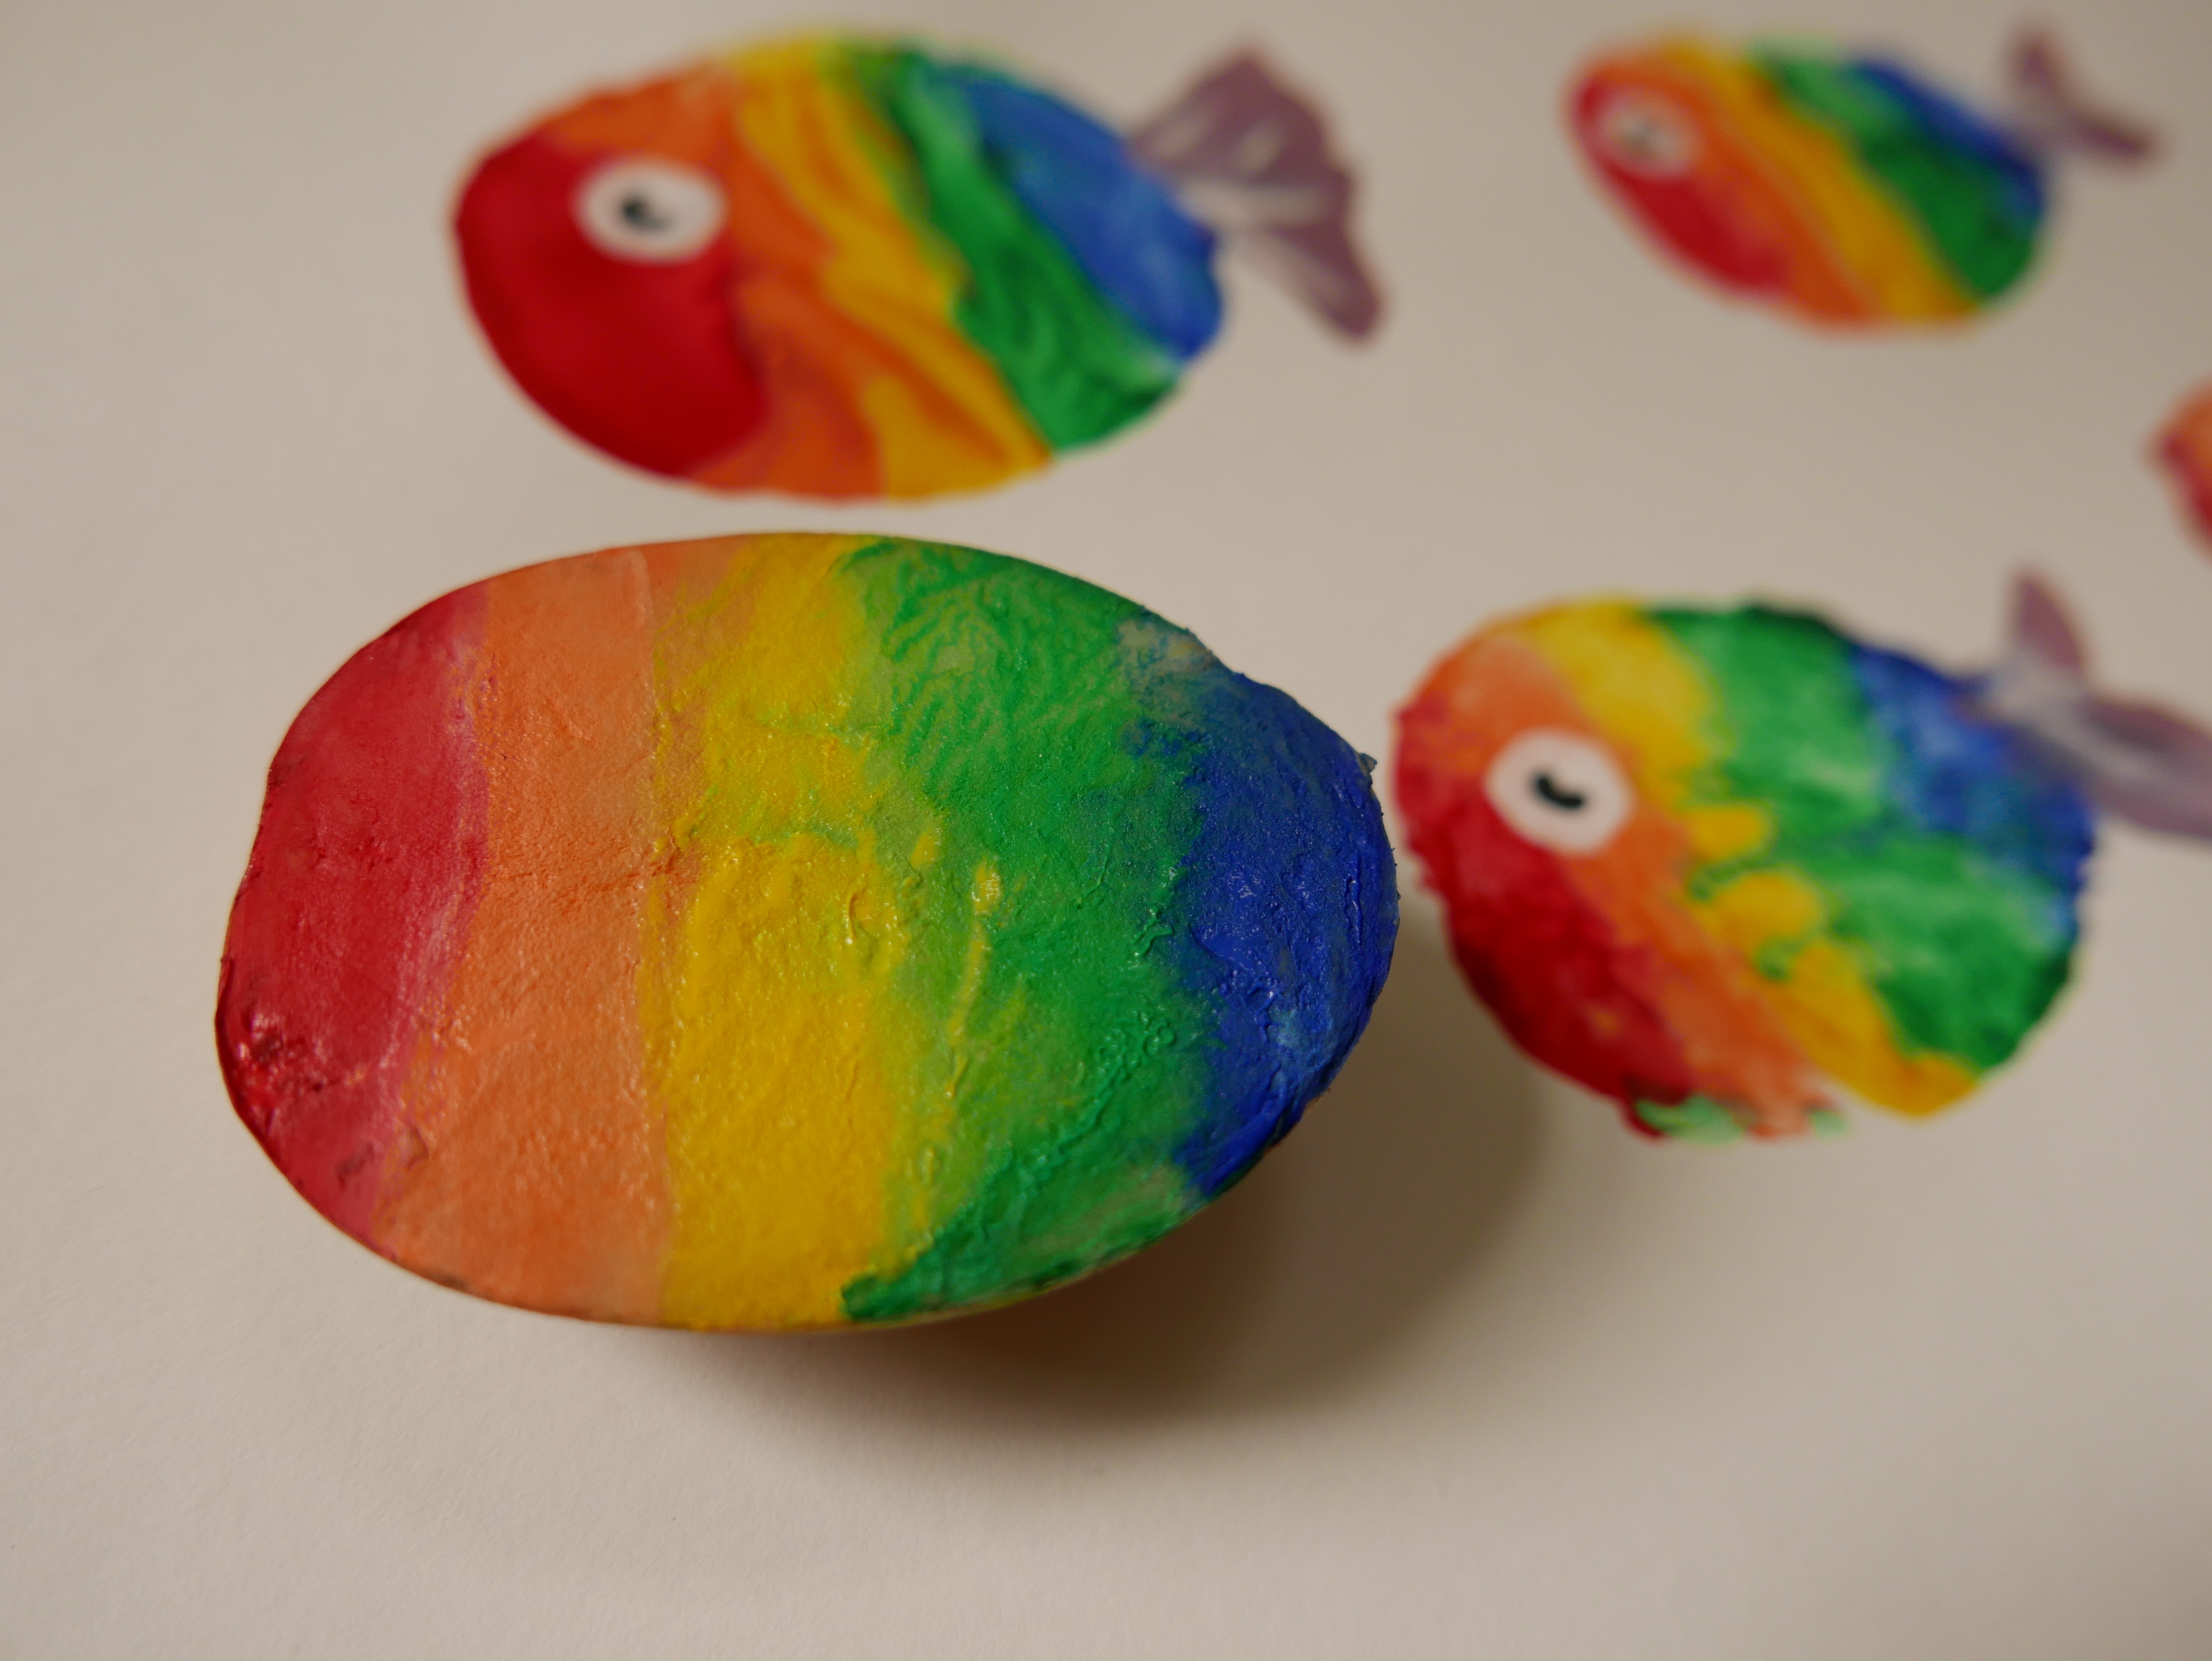
Rainbow fish potato prints are so simple to do. You just need to dip a half of a potato into rainbow colours onto the potato and then print it onto the paper. Once the print has dried you can paint, stick or draw on an eye and a tail.
If you like this you might like to try:

16 Weather science and sensory activity ideas

8 Rain Science experiments and activity ideas
30+ Snow science and sensory activity ideas

