
We hate to waste anything and recycling and reusing materials is one of many small things we can all do to help the environment. So instead of chucking used cardboard boxes we like to find ways to use them in crafts and activities.
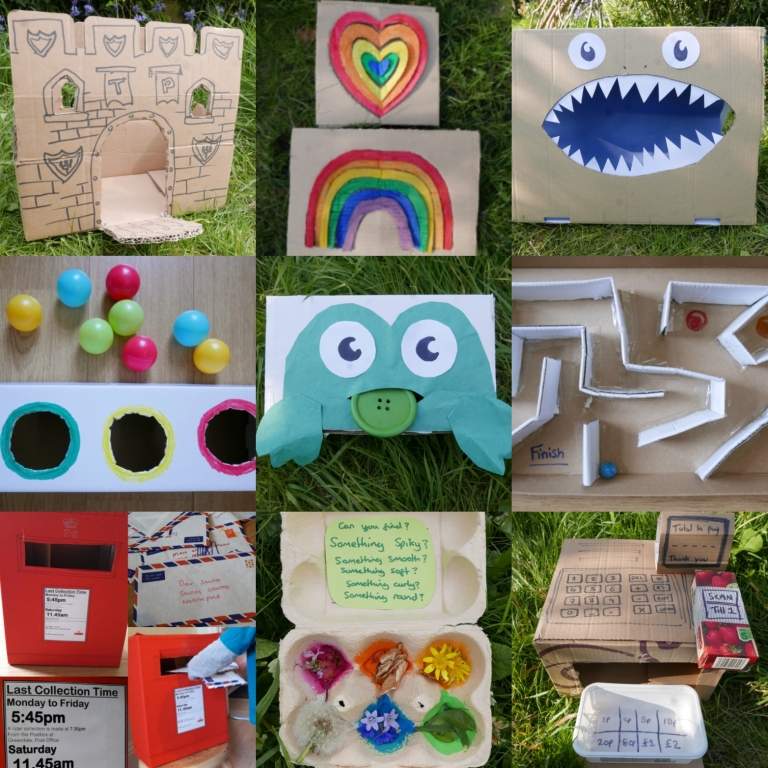
Here are 25 simple and easy cardboard activity ideas to try, From shape sorters, marble mazes, castles and animal feeding games to nature hunts, post boxes, paint trails, shop tills and moving conveyor belts. There are lots of fun ideas here for children of all ages to enjoy and explore.
1. Colour and shape sorters
You can make a colour or shape sorter out of any size or shape of box. All you need to do is cut holes of different shapes or sizes into the top of the box. Children can then have fun posting and drop objects through. This a great activity for developing fine motor skills and spacial awareness.

You can also use it to teach children colour recognition. Simply paint or draw a different colour around the edges of each hole. Then children can enjoy matching the colour of the objects to the colours of the holes. You can use any objects to post from balls and toys to rolled up socks and spoons. Or you could even cut some out cardboard shapes for them to sort and post.
Note: Don’t forget to make sure you have a way of getting the objects out, either by being able to open the box or by cutting a hole in the back or bottom so the children can retrieve anything that’s posted through.
2. Shark attack target practice.

This is brilliant game for children of all ages! They will love the challenge of throwing and kicking balls into the mouth for the shark to eat. It’s great for developing strength, coordination and spacial awareness.
All you need is a carboard box (or piece of cardboard big enough to fold into a triangle) and some paper. First cut an oval shaped hole into the front face of the box to form the sharks mouth.
Then cut some teeth shapes out of the paper to tape or glue around the inside of the mouth. Its slightly easier to cut and stick the teeth individually than it is to cut them out in one go.

Next cut two circles out of paper to make the sharks eyes. Draw or paint on some black pupils and stick them onto the box sharks face.
If you want you could line the inside of the mouth with coloured paper or paint like we did but this isn’t necessary. Your shark is now finished and ready to use.
Have fun using it for target practice using balls, bean bags, rolled up socks, or even pine cones.
3. Feed the frog

Feeding the frog is a cute little activity that’s perfect for developing fine motor skills and stimulating imaginative play. All you need is a cardboard box and paper or paint.
First cut a mouth shaped hole into the side or top of a box. Then cut a simple frog shape out of paper (you could also use tissue paper or even old wrapping paper). Make sure to cut another mouth hole into the paper before you stick it onto the box.

Next cut out some little frog feet and two eyes out of paper. Stick all the pieces onto the box and your little frog is ready to feed. The children can have fun feeding the frog anything they like or can find, from grass, sticks and stones* to pieces of card, jam jar lids or milk bottle tops*. You could even stick or draw pictures of flies and insects onto them.
Notes: * Please always be aware of the choking hazard of small objects and never leave young children unsupervised. Don’t forget to make sure you have a way of getting the objects out, either by being able to open the box or by cutting a hole in the back or bottom so the children can retrieve anything that’s posted through.
4. Post box fun and games
Posting letters is a great activity for developing fine motor skills, roleplay and imaginative play.

Simply cut a rectangular post hole into the front of a box, then cut a hole or door into the back of the box so children can retrieve any letters they post.
Next paint or colour the box in red or cover it with red paper. Voila one passable post box. If you wanted to you could also use black pen to add in some detailing and print a collection times sign for the front (you can easily find one online or make one up in a word programme like we did). But you don’t have to add anything extra if you don’t want to.

Now the children can enjoy writing letters and addressing envelopes to imaginary friends, people and places. Even if the children are too young to write they will enjoy pretend scribbling made up addresses with you. (As well as giggling at the silly places and people you can come up with – Man on the Moon and Dear Spider, Spiders Web, The Shed for example).
You can use cheap stickers of any shapes and sizes for them to stick on as stamps. If you happen to have any ink stampers they can also pretend to frank the post. Kitchen scales are also great for weighing post and you can also make pretend parcels and boxes for variety.
An old satchel or bag makes a great postbag for delivering the mail and hats and jackets of any kind can add to the roleplay fun.
5. Feeding baby bear (Goldilocks and the Three Bears)
Feeding baby bear porridge is a another great activity for developing fine motor skills and stimulating imaginative play. All you need is a cardboard box and some oats or cereal and a spoon.

First you need to draw, paint or stick a picture of a baby bear onto the card board box. Then cut a hole for the mouth. The children can then have fun spoon feeding the bear porridge oats or cereal.

You could even read the story of Goldilocks and the Three Bears alongside this activity.
6. Feed the Hungry Caterpillar game
Another easy activity for little learners that helps develop fine motor skills. This time the children can enjoy feeding the hungry caterpillar different types of food.

All you need is a cardboard box and some jam jar lids. Simply draw or paint a Hungry Caterpillar figure onto the box and cut a slot in the mouth area that’s wide enough to post the jam jar lids through.

You can draw, paint or stick pictures of food onto the jam jar lids. Then the children can have fun feeding them to the caterpillar.
Again you could enjoy reading the Hungry Caterpillar story alongside this activity.
7. Eggbox nature hunt
A nature hunt you can play on a walk or at home in the garden. Simply paint or draw different patches of colour onto the bottom compartments of an egg box.
For older children you could also write a list of additional things to find on the inside of the lid. Like something soft, something spikey, something smooth, something curly, something round. It’s a good way to introduce children to new words and concepts.

The children can then collect as many natural objects as you can find to match to the colours of your patches. Like leaves, stones, grass, bark, fallen fruit and flowers. *Pretty please don’t pick any wild flowers, only collect ones you have grown yourself or fallen ones you find on the floor.
Can you get a whole rainbow? What colour did you struggle the most to find? Which colour was the easiest to find? Which colour do you like the most?

It’s a good opportunity to talk about why things are all different colours. For example flowers are brightly coloured to attract pollinators like bees and butterflies, grass and leaves are green because of the chlorophyll in the cells which is busy turning sunlight into food.
8. Magnetic fishing game
A fishing game that’s fun for children of all ages and helps develop co-ordination and concentration.
For this one you will need a cardboard box, paper clips or split pins (either will do), a fridge magnet*, a stick and some string or wool.

First cut a hole into the front of the box to form a window into what will be the fish tank. Next cut a hole into the top of the box for the children to fish through.
You could paint the inside of the box blue or cover it with blue paper. We also added some green seaweed to the front of the box using tissue paper but you don’t have to do this.

Now your fish tank is ready you will need some fish to catch. Simply cut some basic fish shapes out of paper or card. If you are using split pins you then need to push them through the fish to form the eyes. If you are using paper clips then push them onto the nose of the fish and draw or paint an eye on instead.

Now you have a fish tank and some fish its time to make the fishing rod. Simply tie a piece of string or wool onto the end of a stick. Then firmly tie the other end to a fridge magnet. We luckily had a crab shaped fridge magnet which was perfect for this. But you can use any fridge magnet you have to hand.
Now the children can enjoy dangling the end of their fishing rod into the fish tank to catch the fish.
Notes: * Please always be aware of the choking/swallowing hazard of magnets, split pins and paperclips and never leave children unsupervised with them.
9. Nature art frames
You can easily create some beautiful works of nature art using some simple to make cardboard frames. All you need is a sheet of cardboard, a pen and some scissors.

Then all you need to do is draw a simple shape or picture like a heart, circle or even a butterfly. Just make sure your picture is made up of 1 or 2 easy to cut out sections that you can then look through.

When you have cut out the see through sections of your frames, all you need to do is take them outside and hold them up against any of the interesting natural things you can see, like the sky, trees, flowers or grass for example.

You can take photos like we did to capture some of your pictures and compare the differences in backgrounds. (Click here to see some more of the nature art frames we have made.)
10. Cardboard Puzzles
It’s so incredibly easy to make your own puzzles using just cardboard, glue and paint. These are great for encouraging problem solving and fine motor skills.

You can make them any shape you like, we choose to make ours heart and rainbow shaped.
First you need two pieces of cardboard cut to equal size. Cardboard boxes cut up work perfectly for this. You can make your puzzles as big or as small as you like.

Fold one of the cardboard pieces in half. Then cutting from the edge of the fold, cut half a heart shape or a rainbow stripe shape. Then cut a smaller heart or rainbow stripe inside or under that shape and so on and so forth until you have 5 heart or rainbow shapes.

When you unfold the cardboard you should now have 5 complete heart rings and a square piece of cardboard with a large heart shaped hole. Glue the square piece with the heart shaped hole onto the other origunal piece of cardboard.

Now you you can paint each heart shaped ring a different colour of the rainbow and then leave them to dry.
When your puzzle is dry its ready to play with. Have fun arranging and fitting the heart rings into your puzzle.

The puzzle pieces are also fun to use separately in loose parts play. Children will enjoy finding their own different uses for the shapes in play.
11. Marble mazes.
Great again for problem solving, logic and fine motor skills. These look complicated to make but they are surprisingly easy and quick to create using just a cardboard box and tape.
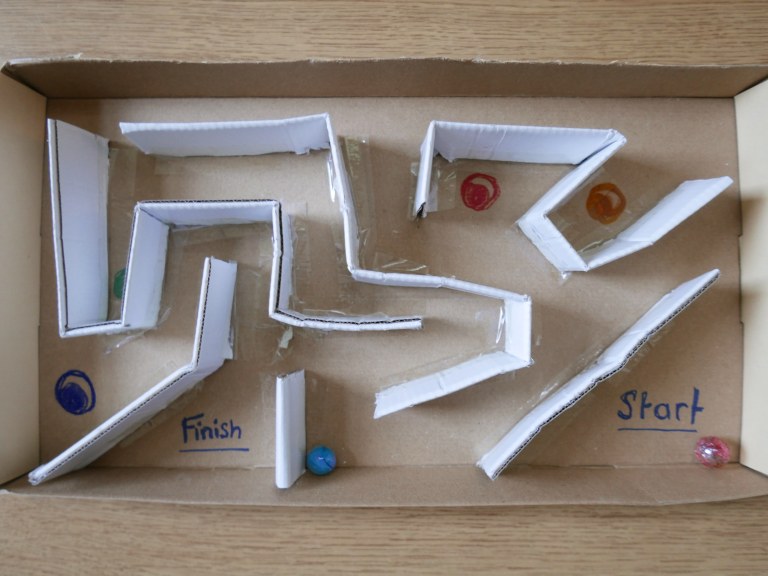
First you need a cardboard box for the base. Cut the box down into a shallow tray that’s deep enough for a marble to roll around in without falling over the edge when its tipped.
Next cut the remainder of the box into strips that are roughly twice as wide as the depth of the box. You need to be wide enough to fold them in half to form the maze walls.
Fold the strips in half and bend and shape them to form sections of wall. Experiment with laying them on the bottom of the box until your happy with the layout. Then attach the walls to the base of the box using a strip of tape on each side or by using quick drying glue or a glue gun.

Now you can draw on a start and finish line for the maze. How about adding additional points that the children have to roll the marbles to. for example we added different coloured gems that have to be collected before they can escape the maze.
Notes: * Please always be aware of the choking hazard of marbles and pompoms, never leave young children unsupervised with them.
12. Heart nature hunt boards
Another easy nature hunt activity you can do using recycled cardboard. Simply cut a heart shape out of cardboard and stretch a few elastic bands across the surface.

Now you can have fun going on a nature hunt to collect as many natural objects as you like. Thread your finds through and under the elastic bands to attach them to your board. *Pretty please however don’t pick any wild flowers, only collect flowers you have grown yourself or fallen ones you find on the floor.
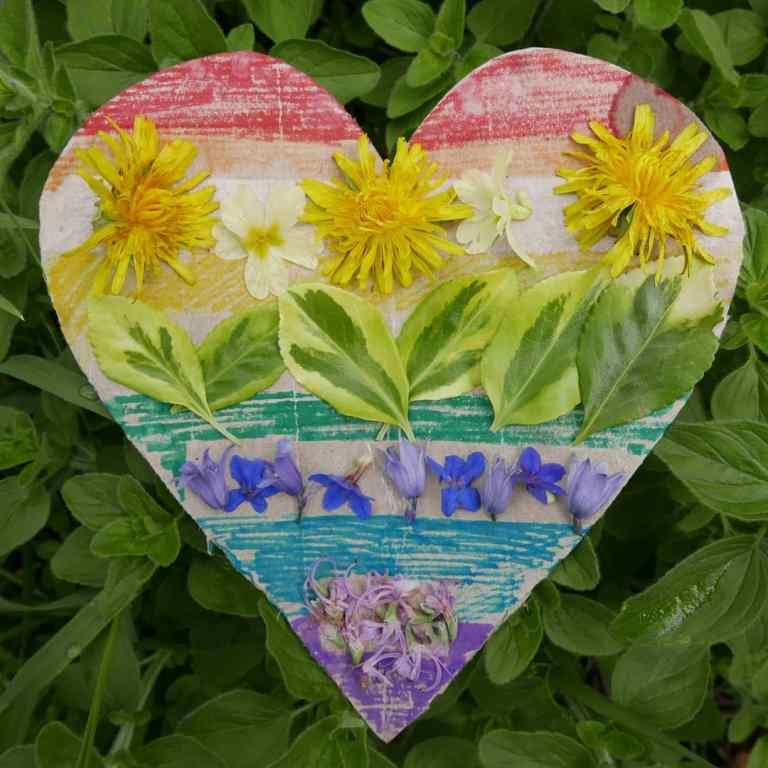
Alternatively you could stick double sided tape (or doubled up Sellotape) across the surface of your heart to stick your nature finds too. You could even paint or colour in your heart before you go to collect your nature finds. We made ours rainbow coloured and then found matching coloured natural items to complete the rainbow.

Or you could make a heart shaped peg board for a colour nature hunt. All you need again is a piece of cardboard cut into the shape of the heart and some pegs. Simply paint or draw patches of different colours into your board. Then you can glue a peg to each patch of colour so you can attach your finds to the board.
13. Shop till fun and games
Playing shops is great activity for developing roleplay and imagination in younger children and maths problem solving skills with older children.
Its really easy to make your own till using just a cardboard box, pen, tape and a recycled container (or another box)

Simply draw a numerical keypad onto the top of the box with numbers 0-9 and symbols for plus, minus, times and equals. If you want you can also fold a piece of cardboard to make a ‘Total to Pay display’ to stick to the top of the till. We also used another small box as our till scanner but you don’t need either of these.
Finally cut a flap into the side of the box to form a hatch for the coin tray. For your coin tray all you need is a recycled container. You can leave it plain or draw sections for different coins onto the bottom of the container.

Now you have a till you can use it with pretend or real food, toys or items from around the house. Younger children will enjoy playing shop keepers and you can challenge older children to write up price lists for the items. They can then practice and develop there maths by adding, subtracting and multiplying the costs of each item to work out the total.
How about practising with real or play money that you can make using cardboard or paper.
Notes: * Please always be aware of the choking hazard of small items like coins, never leave young children unsupervised with them.
14. Conveyor belt
If your feeling adventurous you could even make a conveyor belt for your shop. Again this is surprising simple but also slightly fiddly to make.
You will need a cardboard box (no surprises there) strong paper and either 2 straight sticks or 2 pencils. First cut the top and one end of the box off.
Next push the sticks or pencils through either side of the box. You want both to be at an even and equal height, so it may be best to measure and mark out the holes to push them through first.

Next cut a strip of the paper out to form the conveyor belt. It needs to be almost the width of the box and long enough to wrap round the sticks and back with little extra length where you join it together. Now here comes the fiddly part wrapping the paper around the sticks and joining it together (using doubled sided tape or tape) so its tight and taut across the sticks.
Hopefully when you now turn the sticks your conveyer belt should move. (If it doesn’t check that the belt isn’t too loose). And voila the children can now enjoying moving objects across the surface of the conveyor belt as if by magic.
15. Cardboard box castles
Cardboard box castles are great for imaginary play and it so easy to make a castle out of just a cardboard. Simply cut three or four rectangular notches into the top edge of a box to form the castle ramparts.
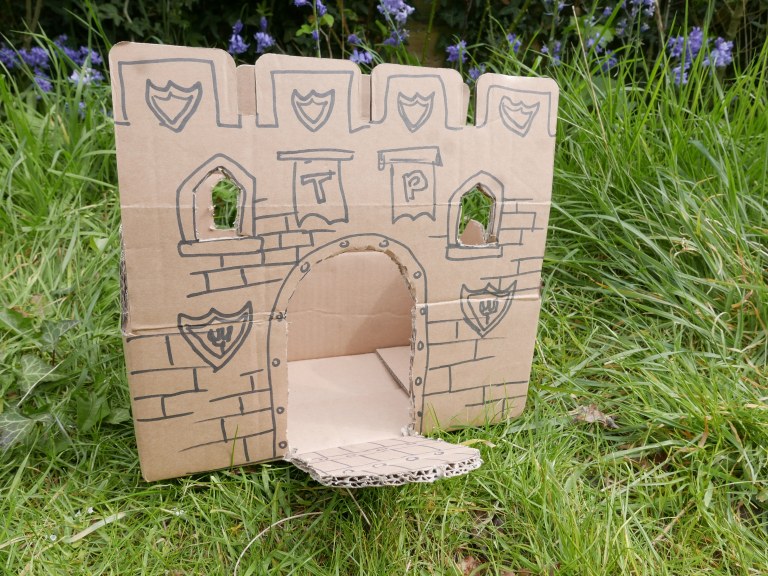
Then cut an oval-ish door into the front, making sure to leave a join at the bottom so your door hinges open like a draw bridge. Then draw on (or cut out) some windows. If you want you could also add extra details like bricks and flags. Or how about using a stick and some paper of fabric to make a proper flag for your castle.
16. Coin drop
Coin drops are so much fun even the adults will want to have a go. All you need is a cardboard box, some recycled clear plastic packaging, lollipop sticks and tape or glue.
First glue the lollipop sticks in an alternating pattern, angled downwards across the side of your box. This is the route you want your coin to drop down, so think carefully and make sure you leave plenty of space for the coins to travel in-between.

Next tape or glue a sheet of clear recycled plastic packaging across the side of the box. You want it tight enough to stop the coins flopping away from the side of the box but not so tight that they cant roll and move.
And that’s all there is to it. Now you can enjoy dropping the coins down the coin drop you have created. How about asking the children to predict what happens before you drop the coins, or trying to race two coins at once.
Notes: * Please always be aware of the choking hazard of small items like coins, never leave young children unsupervised with them.
17. Telescopes and spy stations
For budding explorers and children that love pretend and imaginary play. You could use this one as a telescope or pretend its an observation box or spy station.
Again all you need is cardboard box and also this time a kitchen roll tube.
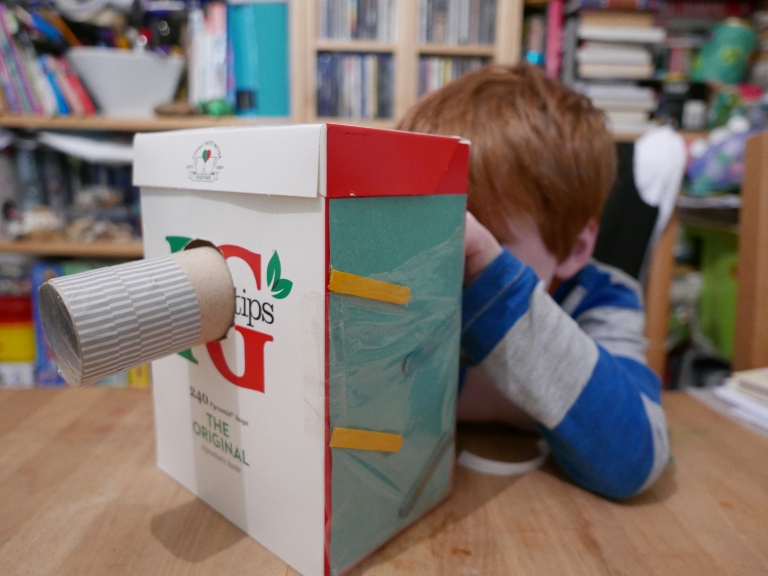
Simple cut a hole at the front of the box that’s wide enough to fit the cardboard tube through. Then cut a slightly longer hole at the back so you can move the cardboard tube up and down like a telescope or spy glass. You could even tape some cling film or clear plastic packaging to the end of the tube to make it more realistic.
18. Roadmaps and play towns
Another great activity for developing fine motor skills and stimulating imaginative play. All you need is a cardboard box and pens or paint. You can either cut the box into a panel for this or simply draw or paint straight onto the top or side of the box.
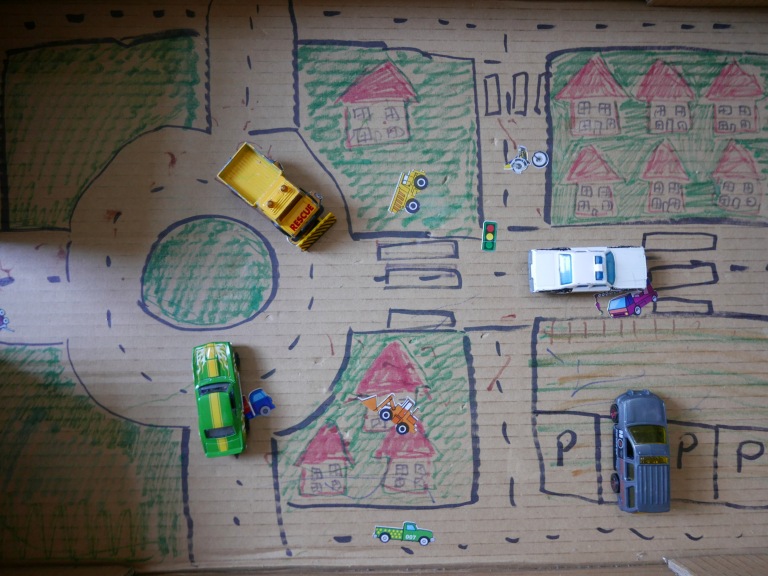
The idea is to draw on (or paint) a roadmap or town for the children to play on using cars and toys. It can be as simple or detailed as you like. You could out in roads, roundabouts, crossings, junctions and parking spaces. Or how about adding in houses, trees, duck ponds, rivers, train tracks, police stations, shops, schools ect the possibilities are endless.
19. Ramps for rolling balls or cars down.
Another activity that’s fun for all ages. Creating cardboard ramps to roll cars, balls and other objects down. Younger children will enjoy the excitement of rolling and racing objects down the ramp as fast as they can.

You could even challenge older children to design and make their own ramps using bits of cardboard and cardboard boxes.
20. Paint trails and foot print fun
A very messy activity that children of all ages will love. Creating a paint trail for children to follow and explore is easy. All you need is some sheets of cardboard (we used broken up cardboard boxes) and some non toxic washable paint.

Lay the sheets of cardboard out in a line that the children can follow. Then on some of the pieces of cardboard (or on some non slip trays or mats) squirt different colours of paint for the children to walk through.
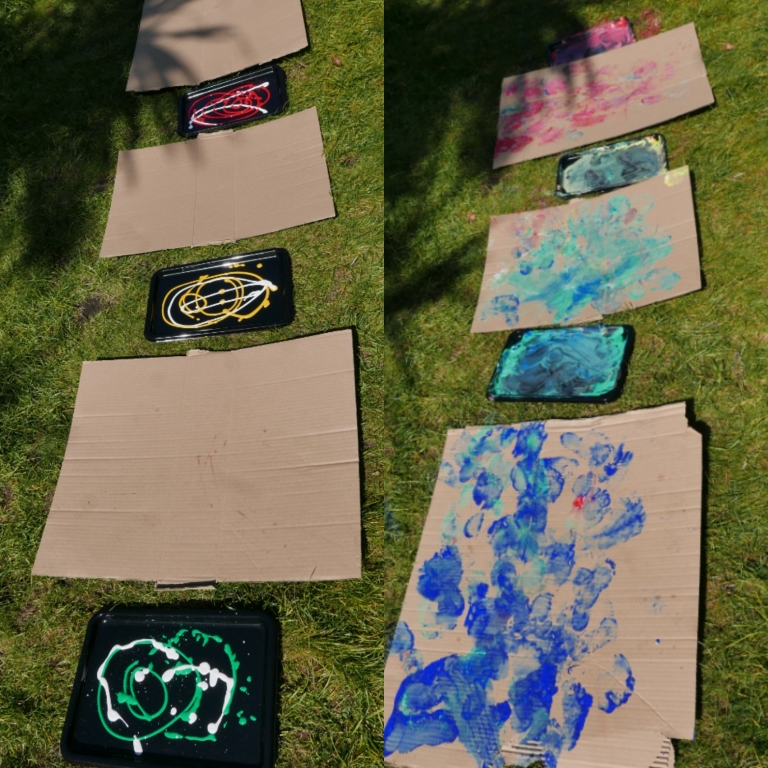
They will love the sensory feel of the paint between their toes and will have fun creating some beautiful footprint patterns and tracks across the cardboard. Once you have finished you can evencut out sections of the cardboard and footprints to keep as artwork.
Notes: Please be aware of the slip hazard of this activity and that paint may stain clothes and surfaces.
21. Sensory light boxes
Fairy lights + cardboard box = sensory magic ❤🧡💛💚💙💜 it’s also a great way to recreate star constellations. All you need to do is make small holes in a cardboard box using a pencil, then carefully and gently push the lights through.
Health and safety warning: Make sure this activity is heavily supervised and only use it for a short while because the fairy lights are an obvious fire, electrical and strangle hazard. They can also become hot to the touch after a short while.

If your a childcare provider I would suggest carrying out a full health and safety assessment for this activity.
22. Small world and roleplay props
Cardboard is so versatile you can even use it to make props, signs and settings for small world, role play and even parties. For example we used cardboard and marker pen to make a collection of wild west signs for a cowboy themed birthday party. They looked great hung up on boxes, doors and furniture and really made it feel like the wild west.

23. Butterfly/fairy wings
Great for imaginative play and creativity. Simply cut a piece of cardboard into the shape of butterfly or fairy wings. The children can then have fun decorating the wings using paint, pens, glue, collage, stickers or even flowers and other natural materials like leaves and sticks.
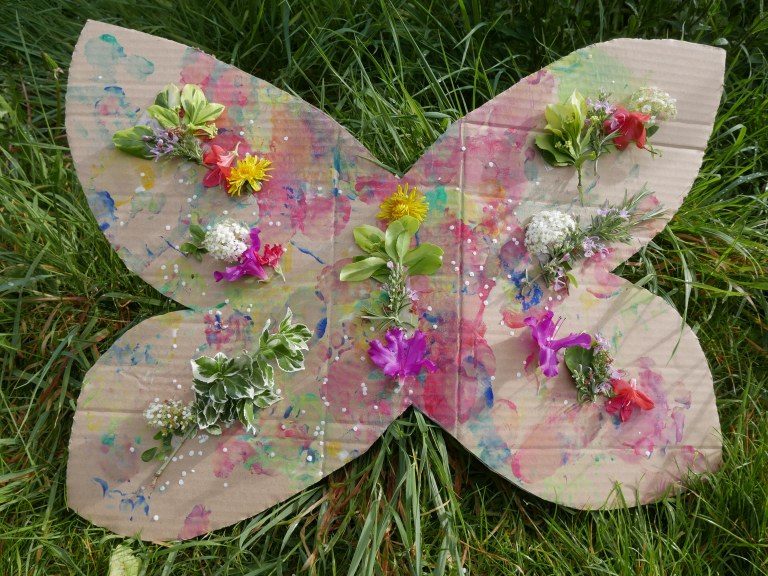
When they have finished you can tie or stick string or ribbon arm bands to the back of the wings so the children can enjoy wearing them and pretending to be butterflies and fairies.
Notes: * Please always be aware of the choking hazard of string and ribbon, never leave young children unsupervised with them.
24. Egg box hedgehogs
Another simple and easy to set up activity that helps develop fine motor skills. Older children can make their own hedgehogs and younger children will enjoy pushing and pulling the ‘spines’ in and out of the box.

Simply draw a face onto the side of an egg box, then push sticks into the to make the spines. You can use natural sticks you find on a walk/in the garden or lollipop sticks. Sometimes it helps to make the holes by pushing a sharp pencil through the top first.

You can also use it to teach children colour recognition. Simply paint or draw a different colour around the edges of each hole. Then children can enjoy matching the colour of the sticks to the colours of the holes.
25. Peekaboo and photo boards
And last but not least, how about making a peekaboo board that children can peek through to pretend they are different types of animals or people. This also makes a great novelty prop/photo board for parties and events like weddings.

Simply paint, draw or stick on a picture of an animal or person onto a large piece of cardboard. Then cut a hole out where the head is for the children to peep through.
If you like this you might like to try:
DIY craft ideas using cardboard boxes by Porch.

8 Balloon experiments and activities


114 thoughts on “25 Cardboard box activities”