There are over 26,000 cultivated varieties of daffodil but only one species that is truly native to the UK. You might be surprised to find that Daffodils are NOT good plants to grow for wildlife, most commercial varieties are so hybridized (cross-bred) that they are sterile, produce very little pollen or nectar or have lost some of the characteristics that attract pollinators. Daffodils are also toxic to most animals (including humans) as they contain an alkaloid poison called lycorine. The sap also contains sharp crystals of calcium oxylate called raphides. Slugs, snails, mites, flies and badgers are some of the very few animals that can safely eat daffodil plants or bulbs.

Although daffodils flowers are bright and cheerful to grow in the garden there are so many other flowers and plants that are better to grow for wildlife and pollinators. You can find a handy list of plants that provide a source of food for butterfly caterpillars here, a list of nectar rich plants and flowers that butterflies can to feed on here, and a list of nectar rich night scented plants and flowers that Moths can feed on here.
If you are going to plant daffodils then the best variety to plant for pollinators and wildlife is the native (and original wild species) Narcissus pseudonarcissus. Native non hybridised species of daffodils attract more pollinators than commercial varieties as they provide far more pollen and nectar as food.

Daffodils can grow in two ways, from seed or from a bulb. Daffodil seeds form in fertile species of daffodils when the plants are pollinated. Commercial species of daffodil often have to be pollinated by hand (by humans) where as native species are normally pollinated by wind and insects. The pollinated seeds then develop in a seed pod that takes the form of a swelling behind the flower petals. Once the flowers have faded and die the seed pod begins to dry, eventually cracking open to release the seeds. Each seed contains the genetic material from two daffodil plants, the plant that produced the pollen and the plant that was pollinated.
As the seeds grow they develop into a modified bud that then forms a bulb. It then takes a few years for the bulbs to develop fully enough to flower. Daffodil bulbs are made up of tightly packed modified leaves (called scales) covered in a thin papery coating. The modified leaves that make up the bulb are specially adapted to store food for the plant to help it grow and thrive during the spring and summer. The stored food then helps the plant to survive and remain dormant during the colder winter months or during droughts.

Daffodil bulbs continue to grow and develop underground even in their dormant form. They grow additional layers of bulb leaves to store more food, expand the root system below the earth as well as growing new buds that can develop and form into new bulbs. The new bulbs eventual divide away from the original bulb to form new daffodil plants. As the new plants have formed asexually (without pollination) they only contain the genetic material from one plant and are therefore are clones of the original plant.

Although daffodils are mainly grown for decorative and ornamental purposes they can also be cultivated as a source of essential oil to make perfumes. Narcissus oil was used by the ancient Egyptians, Greeks and Romans and is still used today as a key ingredient in some modern perfumes. Please note daffodil sap can irritate your skin so it isn’t wise to try and experiment making your own perfume unless you know how to properly extract the essential oil.
You can find lots of fun and easy activity ideas below to help you learn more about daffodils.
1. Go on a daffodil hunt
You might be surprised by just how many different varieties and species of daffodil you can spot in parks, woodlands, gardens or along road sides, from late February until the end of April. Have a look to see if you can see the differences in colours, petals, trumpet shapes and stem heights of any daffodils you spot. Can you find any native Narcissus pseudonarcissus daffodils? They have warm yellow centre trumpets and paler outer petals. The stems are shorter than garden variety daffodils and their leaves long, thin, flat and grey-green in colour.

2. Dissect daffodils
Dissecting daffodils* is a great way to learn about the anatomy of flowers. First you need to draw or print out a simple image of a daffodil flower onto cardboard or paper and then label all the different parts of its anatomy. There is a great free download printable sheet you can use here. Next you can cut the daffodil in half and see if you can find and match all of the parts in the flower to the parts in the picture. *Pretty please don’t use wild flowers, only use flowers you have bought or grown yourself.

This is a great opportunity to stimulate conversation about pollination and how flowers attract insects using bright petals and sweet smelling nectar. Then you can talk about how the insects brush against the pollinating parts of the flower picking up pollen that then gets distributed to all the other flowers and plants the insects visit afterwards.
3. Plant a daffodil bulb
Growing a plant from a seed or bulb is a great way to observe and learn about the life cycle of plants. October to mind November is the best time of year to plant daffodil bulbs as it gives them time to establish a root system before the ground freezes. The bulbs need to be planted in sunny areas and the holes should be roughly 8-10cm deep. It is fascinating watching as the shoots push through the soil to the surface in spring, growing leaves to absorb energy from the sun and convert it into food using a process called photosynthesis. The roots also absorb water and nutrients from the soil to feed the growing plant. You can measure your plant each day using a ruler to see how much it’s has grown. Keep a diary and make observations or drawings of the daffodil bulb and plant at its different stages of growth.

4. Observe all the stages of daffodil growth
It hard to observe the different stages of the bulbs growth when it starts of underground. But there is an easy and simple experiment you can set up to observe the bulbs growth from start to finish. You just need a large clear jam jar or pots to plant the bulb into to grow. Just fill the jar or container with soil and then make a hole to place a daffodil bulb in up against one side of the jar. Give it a light watering and then place the jar in sunny spot indoors where you can watch it grow. Keep the soil damp with a light watering every few days and monitor the bulbs growth. Measure the bulb and daffodil plants growth each day using a ruler to see how much it grows overtime. Keep a diary and make observations or drawings of the bulb and plant at different stages. When your plant starts to out grow the container then it’s time to replant it into a pot or the garden.

5. Learn about bulbs
Bulbs are food storage organs for plants. They can form in several different ways and can have very different structures. Plant corns, rhizomes and tubers are all types of bulbs but they look very different to ‘true bulbs’. True bulbs like daffodil bulbs are are made up of tightly packed modified leaves, or leaf bases called scales. Some true bulbs are also covered in a thin papery coating but some are just bare. The modified leaves that make up bulbs are specially adapted to store food for the plant to help it grow and thrive during the spring and summer.

Some bulbs are edible and have been cultivated and grown throughout history to provide an important source source of food for humans and domestic animals. As bulbs are naturally food stores for plants they are packed with nutrients like vitamins, minerals and fibre. Their ability to remain dormant also means they can also be stored and kept for long periods of time. Onions are the perfect example to use to learn about edible bulbs or true bulbs as you can easily slice one in half to see the layers, roots, stem, skin. you can also have fun pulling apart the layers to look at them more closely. Onions belong to the Allium family of plants which also includes three -cornered leeks, wild garlic and chives.

Not all bulbs are edible however, daffodils are a good example of non edible bulbs as they contain an alkaloid poison called lycorine. This makes them toxic to both humans and most animals! I wouldn’t recommend cutting a daffodil bulb in half due to the toxicity its safer and better to use edible bulbs like, onions, leeks or garlic for this demonstration.

5. Re-grow food scrap bulbs
Did you know that you can regrow some plants from food scraps? It’s a great way to recycle food waste as well as show how food grows, what the food looks as a plant and what part of the plant you are actually eating. Spring onions and leeks are really great bulbs to regrow from food scraps as they regrow really quickly. All you need is the scrap trimmed bottoms from some spring onions.
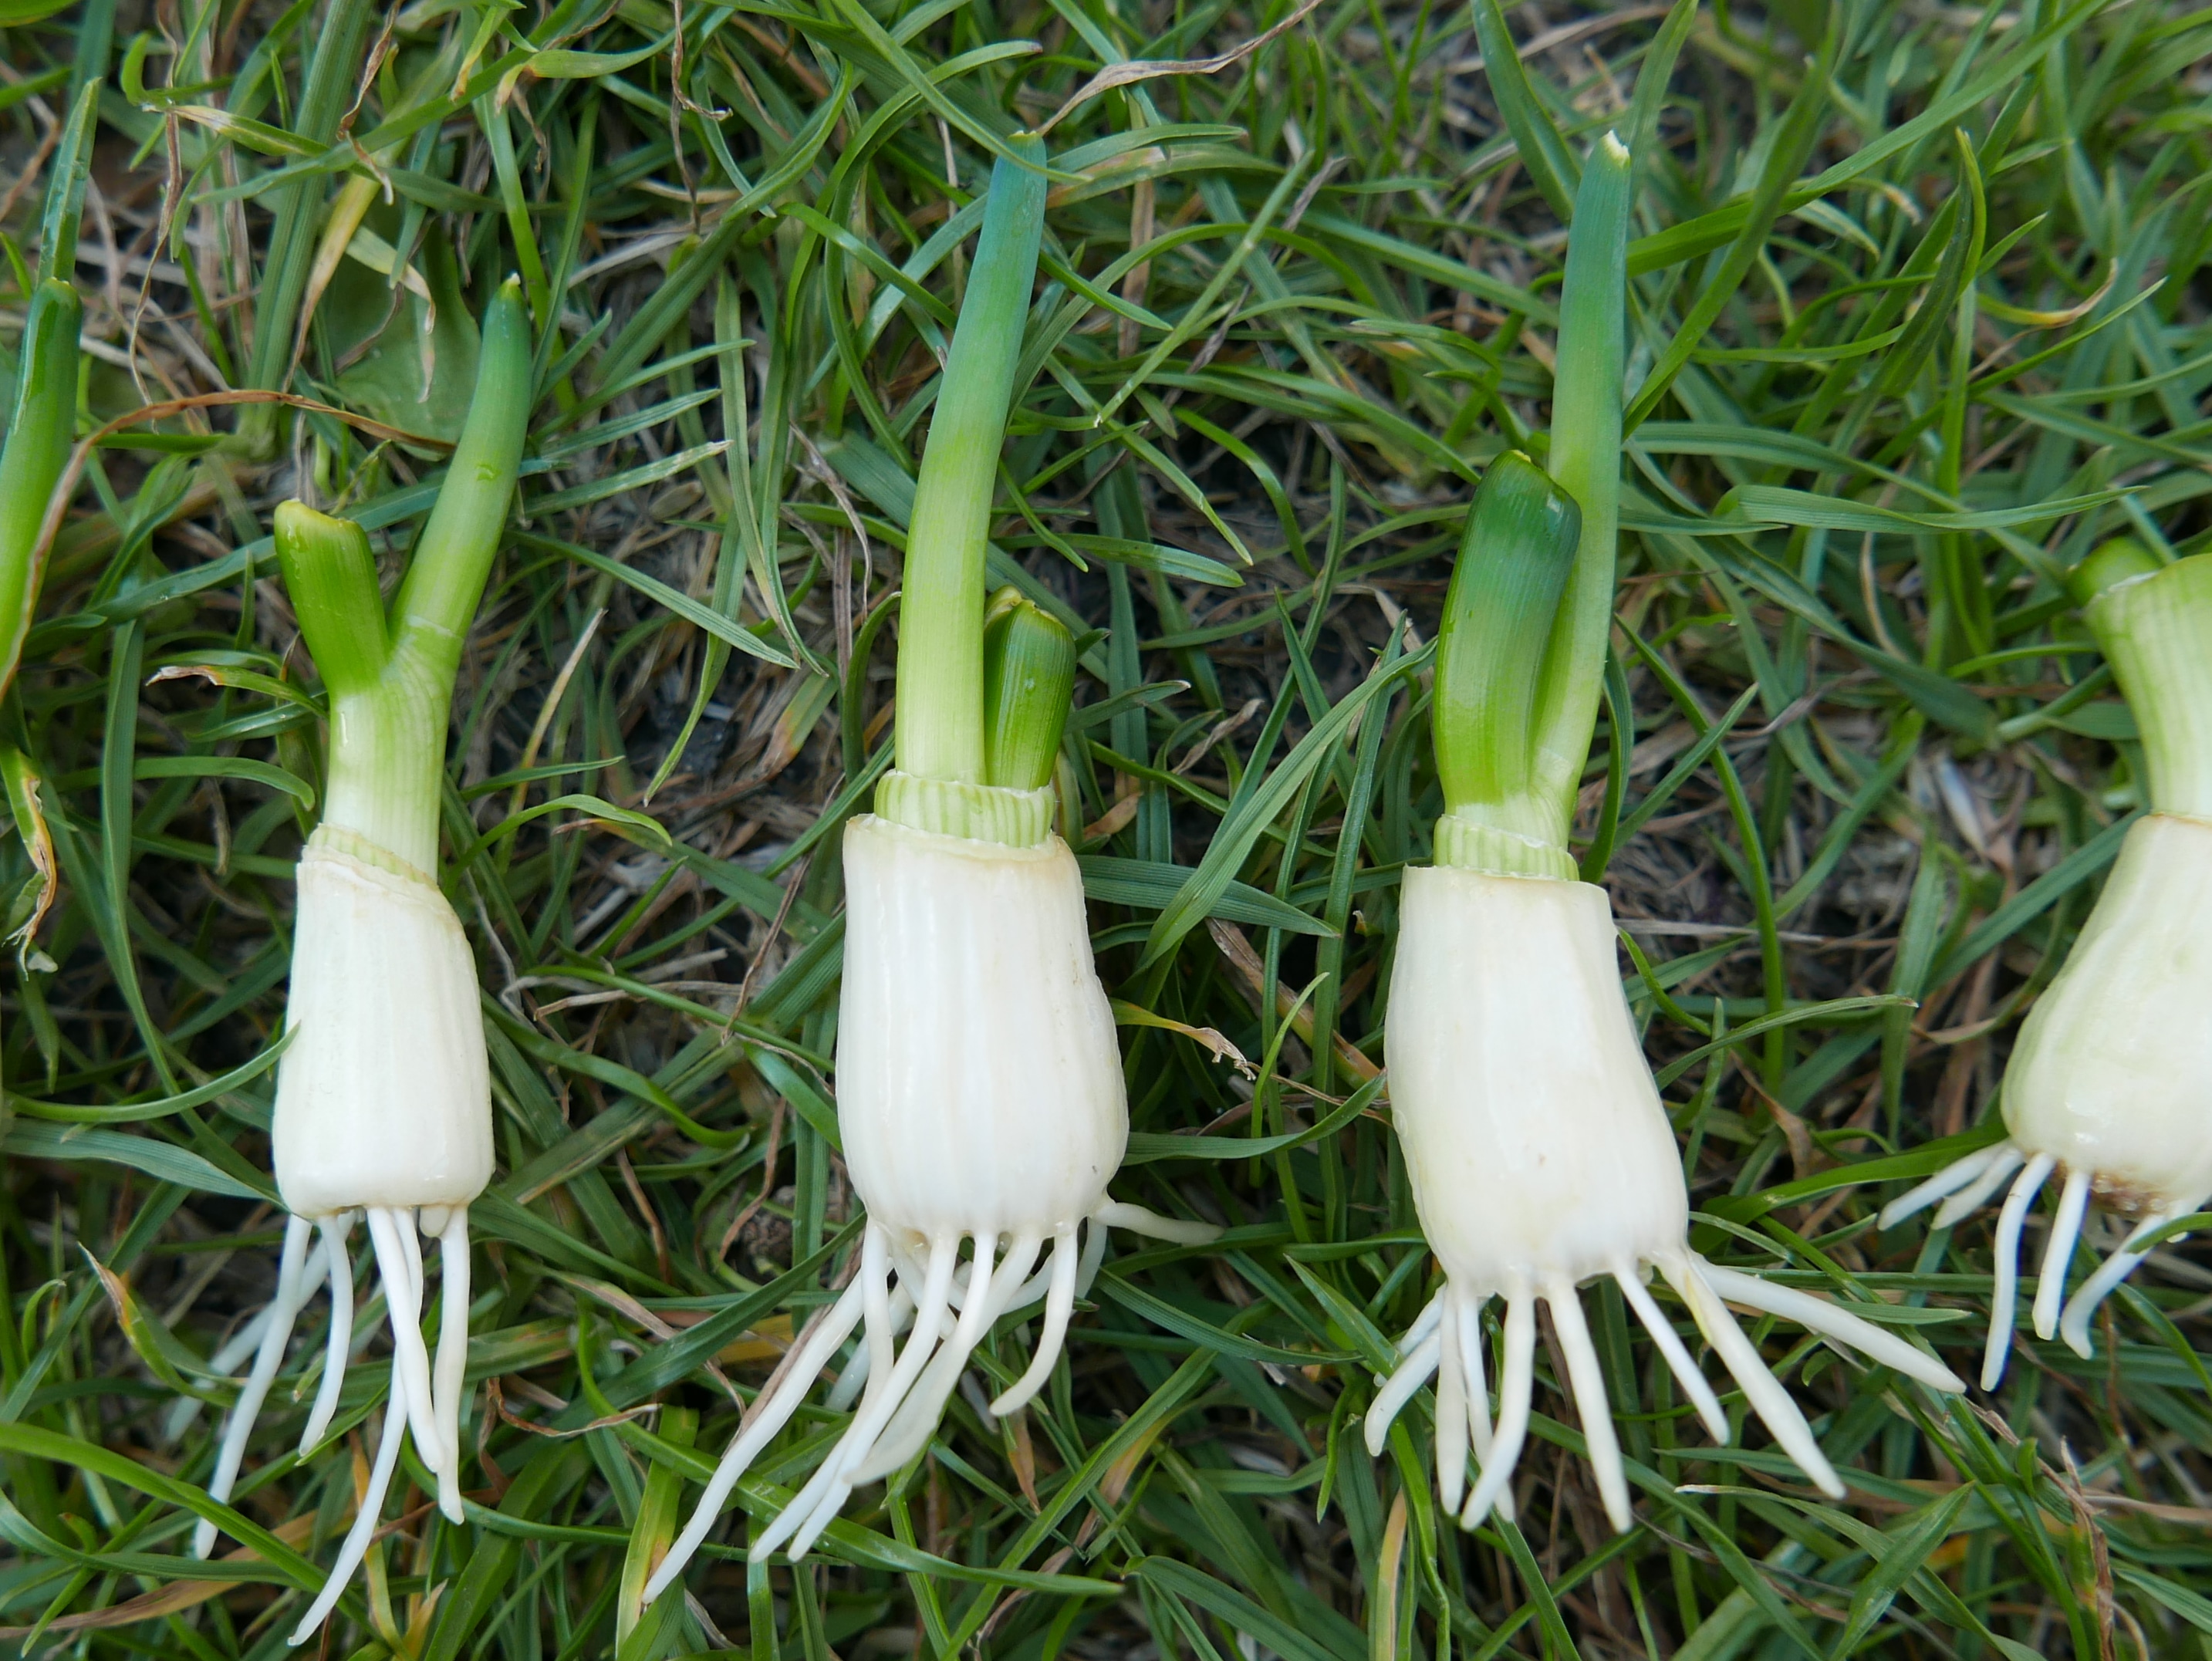
Place the trimmings bottom down in a shallow dish so the root ends touch the bottom. Next pour a small amount of water into the dish so it lightly covers the bottom of the dish without covering the spring onion of leek bases. Place the dish in a warm sunny area and wait and watch for the roots and shoots to start growing. Don’t forget to top the water up every now and then. When your plants look like they are starting to thrive you can replant them in soil to grow properly into spring onions or leeks again.

STEM activity: How about experimenting by re-growing the spring onions with a series of different conditions. Place each spring onion in a different pot or dish of water. Mark a number onto each container and then write down the same numbers on a sheet of paper so they can track the results.
Experiment with the following different conditions:
- A spring onion in normal water.
- A spring onion with water but no light (Leave it in darkness)
- A spring onion with no water.
- A spring onion in coloured water. (Add a few drops of food colouring)
- A spring onion in slightly acidic water (add a drop or two of lemon juice)
- A spring onion in alkaline water (add half a teaspoon of baking powder).
When you have finished you can talk about the results and what plants might need to grow and thrive.

6. Make daffodil botanical dye
The process of making botanical dyes is very simple, you can easily create some beautiful coloured botanical dyes yourself using daffodils or other foraged plants or vegetable scraps. You can then use it to colour fabrics like cotton, linen and wool or materials like paper, card and wood. To make a basic botanical dye you will need an old saucepan (not one that will ever be use for cooking again as daffodils are toxic they contain a poison called lycorine!), some clean washed fabric or textile materials (its best to start with scraps of fabric like linen, cotton and wool first), water, a wooden spoon and one of the plants or vegetables listed further below.

You can also use soy milk and a mordant to help the dye to chemically bind to the fabric but we didn’t use these for our initial experiments we just kept it simple. If you do wish to treat your fabric with soy milk before you start dying, then simply soak your fabric in some soy milk and then leave it to dry. Mordants like copper and iron will also help the dye fix to the fabric but at the same time will also alter or affect the colour of the dye. If you use an old copper or iron saucepan you may get different results to a stainless steel one. You can also vary the colour of any dye you create by making the water slightly acidic or slightly alkaline, you can do this by adding a small amount of lemon juice or bicarbonate of soda to the water.
- Reds and pinks – Red onion skins, avocado skins, avocado stones and hibiscus flowers, Japanese maple leaves,
- Oranges – Onion skins, eucalyptus leaves, cinnamon, Roobis tea and rosemary with acidic water.
- Yellows – Marigolds, daffodils, saffron, orange peel, Dahlia flowers, bay leaves
- Greens – Nettles, carrot tops, Dyer’s Knotweed (otherwise known as Japanese Indigo) daffodils (the latter is a very light green)
- Blues and purples – Blackberries, woad leaves and red wine
- Greys – Lavender, mint, black tea and rosemary with alkaline water.
- Browns – Acorns, pine cones, alder cones, alder catkins and thyme.

To start with place your natural material in a saucepan and then add in enough water to cover the materials and also eventually soak your fabric in. Carefully bring the water in the saucepan to the boil and then leave it to simmer for an hour. Keep and eye on it to make sure nothing burns and give it the occasional stir. After an hour your water should have turned a beautiful colour with the rich colour pigments. Turn the heat off and leave the water to cool a little then strain out the natural materials and return the water full of dye to the saucepan.
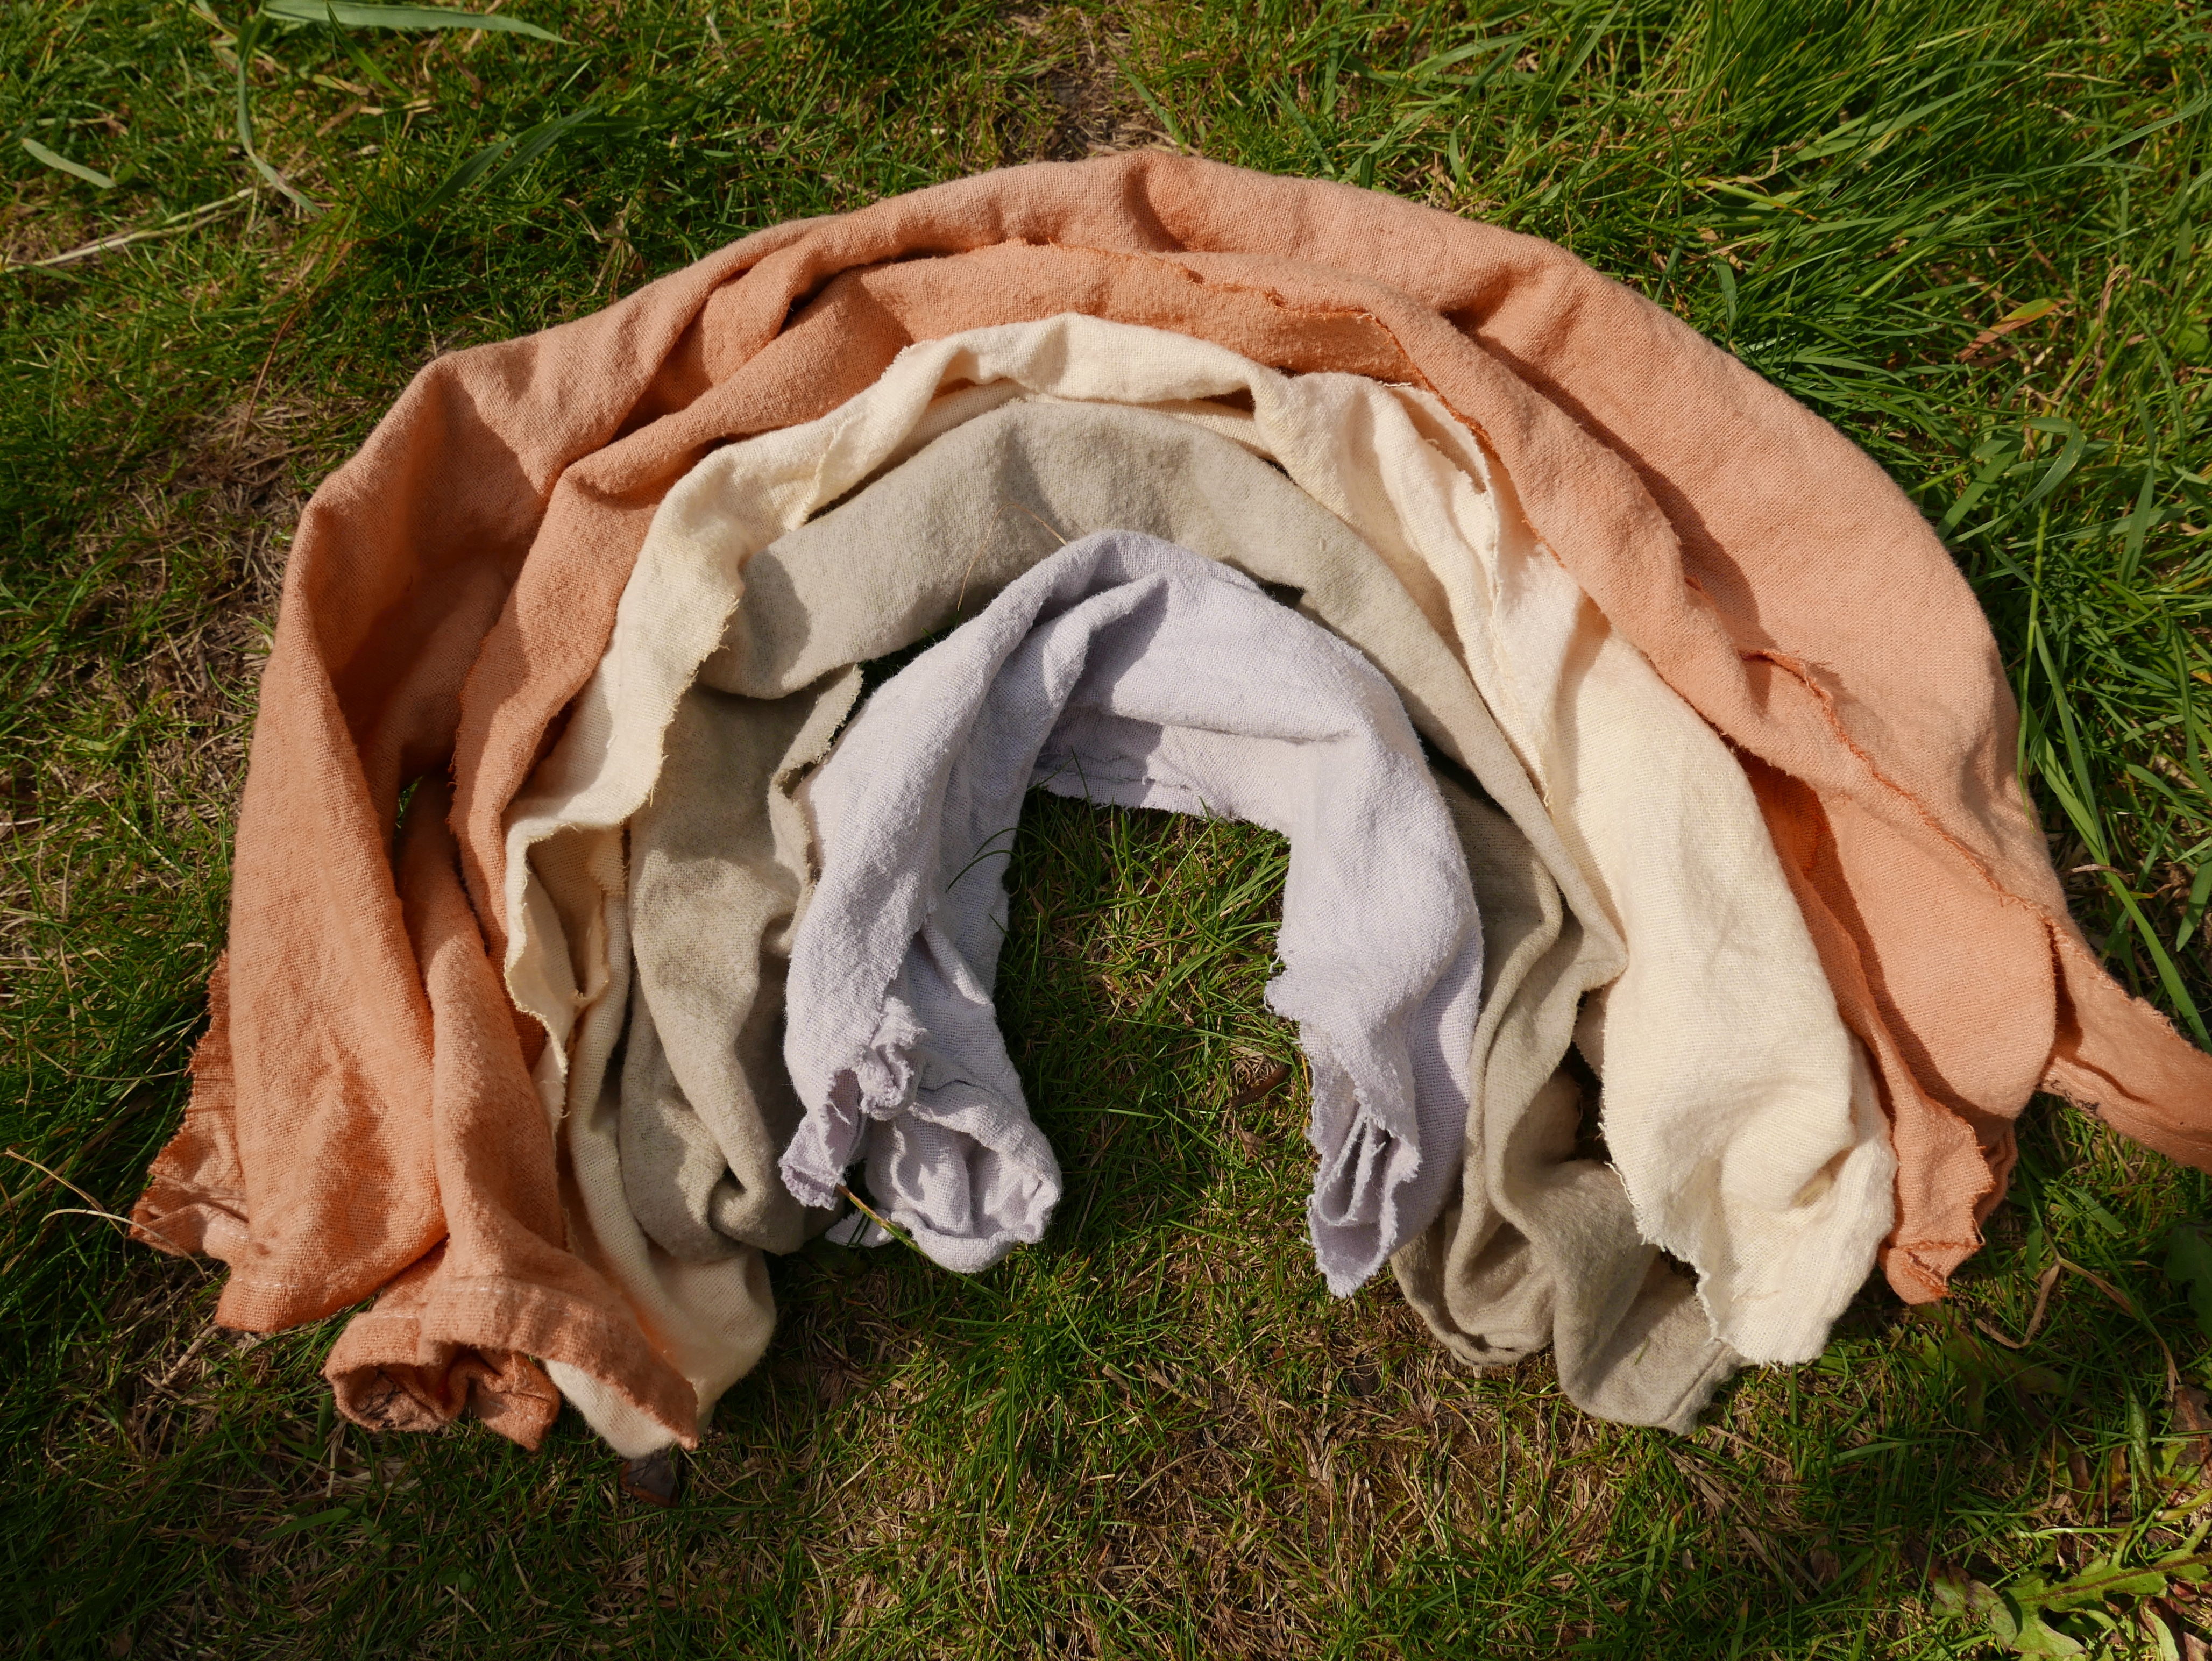
Place the fabric in the water and stir to make sure its fully coated. Then reheat the water to a simmer and keep stirring as it simmers for another 15-30 minutes. Turn the heat off and leave the saucepan to cool. Leave the fabric in the water and saucepan overnight to absorb as much of the dye as possible. Carefully remove the fabric (don’t rinse it yet) and hang it up to dry. Be careful to put something underneath to catch any drips and don’t hang it in direct sunlight. Then leave it for a week to allow the dye a chance to take properly, before then eventually ironing and finally rinsing your fabric.
7. Daffodil nature painting
Nature painting is a simple activity for children of all ages, Just simply dip daffodil flowers and leaves into paint and use them as natural paintbrushes or paint, print and mark make with. How about experimenting with other different natural materials to see what variety of marks you can make by using different shapes and textures. Recycled cardboard is a great environmentally material to use instead of paper for your nature painting. Simply cut out panels from old cardboard boxes and packaging.

8. Daffodil potato prints
Potato printing is a simple activity for children of ages, all you need is a potato cut in half, a bit of inspiration and some paint to get started. They make great invitations to play for children of all ages and you can use the potato prints to make patterns, pictures, cards or recyclable wrapping paper. You can easily make some simple daffodil prints by cutting a potato half and then cutting out six triangles around the edge to form a star shape with six petals. Dip the potato into yellow paint and then have fun printing the yellow flower heads. You can then add orange or darker yellow centres using finger prints and green stems or leaves using green paint, pen or collaged materials.

You can also make daffodil bulb prints using potato’s and paint. All you need a potato cut in half, cut the top half of the potato to give it a pear or bulb shape and then dip it in brown or orange paint to print with. You can then paint, collages or draw on green shoots and white roots to show the bulbs growing

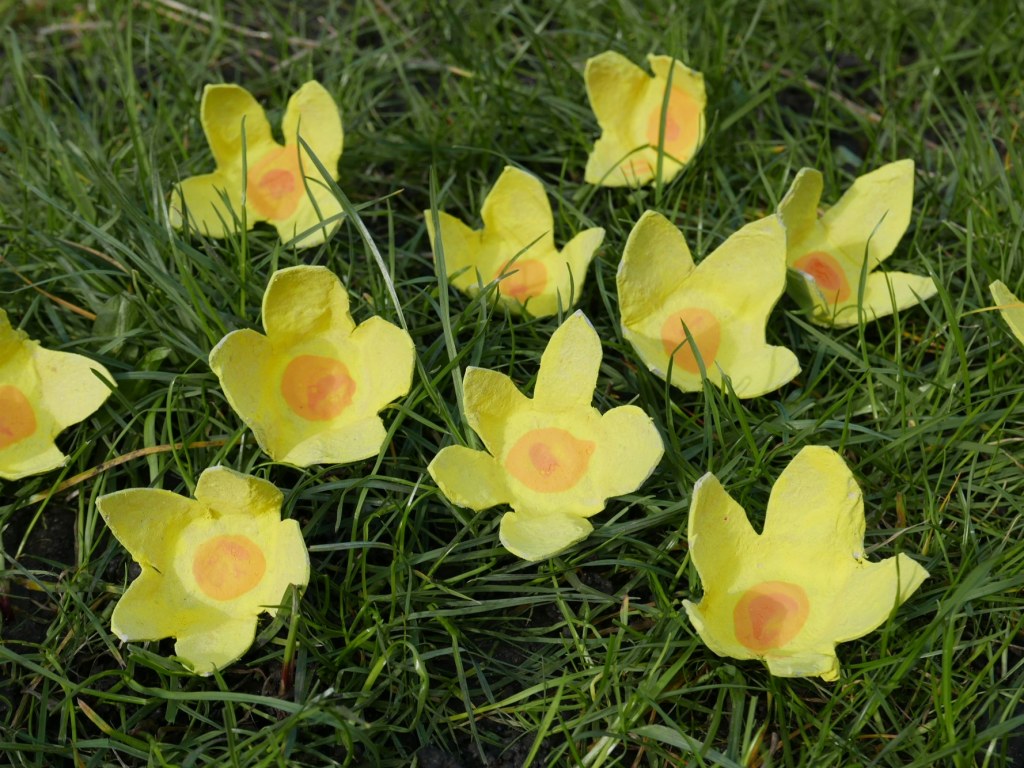
9. Egg carton daffodils
We hate to waste anything and recycling and reusing materials is one of many small things we can all do to help the environment. So instead of chucking used egg cartons we like to find ways to use them in crafts and activities. You can cut easily use the bottoms of egg cartons to make simple daffodil flower shapes. Simply cut out the bottom cups and cut round the edges to form petals. You can add colour to your egg carton daffodils using paint, pens or collaged materials.
You could also make more detailed daffodil flowers using the central spikes from the bottom of the egg carton with the top flat surface of the lid. First cut off the lid and then trace and cut out a six petal flower shape. Next cut out a bottom triangular spike from the carton and turn it upside down, cut the edges of the triangle into a wavy line and push the waves outwards to form the edges of the daffodils trumpet. Finally glue the trumpet to the petal base and add colour to your flower using paint, pens or collaged materials.

10. Cardboard tube daffodils
Old wrapping paper or kitchen roll cardboard tubes are also great for arts and crafts. It’s quick and simple to turn an old cardboard tube into daffodils. First cut the tube into two evenly sized pieces (or four to make two flowers if its a longer roll),. Now take the first tube piece and cut five or six evenly spaced slits into the top to create 5 flaps. Fold the five flaps over to form the petals and then cut the edges to make them rounded.

Next take the second tube and cut 8-10 small wavy petal shapes into the top of the tube and bend them outwards. Now cut five slits into the bottom of the second tube and then pinch them inwards with your hand so that you can slot it into the first tube to attach the trumpet to the petals. Finally add colour to your cardboard tube daffodils using paint, pens or collaged materials.

11. Daffodil cardboard tube prints
You could also make some very basic daffodil cardboard tube prints by cutting an old cardboard kitchen roll tube in half (or if you are using an old wrapping paper tube cut it into into quarters). Next cut an even pattern of six slits into one of the ends of the tube. Finally bend and fan out the strips to form the petals of your flower shape. You could also cut them to shape them more like petals. Finally dip your flower shapes into paint for printing onto paper or card. You can then use potatoes, hands or fingers to print a darker yellow or orange centre.

12. Spring sensory Oobleck
Oobleck is great sensory fun for children of all ages. All you need to make it is cornflour and water but you can also add colour and extra sensory elements with food colouring, scented herbs, flavoured oils, flowers and other natural materials. Oobleck is named after a Dr Seuss story and its a non-Newtonian fluid. This means it acts like a liquid when its relaxed or being poured, but when you push, squeeze or exert any kind if force onto it, it becomes temporarily solid. This makes it a fantastic material for tactile and sensory play. When you are using daffodils only use the heads and not the stems as the sap can be irritating to the skin and remember daffodils are toxic if eaten so always supervise very young children and babies.
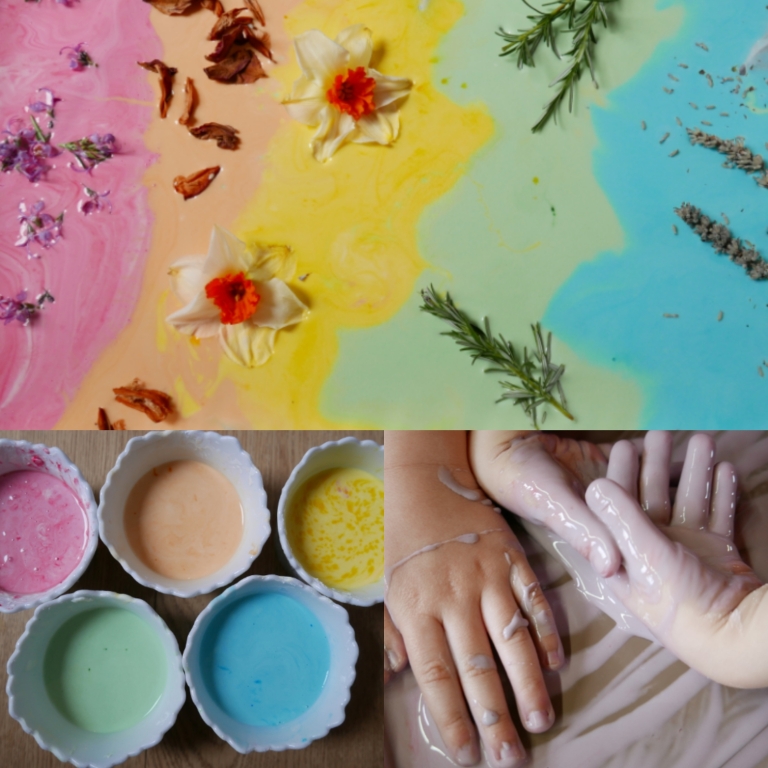
To make basic Oobleck all you need is cornflour and warm water. Simply add and stir small amounts of water into the cornflour until it forms a thick gloopy liquid. You can also add colour to your ooblock by mixing in small amounts of food colouring or non toxic paint. How about making a rainbow by mixing up several colours and then carefully pouring them one by one into a tray.
You can also add additional tactile and sensory elements to the oobleck using scented herbs like mint, rosYou can also add additional tactile and sensory elements to the oobleck using scented herbs like mint, rosemary, basil, sage and thyme. Flowers like lavender and roses are also great for sensory play. Or how about trying scents using spices like ginger and cinnamon, food flavourings like mint and vanilla, non toxic scented oils like lavender oil or even fresh citrus fruit peel, slices and or juice.
*When you are using daffodils only use the heads and not the stems as the sap can be irritating to the skin and remember daffodils are toxic if eaten so always supervise very young children and babies.
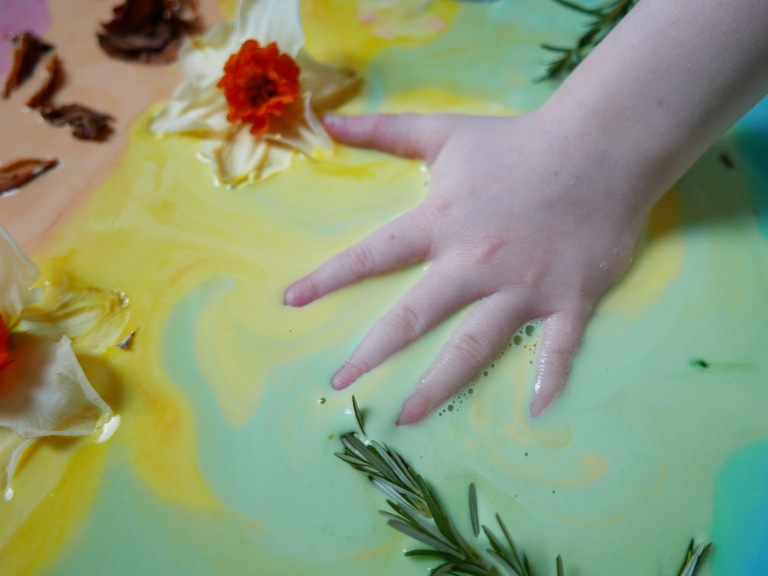
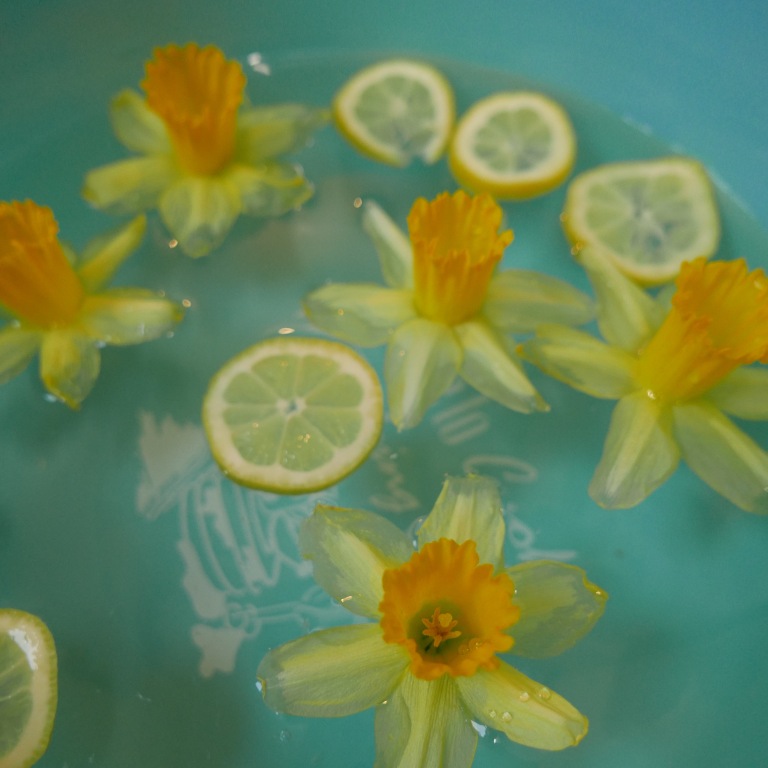
13. Daffodil sensory water play
Water play is great and simple fun for children of all ages. You can easily add extra sensory elements with scented herbs, citrus fruit slices, flavoured edible oils, flowers, ice and other natural materials. Warm water will bring out the smell and scent of any scented items you add and will also be more pleasant to play with. When you are using daffodils only use the heads and not the stems as the sap can be irritating to the skin and remember daffodils are toxic if eaten so always supervise very young children and babies.
14. Daffodil ice play ideas
Ice is a wonderful material for sensory and exploratory play. Its so easy to make and you can easily add extra sensory elements like scented herbs, flowers*, leaves, flavoured oils, textured natural materials and colours. Or even just reuse water leftover from sensory water play. All you need are some recycled plastic pots or tubs (of any shape or size it just needs to fit in your freezer), water and some natural or sensory materials to add in.

When you are using daffodils only use the heads and not the stems as the sap can be irritating to the skin and remember daffodils are toxic if eaten so always supervise very young children and babies. *Pretty please don’t pick any wild flowers, especially in spring as they an early source of food for pollinators, only collect ones you have grown yourself or fallen ones you find on the floor.
15. Daffodil log slices
Painted log slices are great fun to use in pretend play you could easily paint them to look like animals, people or food. We turned ours into daffodils using just paint and a bit of imagination. Once you have finished painting your log slices the children can have fun using them in pretend play or as story prompts or props. You could even hide them and have a treasure hunt or recreate childhood games by turning them into counters for games like noughts and crosses, snakes and ladders or even checkers.

16. Daffodil painted pebbles
We love finding painted pebbles when we are out and about, it’s wonderful to see the creativity and love that people put into them. You can easily find pebbles to decorate yourself by looking in your garden, on a nature walk or along the shore. All you need then is some paint or permanent markers to paint or draw daffodil themed flower, bulbs or plant designs onto the pebbles. *Safety note please be aware of the choking hazard of pebbles with smaller children.

Once you have finished painting your pebbles you could use them in pretend play, as games counters or hide them in your garden and have a treasure hunt. You could even join a local rock finding group where you show pictures of the rocks you have made and invite people to find them in a local park or a safe, easy to access place. Who knows how far your rocks may travel and the adventures they might have may have along the way.
17. Play a pollination game
You can learn how insects pollinate native daffodils and other flowering plants by playing a simple pollination game. All you need for this is a large sheet of paper or cardboard, recycled bottle tops, a stick, string, glue and paint. First you need to paint some flowers across the surface of your picture. A few of them need to be big enough to place the milk bottle tops in the centre.
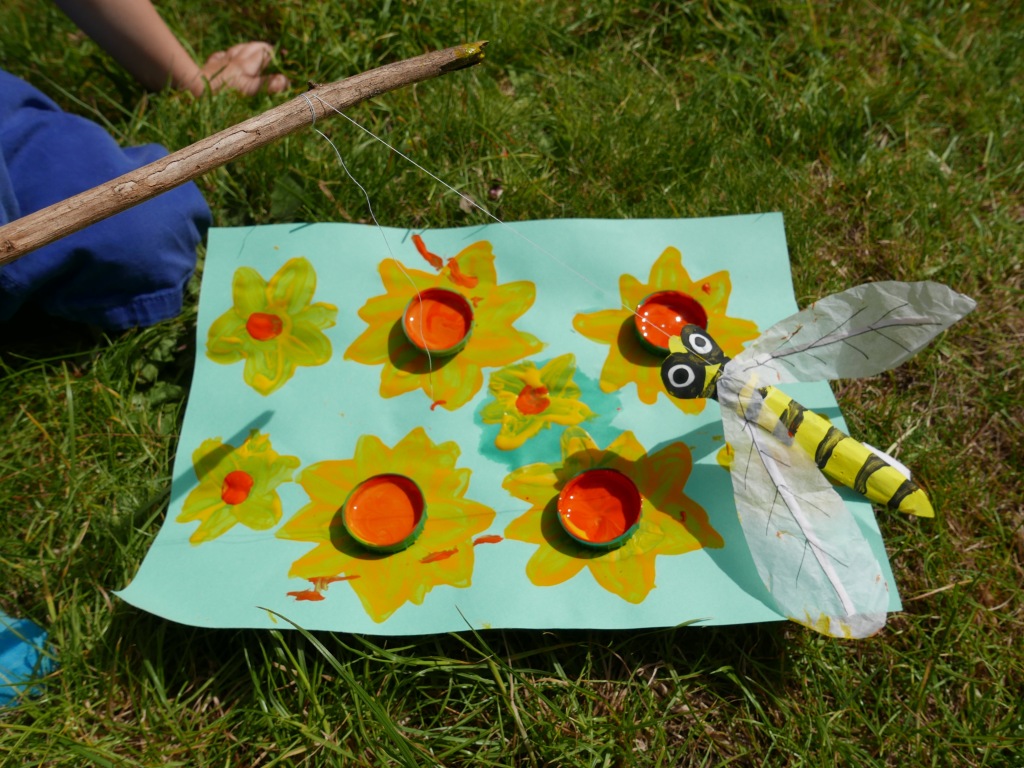
Paint the smaller flowers with yellow or orange centres and then glue a few milk bottle tops onto the larger flowers. Next paint or draw a pollinating insect like a bee or butterfly onto a piece of card and cut it out. Then glue a small scrunched up piece of tissue onto the bottom of your flying insect so it can pick up the ‘pollen’ and transfer to the other flowers. Once the paint and glue has dried on the picture and insect you can then fill the bottles tops with yellow or orange paint to make your pollen.

Now you can have fun dipping the bottom of your insect into the ‘pollen’ paint and landing it on the other flowers to pollinate them. This is a great opportunity to talk to children about the important role pollinating insects play in the life cycle of plants and trees. Did you know that a third of the food we eat comes from plants that rely on pollination? Even medicines and materials like morphine, aspirin and cotton are derived from pollinated plants.
If you like this you might like to try:
14 Seed science activity ideas

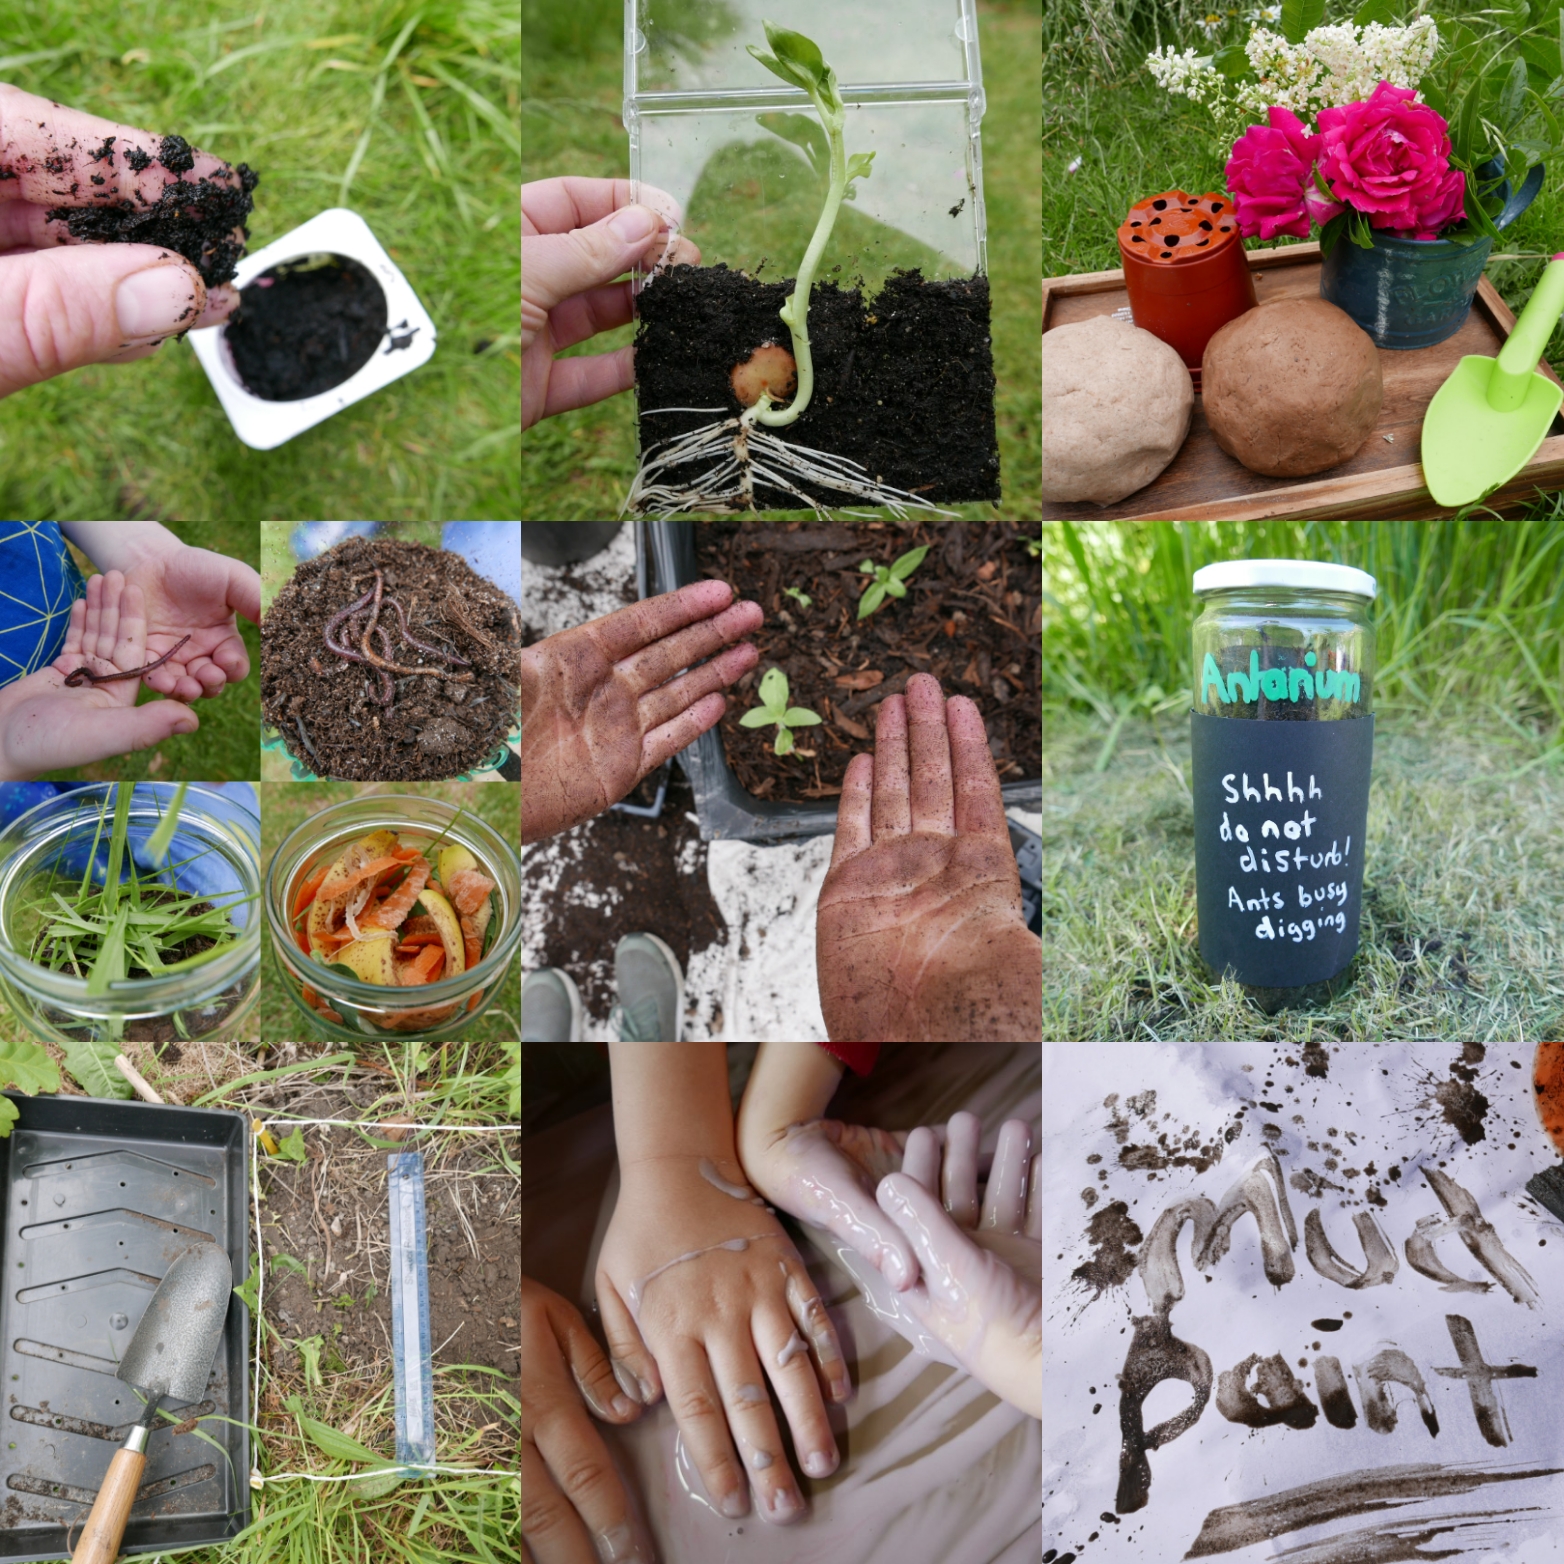
14 Soil science and sensory activities