
Did you know that strawberry plants are a member of the rose family? Ancient Roman’s used to eat wild strawberries as they believed they had medicinal properties and in the 14th century the French began gathering wild strawberry plants from forests to plant in their garden. The garden strawberries that we know and eat now where believed to have been grown in France in the 18th century.
Strawberry plants are a great example to use when talking about the importance of pollinating insects in relation to the food we eat. You can easily see the way the strawberry plant flowers turn into strawberries after pollination. Without pollination the flowers would not produce any fruit.
Did you know that a third of the food we eat comes from plants that rely on pollination. Even medicines and materials like morphine, aspirin and cotton are derived from pollinated plants? This is why its so important to protect pollinators! By banning the use of harmful pesticides and providing wildflowers essential natural habitats for them.

Strawberries are a great source of vitamins C and B9 as well as manganese and potassium. They are also full of flavour, smell and colour which makes them perfect for sensory exploration and play. You can find lots of fun and easy strawberry recipes and activity ideas below.

1. Grow or pick your own strawberries
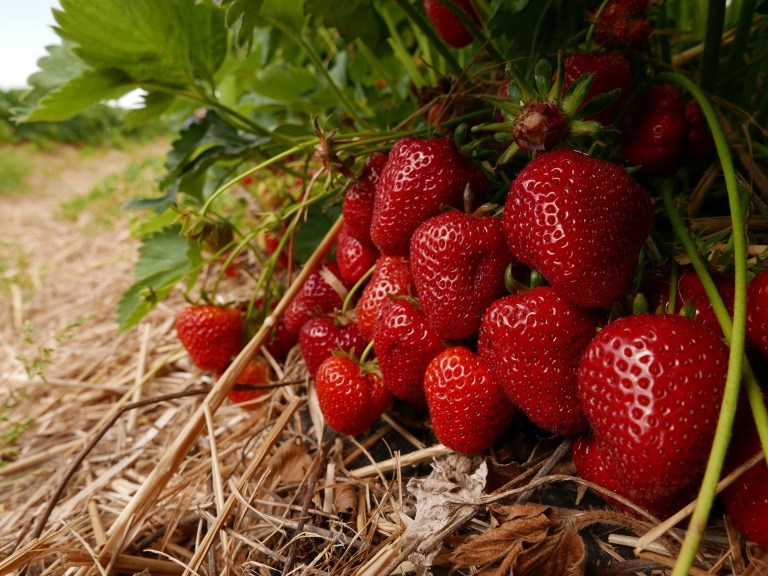
We love picking and eating sweet ripe strawberries straight from the plants. It’s a great opportunity to explain to children how food we eat grows. Several surveys have shown that many children lack an awareness of where there food comes from. There is a real disconnect from the reality of how plants actually grow as well as the importance of pollination and decomposition in the life cycle of a plant as well as in the growing of essential crops. You can easily grow your own strawberry plants in gardens, pots or window boxes, or you could visit a ‘pick your own’ farm and enjoy rummaging amongst the strawberry plants for the biggest and juiciest strawberries you can find. After you’ve picked you strawberries you could then have fun trying some of the simple recipes or activities below.

2. Look for wild strawberries
The strawberries we grow today are the decedents of wild strawberry plants that originally grew in forests. You can still find wild strawberries plants today in some woodland areas if you know where to look. They tend to be smaller than the strawberries we farm but they are still edible and fun to forage.

3. Learn about the lifecycle of strawberry plants
The life cycle of a plant is a wonderful thing to learn about. Strawberry plants originally start their lifecycle as tiny seeds that contain all the energy the plant needs to start growing. The roots push through the seed casing and start to grow downwards whilst a shoot appears and starts to grow upwards. You might be surprised to find that what looks like seeds on the outside of the strawberry are actually the plant’s ovaries called achenes. The achenes are technically a separate fruit which contain a tiny seed inside them.

As the plant grows the shoot pushes through the soil to the surface, it then begins to grow leaves that absorb energy from the sun and convert it into food using a process called photosynthesis. The roots also absorb water and nutrients from the soil to feed the growing plant. Eventually the strawberry plant grows flowers to attract pollinators. The flowers that are pollinated will then lose their petals as they start to form strawberries containing achenes and new seeds. Strawberry plants also have the ability to form new plants by cloning themselves. They plant can send out runners which reach across the ground and send additional roots into the soil. Each new plant that grows from the runners is a clone of the parent plant.
4. Make a strawberry growth circle
You can either draw or find examples of strawberries at each stage of growth to demonstrate how they develop from flowers into fruit. Your circle should start with a white petalled flower, once pollinated the petals on the flower fall away so you need a petal-less flower next, soon the fruit begins to develop with the centre of the flower swelling into a bumpy, green, hard small fruit, this hard fruit continues to swell and grow eventually becoming pale and smooth green with smaller speckles. As the fruit ripens it turns from pale green to red and finally softens when it is fully ripe.

5. Use a Pollination garden shop calculator
The Buzz Club have created a wonderful and simple to use calculator that shows you how much the food we grow replies pollinating insects like bees, butterflies, moths, hoverflies and beetles. To use the Garden shop calculator you just need to download a simple spreadsheet here and fill in the amounts of strawberries or other food you have grown . The spreadsheet will then calculates what % of the harvest bees and other pollinating insects have contributed to. Alternatively you can also use it to calculate what percentage pollinating insects like bees have contributed to growing any food you have picked from a farm or bought in a shop. If you live in the UK you can also feedback your results to help with a citizen science project. To feedback your results simply fill in and submit the result

6. Play a pollination game
You can learn how insects pollinate strawberry plants and other flowering plants and trees by playing a simple pollination game. All you need for this is a large sheet of paper or cardboard, recycled milk bottle tops, a stick, string, glue and paint. First you need to flowers across the surface of your picture. A few of them need to be big enough to place the milk bottle tops in the centre.

Paint the smaller flowers with yellow centres and then glue a few milk bottle tops onto the larger flowers. Next paint or draw a pollinating insect like a bee or butterfly onto a piece of card and cut it out. Then glue a small scrunched up piece of tissue onto the bottom of your flying insect so it can pick up the ‘pollen’ and transfer to the other flowers. Once the paint and glue has dried on the picture and insect you can then fill the milk bottles tops with yellow or orange paint to make your pollen.

Now you can have fun dipping the bottom of your insect into the ‘pollen’ paint and landing it on the other flowers to pollinate them. This is a great opportunity to talk to children about the important role pollinating insects play in the life cycle of plants and trees.
7. Strawberry nature art
Nature art (also sometimes called land art) is a wonderful nature activity that encourages creativity and fine motor skills in children of all ages and abilities. All you need is some imagination and natural materials like strawberries to make a picture. If you grow strawberries in your garden (or pick some from a farm) then you can use them to make some bright and beautiful nature art pictures and patterns before you eat the strawberries. You could also take photos of your artwork so you can then print them out or even turn them into cards to give to friends and family.

8. Strawberry potato prints
Potato printing is a simple activity for children of ages, all you need is a potato cut in half, a bit of inspiration and some paint to get started. How about using the potato prints to make patterns, pictures, cards and even recyclable wrapping paper. It is also fun to experiment printing on different types of surfaces and textures from paper to fabric, foil and wood. And as long as you use non toxic paint you can even print on outdoor surfaces like paths, trees and leaves.

You can easily make a strawberry print by dipping a potato half in red paint and then printing it onto a surface. When the paint dries you can then easily paint, stick or draw on yellow seeds and green stems. Potato’s are a great environmentally friendly material to use as stamps for printing. You can compost them after use or even grow them into potato plants. Simply wash any paint off the potato halves and leave them to dry for a few days. Then plant them in damp soil or compost. If you are lucky like we were your potato’s may start to grow into little potato plants.
9. Painted strawberry stones
We love finding painted pebbles and stones when we are out and about, it’s wonderful to see the creativity and love that people put into them. You can easily find pebbles to decorate yourself by looking in your garden, on a nature walk or along the shore. All you need then is some paint or permanent markers to paint or draw colourful designs onto the pebbles or turn them into animals like bees and beetles or food like strawberries.

Once you have finished painting your pebbles you could use them in pretend play, as games counters or hide them in your garden and have a treasure hunt. You could even join a local rock finding group where you show pictures of the rocks you have made and invite people to find them in a local park or a safe, easy to access place. Who knows how far your rocks may travel and the adventures they might have may have along the way. *Safety note please be aware of the choking hazard of pebbles with smaller children.

10. Chocolate and strawberry topped cupcakes
Chocolate dipped strawberries make beautiful cake decorations and taste delicious. You can easily make some simple cup cakes with strawberry toppings. All you need for this recipe is:
- 100g softened butter or an alternative butter spread
- 100g caster sugar
- 1 egg (lightly beaten)
- 100g self raising flour (or alternatively 100g of plain flour with 2 teaspoons of baking powder added)
- 1 teaspoon of baking powder
- A bar of chocolate (either milk, white or dark depending on your preference)
- 12 strawberries

Before you start it helps to preheat the oven to 180 oC/340oF.0
First put the butter and sugar together in a mixing bowl and beat it together until it’s light and fluffy. Next gradually add in the beaten egg whilst continuing to stir the mix. Add in the flour and baking powder and then whip everything with a spoon or mix with an electric mixer for for a few minutes until the mix is light and fluffy. Pour the mix into cupcake cases (don’t fill to the top as the mixture rises quite a lot) and place in the oven for 15 minutes or until the cakes are golden brown. Leave to cool and then top with melted chocolate and chocolate dipped strawberries.
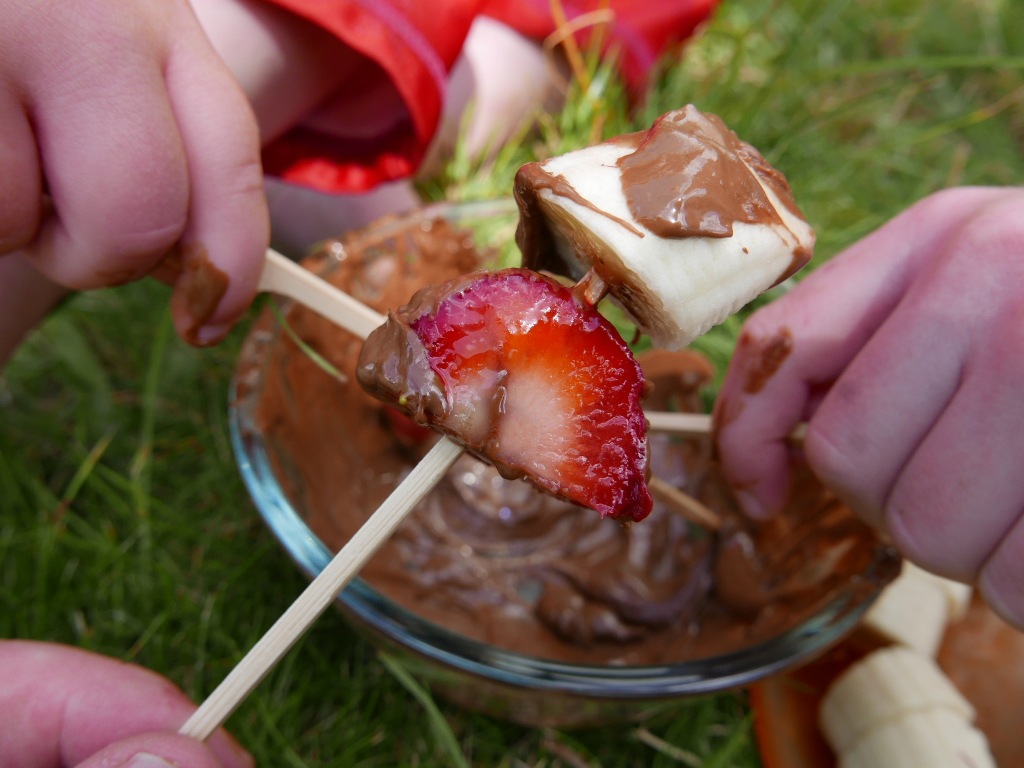
11. Chocolate and fruit fondue
Chocolate and fruit fondue is great tasty messy fun for children of all ages. All you need is some chocolate (either milk, white or dark depending on your preference) and a selection of fruit like strawberries, banana, apple, orange or grapes (The later should be cut in halves). Simply break the chocolate into small pieces and then place it into a microwaveable bowl. Heat the chocolate for 30 second bursts at a time. Stir in-between each burst until the chocolate has melted fully and is smooth and glossy. Then enjoy dipping the fruit into the chocolate on sticks or forks.
12. Sensory water play
Water play is a great sensory activity for children of all ages. Strawberry slices and halves scattered in the water help to add extra scent, colour and texture for the children to enjoy and explore. Lavender and mint are also wonderfully calming herbs to use, but you could also use uplifting fresh citrus fruit slices as well.

13. Sensory ice play
After you finish you can recycle the water and materials by pouring them into different shaped containers or ice cube trays to freeze and replay with as ice blocks another day. It’s fascinating to see the objects trapped in the ice. You can hold the ice up to the light or experiment melting or breaking the ice in different ways using salt and warm water. Or the children can have fun stacking and playing with the ice to make towers.

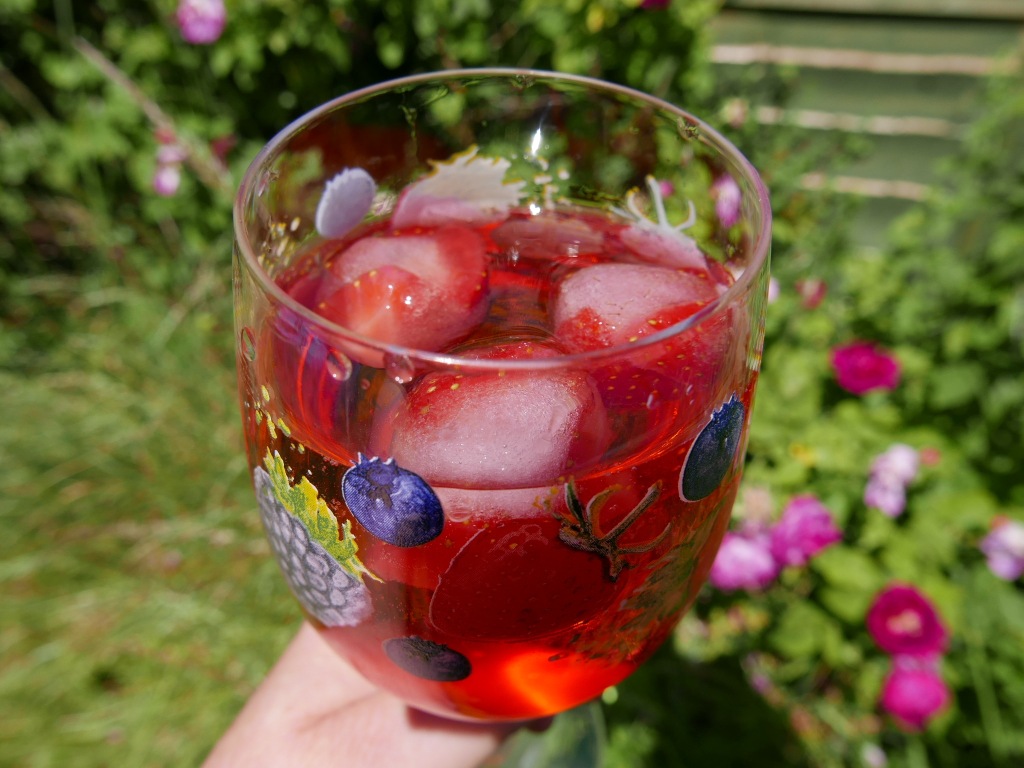
You could also make decorative edible ice cubes for drinks by using freshly washed strawberries frozen with drinking water in ice cube trays. You can then pop them into drinks as pretty decorations. *Please just be aware of the choking hazard of the ice cubes or any other materials you use with small children.
14. Fresh face masks
Fresh face masks so cheap quick and simple to make. To make a fresh face mask simply mix any combination and amount of the ingredients listed below together. It does help to have a liquid base like banana, yogurt or honey to make it easier to spread your face mask on but its not essential. It’s great fun experimenting with different ingredients. (Please always check to make sure you aren’t allergic to any of the materials before applying them to your skin.)

- Bananas and strawberries make a great starter base for face masks as they are naturally moisturising and makes your skin feel refreshed. Its also a great way to use up overripe bananas.
- Natural yogurt is also a good starter base as it contains lactic acid which helps cleanse your skin.
- Honey has natural antibacterial properties and also moisturises and helps soothe irritated skin.
- Lemon juice, orange juice, lime juice and grapefruit juices are all great cleansers and helps brighten tired skin.
- Oats contain compounds that soothe itchy, dry and irritated skin.
- Flowers and herbs like lavender, rose, mint and rosemary all contain rich and calming essential oils that are good for your skin and also smell fantastic.
- Cocoa powder (unsweetened) smalls delicious and mentally boosts and uplifts your mood… it also might make you want to eat chocolate.
- A drop or two of skin safe essential oils (check to make sure its safe for contact with the skin before use) can all add an extra sensory, uplifting or calming element to your facemask.
- Sugar, desiccated coconut, coffee grounds and baking soda are all great exfoliates you can add to your face mask to carefully rub away dead skins cells with.

15. Cardboard tube strawberries
We hate to waste anything and recycling and reusing materials is one of many small things we can all do to help the environment. So instead of chucking used cardboard tubes we like to find ways to use them in crafts and activities. To make cardboard tube strawberries you will need a cardboard tube cut into 3 pieces and some paint. Cut the cardboard tubes at the edges to make the rounded and give them spikey stem tops. Then paint them red with green leaves at the top and yellow dots for the achenes. When your strawberries are dry you can use them as decorations, story props, napkin rings or even fill them with sweets or presents to give as gifts.

16. Egg carton strawberries
You can also make egg carton strawberries by cutting out the bottom cups from an egg cartons to form a simple round strawberry shape. Turn the cups over and then add colour to your egg carton strawberries using paint, pens or collaged materials.

17. Taste safe paint
A taste safe, simple to set up sensory activity.* All you need is some washed and then mashed up strawberries in a bowl or jar, some paint brushes and materials to paint on like paper and recycled cardboard or even stones, wood and fabric. It’s great fun experimenting and painting on different surfaces and textures. *Please note strawberry juice can stain, clothes, skin and surfaces. So this is an activity that requires adult supervision and is often best done outside.

How about also experimenting using a range of different edible natural materials (like rose or dandelion petals, herbs or blackberries) to make a variety of colours to paint with. Or you could add in yogurt to the edible paints to change the texture and make a thicker paint for little fingers to explore and play with.
18. Edible strawberry marshmallow play dough
Such an easy play dough recipe. Simple, quick and cheap to make and the best bit is its edible! Great for little ones who like to taste everything. You only need 4 simple ingredients

- A handful of washed and then mashed strawberries
- Marshmallows (any type, shape, colour or size will do)
- Cornflour
- A little bit of cooking oil. Coconut would be great but we didn’t have any so we used olive oil instead.
Firstly you need to put the marshmallows in a glass or ceramic bowl. Please note: The sugar in the marshmallows gets very hot when heated so you don’t to want risk melting through the bottom of a plastic bowl.
Next place your bowl in the microwave and heat on high for 30 seconds. Carefully remove the bowl and try not to touch the mixture as it will be boiling hot. Add in a teaspoon of cooking oil and the mashed strawberries and mix them well into the marshmallows.
Now slowly add in small amounts of cornflour at a time and keep stirring and adding until you have a firm but slightly sticky ball you can then knead with your hands. Don’t be tempted to add too much cornflour as the mixture will naturally firm up and become less sticky as it cools. Adding too much cornflour makes it too solid and hard to play with later.
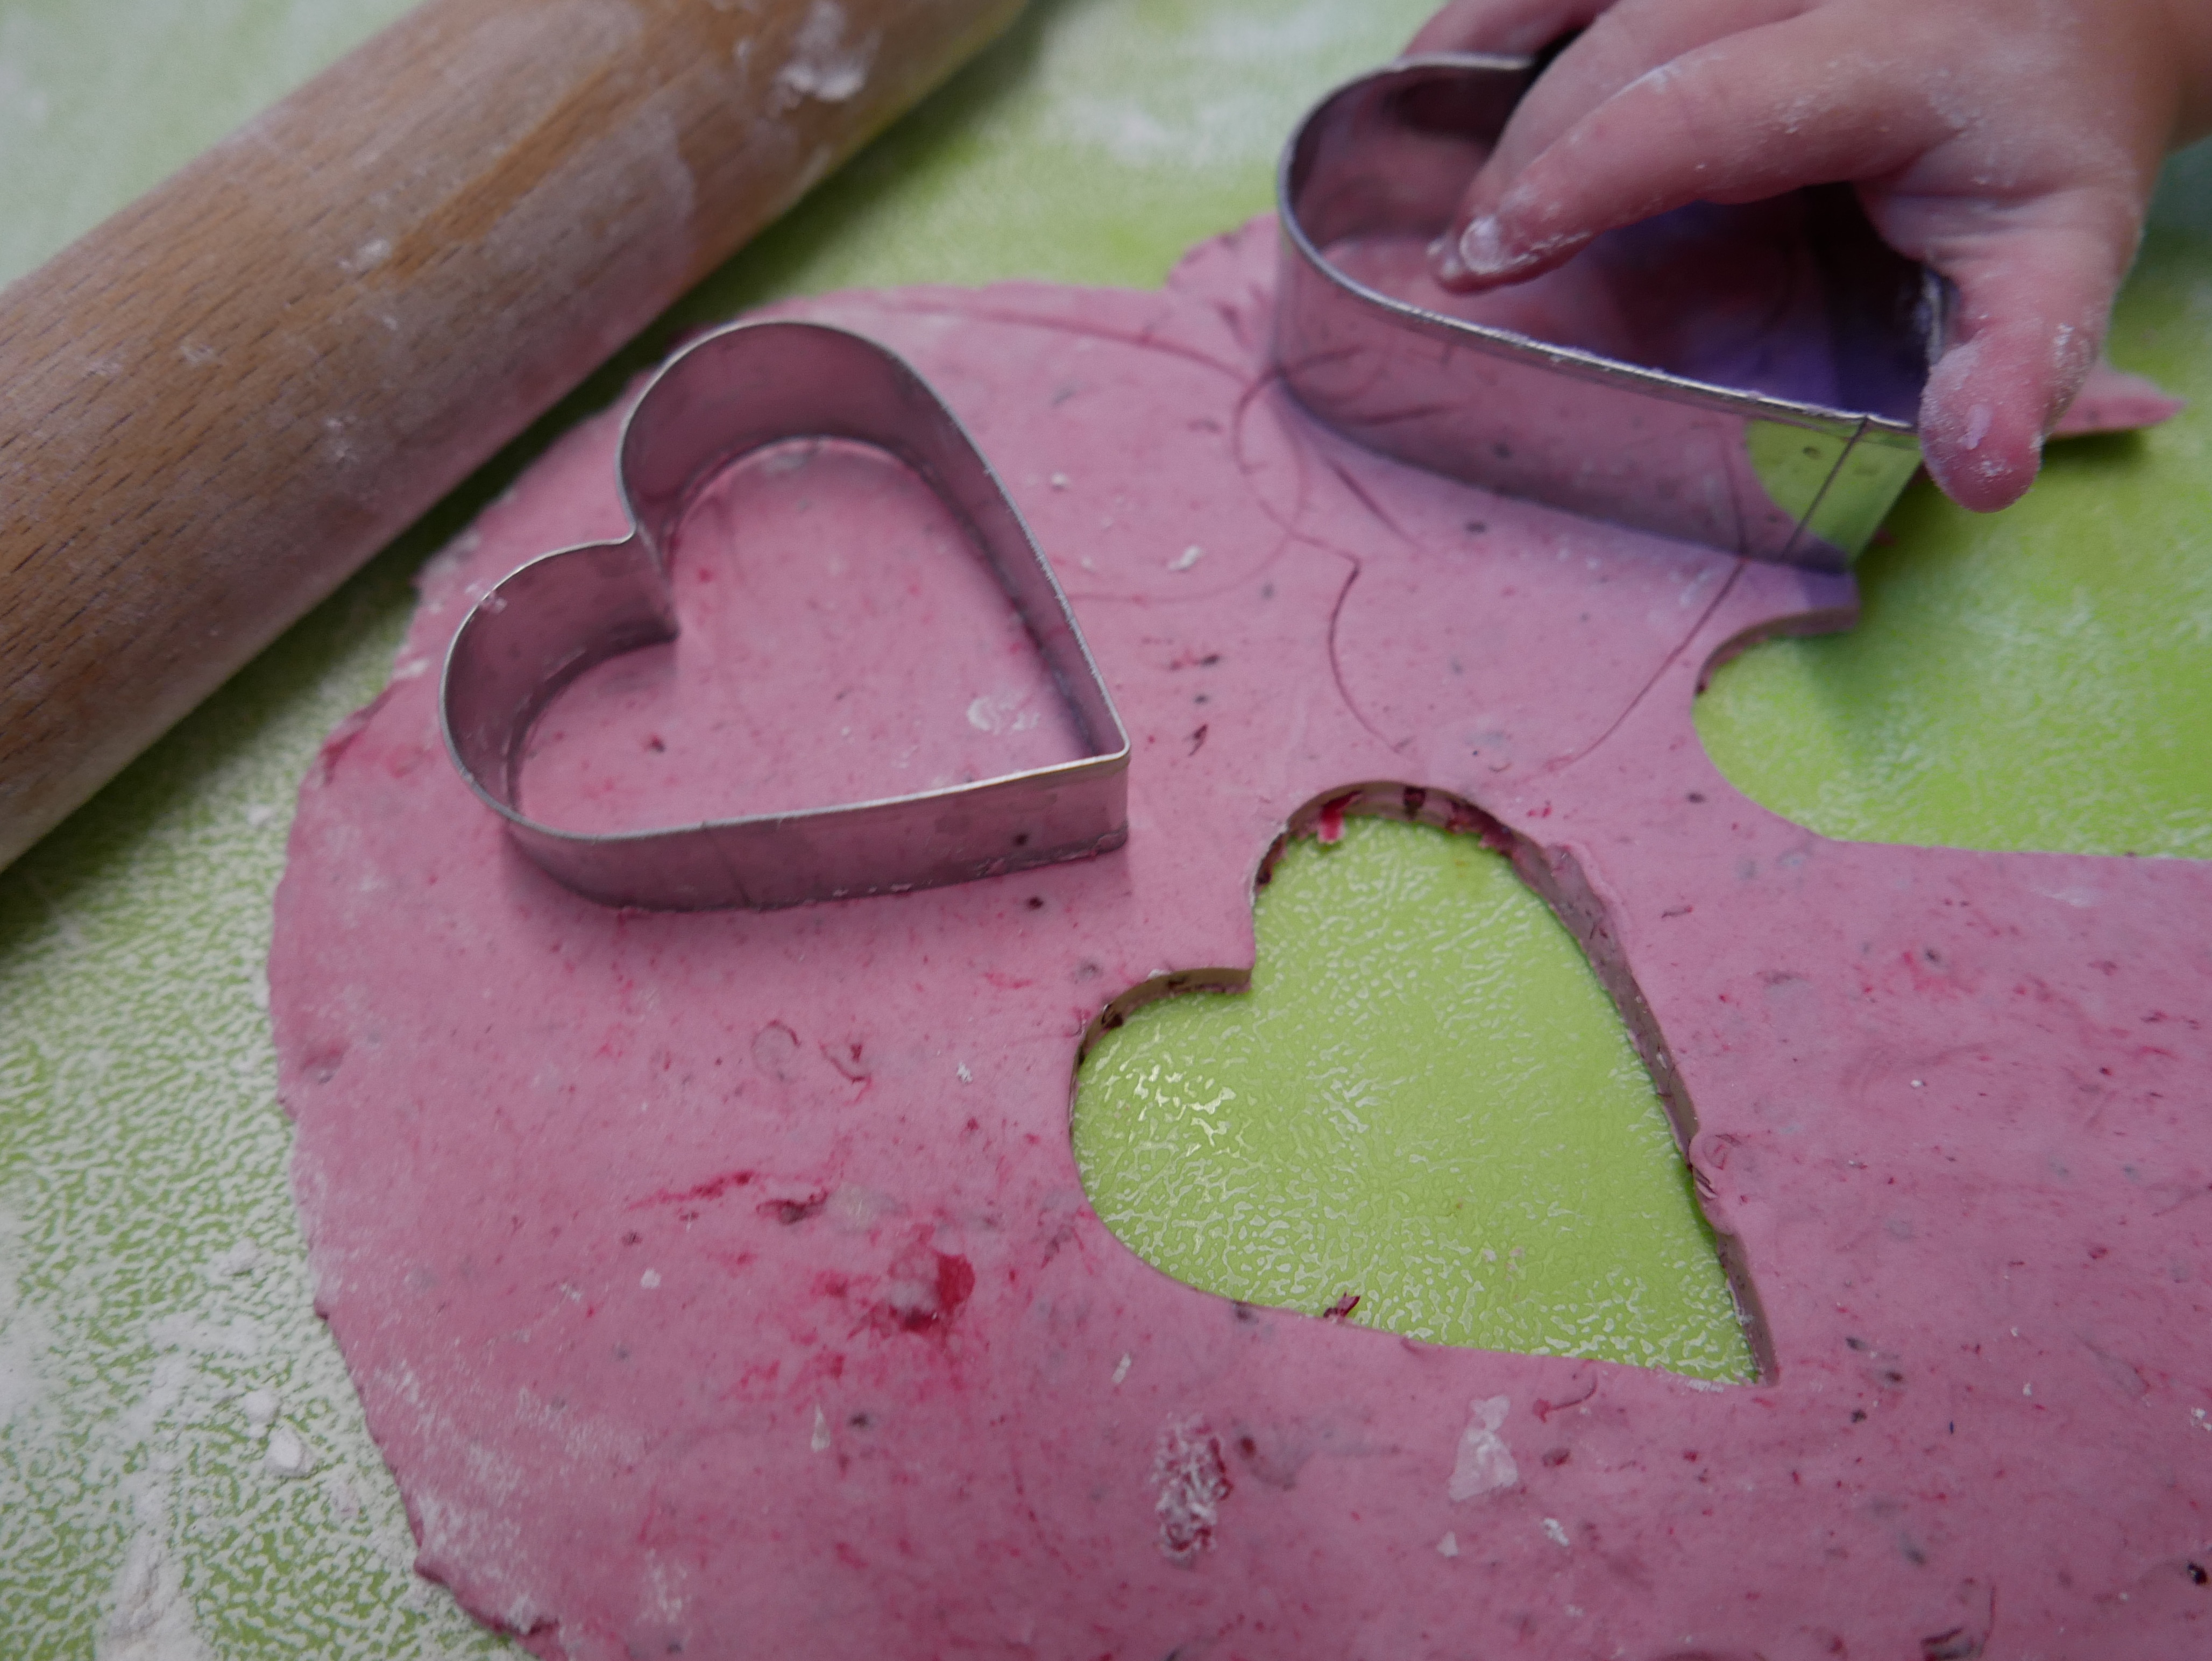
Once the play dough has cooled and firmed up its ready to play with. We lined our table with grease proof paper and I recommend washing hands and play tools as you are handling food that you are going to eat afterwards. You can use the dough like normal play dough, it’s great for rolling out, making imprints in and using cookie cutters and play tools on.
19. Tataki zome
Tataki zome is the Japanese art of transferring botanical dyes from flowers and leaves onto fabric by simply hammering them onto the surface. It’s also know as flower pounding, leaf bashing and sometimes refereed to as Hapa Zome. (Funnily enough Hapa Zome came from an artist getting the name wrong, now its more widely used than Tataki zome which is the correct name for it.)

For this activity you will need scraps of cotton or linen fabric or some old clothing. something to hammer with like a rounded stone, hammer or rolling pin, a safe surface to hammer on and finally natural botanical materials like flowers, leaves and grass. *Pretty please however don’t pick any wild flowers, only collect flowers you have grown yourself, fallen ones you find on the floor or flowers from shop bought bouquets.

Lay the fabric or clothing flat onto a hammer safe surface and arrange your flowers and leaves on top. Then cover everything with a piece of paper or another piece of fabric. Carefully but firmly (supervision required at all times for this) hammer across the fabric with a stone or hammer. You should be able to see the dye seeping through the fabric so make sure you have hammered evenly across. Peel back the paper to see the images you have made.
20. Strawberry ice cream (egg free recipe)
My mum used to make an amazing strawberry ice cream when we were kids. I loved it so much that I now make it for my own children.

To make strawberry ice cream you will need.
- 300g mashed or pureed fresh strawberries
- 280-300ml of double cream
- 300ml of full fat milk
- 100g of caster sugar
Simply combine all of the ingredients together and mix well. Then place them in an ice cream maker or a freezer safe container. If you are freezing without an ice cream maker you will need to pop the container in a freezer and stir the mixture every 15 minutes to break up the ice crystals and until the mixture has frozen.
21. Strawberry smoothies and ice lollies
These are both so simple to make, to make a smoothie you just need to puree some strawberries and or any other fruit you like (Bananas always go well in a smoothie). To turn them into an ice lollies you just need to pour the smoothie mix into an ice lolly mould and freeze.

22. Strawberry gin
To make strawberry infused gin you will need:
- Gin
- Strawberries
- Caster sugar
- A sterilised glass bottle*
*You can sterilise old glass bottles by rinsing them out well with soapy water then filling them with boiling water for 5 minutes or by placing them in a warm oven for a few minutes (caution this will make the glass really hot, so handle with care and oven gloves.)

Simply pour a few teaspoons of caster sugar into the bottle (you can add more to taste at a later date.) Then push in through the top a handful or more of quartered strawberries. Finally pour in the gin and seal the bottle tightly. Give it a good shake and then leave it for a few weeks to infuse.
23. Strawberry salads
Did you know you can also eat strawberries in savoury dishes like salads? They taste great with balsamic vinegar and even go well with cured Italian meats like Parma ham. Or you could make a straight forward fruit salad for dessert with chopped fruits and a little orange or lemonade.

24. Homemade strawberry fruit roll ups
I didn’t realize how cheap and easy it would be to make out own fruit roll up snacks. It’s also a great way to use up bruised or over ripe fruit and left over fruit puree.
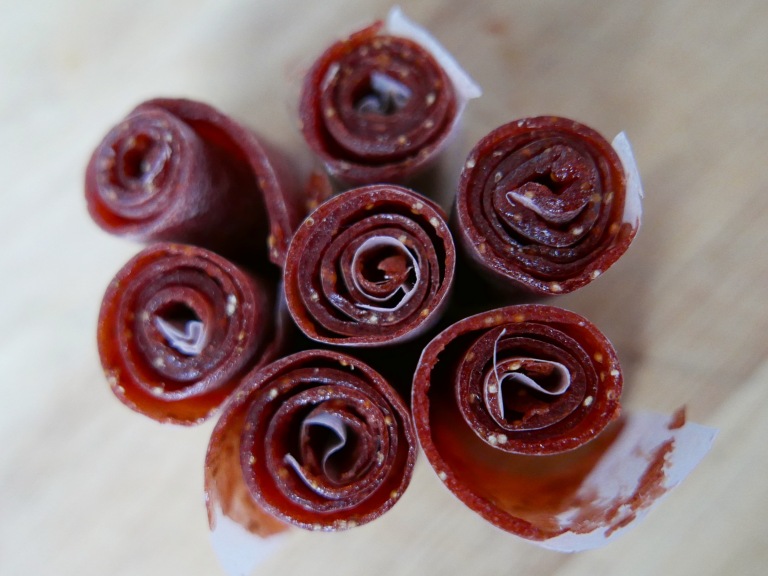
All you need is:
- 2 cups of fruit like strawberries.
- 1 tablespoon of lemon juice
- 2 -3 tablespoons of honey
Dice the strawberries into pieces and then blitz them in a blender. Then pour the strawberry mixture into a non stick saucepan and mixed in the lemon juice and honey. Gently heat and simmer the mix on low heat for 15-20 mins, stirring every few minutes to prevent it sticking to the bottom and burning.

When the strawberry mix has thickened and become glossy carefully pour it onto a sheet of greaseproof paper (on an oven tray) and spread it evenly across the surface. Then place it in the oven for 3 hours on the lowest heat setting so the fruit mix dehydrates and is fully dried. Leave it to cool and then carefully cut it all up into snack sized strips.

Then roll the strips up into tight little rolls (you can add a bit of tape to the end to stop it unravelling). And voila, you have a neat little cluster of fruit roll ups to take out and about or on the go with you. They should keep well in an air tight container for a week or you can freeze them to enjoy at a later date.
25. Gelatine and sugar free strawberry jam
Making gelatine and sugar free jam is really quick and simply. All you need to do is chop up 2 cupful’s of strawberries and then gently cook them in a pan with 4 tablespoons of honey for 5 minutes. Then add 2 tablespoon of chia seeds and blitz the mixture in a blender before returning it to the heat and stirring it on and off for 20 minutes. Then pour it into a sterilized* jam jar and leave it to cool.
You can enjoy your jam on toast, in sandwiches or on scones and cakes. Store it in the fridge in an air tight container and use within a week or two of opening the jar. Or if you make a large batch you could even freeze some to use and enjoy later.

*You can sterilise old jam jars and bottles by rinsing them out well with soapy water then filling them with boiling water for 5 minutes or by placing them in a warm oven for a few minutes (caution this will make the glass really hot, so handle with care and oven gloves.) Place the lid on the jars or bottles whilst still hot and leave to cool completely. You can keep the jam in a sterilized bottle (or jar) in the fridge for a week or too. Or freeze it in a plastic container to keep it for longer.

- For day 8 of 30 days wild, We went strawberry picking, looked for pollinators amongst the strawberry flowers, talked about how pollinated flowers turn into fruits and made a strawberry growth circle. We also bought and planted some nectar rich plants in the garden to provide food for pollinators.
- For day 23 of 30 days wild 2023 we picked strawberries, dug up potato’s in the garden and used a pollination garden calculator to work out how many pollinators had contributed to our harvest. We also spotted some wild strawberries in a local wood.
- For day 12 of 30 days wild 2022 we went strawberry, pea and broad bean picking at a local farm, we also learned about the life cycle of strawberry plants, made strawberry cupcakes, ate chocolate fondue and played in the garden
- For day 16 of 30 Days Wild 2021 we went strawberry picking and enjoyed several strawberry activities and recipes.
If you like this you might like to try:
14 Chive recipes and activity ideas

12 Nasturtium recipes and activity ideas

14 Lavender recipes and activity ideas


I love your content! They are all super cute and adorable! 😊 Strawberries are also one of my favorite fruits so I like these ideas a lot.
LikeLiked by 1 person
Thank you for the kind words 🙂 it makes my day to read lovely comments like this! Strawberries are my favourite fruit too, we grow them in the garden but the children (or slugs) eat them faster than I can grow them.
LikeLiked by 1 person
This is a deliciously fun post!
LikeLiked by 1 person
It was deliciously tasty to make 🙂 still got tons of fresh picked strawberries to make our way through and some chocolate leftover for more fondue fun.
LikeLiked by 1 person